Showing posts with label homeschool preschool. Show all posts

Monday, July 16, 2012

Ink Blot Prints that Demonstrate Bilateral Symmetry


In math, the younger kid gets frustrated with a lot of computation, which is fine (for now--the older kid also gets frustrated with a lot of computation, and yet I still require it of her, because apparently I'm meaner to older kids), so since she's long finished up any kindergarten math requirements that I had of her, we've been luxuriating in those kinds of hands-on, in-depth, sensorial math activities that internalize concepts, and that the kid absolutely loves.

For instance, it wasn't necessary to spend weeks on bilateral symmetry. And yet... bilateral symmetry is so fun! Here are some of our activities:
  • cutting out and folding shapes to discover and test their lines of symmetry
  • using graph paper to draw shapes that have bilateral symmetry, then cutting them out and folding them to test them
  • putting ANYTHING up against a mirror to see it in symmetry
  • taking a nature walk to collect leaves, then sorting them into groups of symmetrical and non-symmetrical, then folding them to test those theories, then drawing in the lines of symmetry using Sharpies
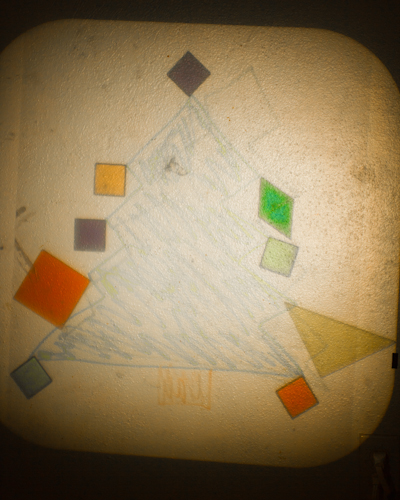
  • painting on one side of a paper, then folding the paper and pressing it down, then unfolding it to look at your magical Rorschach-style print
By the way, these BioColor paints are the BEST at that last one!

This is just the kind of activity that my little kid likes. She made print after print after print, then extended it to finger painting (discovering for herself that printing doesn't work if the paint has had time to dry), then moved on to some very colorful handprinting, then added more and more and more paint and found that she loved the feeling and the look of painting through all the layers...

...and made a GIANT mess!

And yes, to her infinite credit, she cleaned it up completely independently, including washing off the paint bottles, scrubbing the table, and giving herself a bath. That makes the activity even MORE satisfying, don't you think?

For kids whose current special interest is bilateral symmetry, here are a few more fun activities for enrichment and exploration:
And our course it wouldn't be a homeschool project without lots of books!


P.S. Want to follow along with my craft projects, books I'm reading, dog-walking mishaps, road trips, and other various adventures on the daily? Find me on my Craft Knife Facebook page!

Friday, March 16, 2012

Franklin's Sub-Par Cookies


We have a happy history of making the recipes featured in storybooks. The big kid has actually made Amelia Bedelia's cake several times over the past 18 months or so, checking out the book each time to get the recipe, and the kids often ask to make food from their Dr. Seuss Cookbook (We've never actually made the green eggs and ham, but we did make the Pink Ink Yink Drink last week).

A couple of days ago I read Franklin and the Cookies to the little kid, and behold! In the back of the book was a recipe for FRANKLIN'S COOKIES!!! Even more amazingly, we actually had all the ingredients for the cookies (sugar and chocolate chips are hard to keep in our house, because we tend to use them up as soon as we buy them, and then we're just out until the next grocery store run), so we hopped to it almost immediately.

I was a little suspicious of the recipe because it called for a LOT of sugar, and it did some weird things, like not asking the child to cream together the butter and sugar, or instructing her to mix the dry and wet ingredients separately--reminds me of how I used to cook before I knew better, actually, which is why I was suspicious.

And, yeah...

The bad news is that it's not a good cookie recipe. The cookies spread beyond all reason, so that the spacing that you see above resulted in basically a giant cookie cake-type creature. They were WAY too sweet, and since the sugar was never creamed, you could actually see the sugar crystals in each cookie.

But of course, that's just my boring adult perspective. To the little kid, of course, and as it should be, these cookies were perfect. They were sweet, they were chocolate, they were Franklin's own freakin' cookies!

And she made them all by herself. How good does that taste?

P.S. Want to follow along with my craft projects, books I'm reading, dog-walking mishaps, road trips, and other various adventures on the daily? Find me on my Craft Knife Facebook page!

Wednesday, December 28, 2011

An Overhead Projector Christmas Tree


Probably anyone who owns an old-school overhead projector knows how much free play they get. Sure, we use the projector for map tracing, copywork of all sorts, and all sorts of math and science activities, but with just the clear plastic sheets and a nice set of overhead markers, the kids dream up all sorts of fun play--during a playdate a couple of weeks ago, one little kid drew at least a dozen scenery pages on the plastic sheets and then projected an entire play that she'd just made up, using her fingers as all of the characters.

If you have any other accessories, such as translucent pattern blocks, then you're perfectly set up. I bring out the overhead projector as an actual party activity, especially for little siblings or friends on the younger side of the guest list, but my own kids will still spend entire quiet mornings or afternoons engrossed in play with the projector.

Only rarely, outside of helping out with some academic activity related to one of their areas of interest, do I set up an actual "activity" involving the overhead projector, but recently I invited Syd to create an overhead projector Christmas tree.

She drew a tree on a clear plastic page:


She set the page on our projector, and decorated it with translucent geometric shapes:


She enjoyed its projection on the wall, and then took it apart and did it again!

Unfortunately, we only have a small amount of wall space suitable to using the overhead projector in our living room, although as wall space it is ideal, since you can tape a large piece of paper onto it and copy from the projector:


One day, however, the finished basement playroom will become a place that the children do not fear to tread (something about a monster with lots of arms, and one of them is really long and has a pincher on it...), and therefore a place where it gets more use than as a dumping ground for out-of-favor toys, and then, I tell you, THEN we'll have tidy shelves of art supplies and books and toys, and plenty of room in the middle for active play, and a TV so that I have room to use my old-school workout videos...

...oh, and a much larger wall space for the overhead projector.

Wednesday, June 29, 2011

Tutorial: White Chocolate Fondue Sculptures


The big kid's been having an amazing time being interested in cooking lately. I showed her how to Google for recipes and how to bookmark them, and then how to Google for food blogs, and I'm really wishing that I had started her on all that on her own computer, because I now have a lot of recipes bookmarked!

Along with all the delicious, complicated things that we've been cooking together, I've also been making it a point to show the big kid many very, very simple things that she can cook entirely by herself: grilled cheese sandwiches, refrigerated biscuits, fried eggs, etc. The big kid has made peanut butter cookies almost all by herself from a recipe that she found online all by herself, but so far the easiest, most independent kid-friendly desserts that we've done lately have involved our fondue pot.

We have an electric fondue pot (it's possibly the wedding gift that we've gotten the most use out of!), which is why this particular recipe is so kid-friendly. I don't think that the kind that uses the candle underneath would be too far off an almost-seven-year-old's skill level, however.

To make these white chocolate fondue sculptures, first have your kiddo dump a bag of white chocolate chips into a fondue pot and, if it's an electric one, turn the heat just to warm. White chocolate is slightly finicky, in that it will seize up if you introduce any moisture into it while it's melted--we pretty much only used crackery foods with our white chocolate fondue sculptures, however, and nobody drooled into the pot, so we were all good. A more foolproof (but not as tasty, in my opinion) substitution would be candy melts. They come in a billion colors, too, so you could make your sculptures even more fun!

Stir the white chocolate chips as they're melting, because sometimes even if they're hot enough to melt, they'll retain their shape until stirred.

In my humble opinion, the tastiest thing to do with a pot of melted chocolate is to coat three-fourths of a big pretzel stick in it:


Let it sit on waxed paper until solid--


--and then you can store it in any air-tight container until it's all munched up.

What I had wanted to show the kids, however, was how to do edible sculptures with white chocolate. Using a spoon, have your kiddo drizzle melted white chocolate onto wax paper in any shape that she desires. She can stick pretzels into the white chocolate for additional sculptural bits, and sprinkle on sprinkles to color her creation:

These creations will need to be frozen to set hard enough to hold their structure, but if your sculpture base is not white chocolate, but is instead pretzel or a mini-tartlet shell, then it will hold its structure just fine without being frozen to set.

As I'd hoped, the kiddos were able to work on this particular food project completely independently--


--with me just stepping in once they'd tired of it to finish off the white chocolate (oh, white chocolate-coated pretzel sticks, I heart you!).

I think somebody else hearted her edible art:


Actually, since the entire container lasted less than 24 hours, I'd say that we all hearted it pretty well.

P.S. Want to follow along with my craft projects, books I'm reading, road trips to weird old cemeteries, looming mid-life crisis, and other various adventures on the daily? Find me on my Craft Knife Facebook page!

Thursday, March 10, 2011

I Let My Kids Paint My Car


The first death knell sounded for our pretty nice white minivan one day when the little kid was a newborn and the big kid wasn't yet two, and a driver careened through a red light and T-boned us at an intersection just a few blocks from home and across the street from the police station (I was so flustered calling 911 that when the operator asked for my location, I was all, "I'm right outside your house!"). Did you know that even if the other driver's insurer pays up, you're never going to get enough money to flat-out purchase a comparable car in a comparable condition to the one that the other driver trashed for you? Fun, right?

We drove that minivan with the caved-in driver's side for years more, and actually it wasn't so bad because since the insurance totaled the car but it was still safely drivable, they paid us an extra coupla-grand for the salvage rights to the car and lowered our insurance payments, since who needs collision insurance on a car that's already been totaled?

Of course, if your car already looks that beat-up then it's only downhill from there: window stop rolling down? Meh. Air conditioning stop working? What's the point, right? We even kept driving the damn thing after the transmission went out on the way home from Cleveland last winter--the trick was to keep the rpms under 2,000 and the speed under 20 mph.

We were SO happy when my partner's parents offered us their old minivan and we could officially trash this white one that's been half-dead for four years already. And wouldn't you know, when my partner called the insurer to tell them that they could pick up the car for salvage, they said, "Yeah, we don't really actually want it. Feel free to junk it yourself."

And so while my partner waits for the perfect offer (he's holding out for $220 at least), our junked minivan just sits in the driveway, a giant white paperweight.

White. Like, blank canvas white.

I told the kids that they could paint the car.

Our paints are standard student-grade tempera, and the brushes are soft student-grade acrylic brushes:

Our kids are standard student-grade kids, and they jump right in, as you can see:


Yep, I even let the big kid climb onto the roof. But I assure you, when she's not busy breaking her leg at the playground, she is quite the little mountain goat:


A little paint got on the children, as well as the car:


Especially when they discovered splatter paint, Pollock-style:


Behold, our masterpiece!


A rainstorm the same night knocked about 70% of that paint right off. It's freezing cold again outside, but as soon as it warms up I'm going to send the kids out with some buckets and soap and sponges and teach them how to wash the car up perfectly clean again.

And then?

We'll paint it!

P.S. Want to follow along with my craft projects, books I'm reading, road trips to weird old cemeteries, looming mid-life crisis, and other various adventures on the daily? Find me on my Craft Knife Facebook page!

Monday, November 15, 2010

Travel Photojournal: The Grand Canyon

I was worried that the kids wouldn't like the Grand Canyon:


They liked it.

Next, we tour Lowell Observatory!

P.S. Want to know more about my adventures in life, and my looming mid-life crisis? Check out my Craft Knife Facebook page!