Showing posts with label children's art. Show all posts

Tuesday, April 2, 2019

Guest Post: A Little Bit of Rock Painting

I'm featuring a guest writer on Craft Knife today. Syd is here to share with you her photos and review of The Little Book of Rock Painting (which we received free from a publicist). Please don't tell her that this was also her grammar and rhetoric lesson for today, as during the editing stage many, many comma splices met sad ends, and Syd still mourns them because apparently breathless writing is the BEST writing. 

To start with rock painting you need some ROCKS. Who would have guessed?

You could, of course, go and find some rocks in the rock wilderness. Beware, some may bite! I used some bagged rocks, which are nice because they are much flatter and smoother than rocks you would find outside.


The rock painting book that will be the guide in this journey is The Little Book of Rock Painting, full of cute and kinda strange ideas.

Once you have your hands on a rock you should open the book and choose a design. I chose a feather for my first one.


 Bellow you see the instruction page for the feather--it is very straightforward and simple!


I choose a medium squarish rock, perfect for an oval feather shape? Maybe not but it worked despite my poor planning, which was a relief.


Here are the paint pens that I used on the rocks. The more colors you use the better and more vibrant the rock!

 
Here is the beginning phase of the feather. The book was very helpful for making it look like a feather and not a corn dog.


Here is the design for the feather. If the pen was thinner it might have worked better.
The book had nothing to do with this, though. I should have made the feather larger to compensate for the pen size.


Next I followed the owl pattern. It was slightly more difficult then the feather but came out pretty cute!


Here is how the owl came out. You should most likely sketch out the design beforehand so that one of the eyes doesn't hang off the rock.


I followed the raindrop one next. It kind of looks like firecrackers, which is a cute idea for a rock design!


This is how the raindrop came out--super cute!


Next, I chose the fish. Their fish came out super cute but it doesn't have a fin for some reason  so I chose to add a fin to my fish.
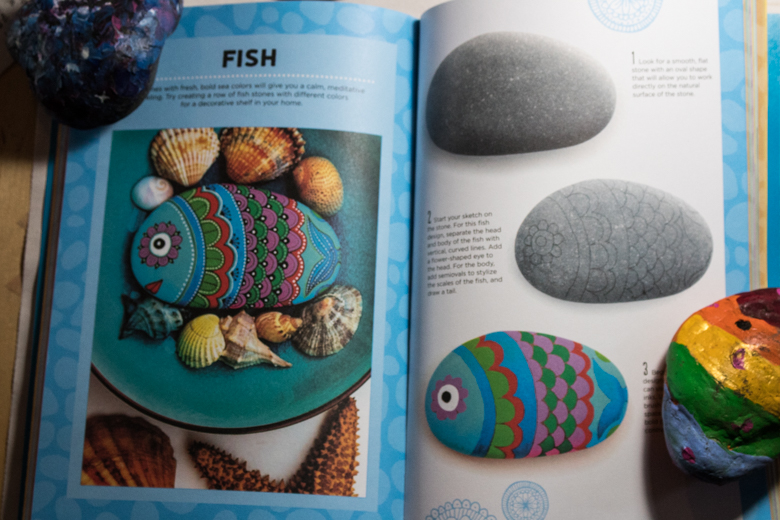


A nice square rock, yet again the wrong shape but it turned out nice!
                         

I sketched a fish... cause I am doing the fish... nice!


Here is the fish all done. I added the googly eyes cause why not?


This one is if you don't have a rock that fits rock painting standards. I used a nice wooden egg to show you can pretty much use anything.


I chose the fox for this one. It turned out pretty cool on the egg.


It wasn't as hard as I feared to draw on a round object. But it was kind of cool to draw on a wooden egg!


I found that this book was full of nice ideas and tips that you could expand on to improve your rock painting knowledge and skill. I enjoyed the simple steps making it easy and fun to use.

Syd is a fashion designer, author of two previous blogs (Syd the Craft Kid and My My Little Ponies), and slime expert.

Monday, March 18, 2019

How to Make Fraction Multiplication Model Sun Catchers


I had intended this math enrichment activity for both girls, but to target primarily Syd, who is reviewing multiplying and dividing fractions in her math curriculum and is having trouble keeping the algorithms straight.

Unfortunately, you'll see only Will in this tutorial, as Miss Syd is having a chronic case of the tweens, and school is such a great outlet for a power struggle when one is feeling tween-ish. I'm declining to participate in this battle, because tweens generally come back around--I mean, look at Will! I wasn't sure we'd both survive her middle school years, and now she's a very dedicated student--so instead of two kids completing a craft project that is math review for one kid and math enrichment for another, we have one kid sulking somewhere else and one kid being crafty.

Eh, Will always needs more fine motor skills practice, anyway.

To make these fraction multiplication model sun catchers, you need the following:

1. Make the templates. The most accurate fraction multiplication model is the ten square or hundred square. We did do a couple of fraction circles, too, but I told Will that we had to know the product we wanted and then construct the model to fit it when we worked with the circles. 

When you work with the squares, the models construct themselves in a really cool way.

Trace several ten or hundred squares or pie circles onto a piece of clear acrylic using black Sharpie. They can be any size you choose.

2. Trace and cut out the fraction models. To make a fraction multiplication model, you need to cut out two fraction representations, one each in a different primary color.

Each fraction representation should be in tenths.

So, for instance, Will cut out one fraction in red--


--and another in blue:


3. Glue the fraction representations to the clear acrylic template. Place them perpendicular, with one edge of each representation lined up on the adjacent side to the other. This way, they will naturally overlap--


--and the area of their intersection is the product.

I like this model because it shows a different way of problem solving than my go-to explanation. Here, the x stands for "of" and the expression 1/2 x 1/2 can be translated as 1/2 OF 1/2. The visual is also a terrific memory aid, as it's colorful and striking and fun:


I haven't figured out a way to make the pie circle model come together as naturally as the square model does; there's no simple construction method that I can pick out that makes the product neatly assemble itself the way it does with the square model.

It can, however, be done--you just have to know what product you're looking for and then assemble the fractions so that the intersection represents that product:


Even though Syd refused to participate in the creation of the fraction multiplication model sun catchers, she can't help but see them on the window every time she's in the family room, mwa-ha-ha:


They look especially lovely when the setting sun shines through them, and I think they're a nice example of how naturally beautiful mathematical representation can be.

P.S. The next time Syd is amenable (perhaps when she's fourteen?), here is how to model fraction division in a way that makes it actually make sense.

P.P.S. Curious about all the other awesome stuff we get up to whenever a kid's not grumping out? Check out my Craft Knife Facebook page for more WIP pics and resources.

Friday, February 15, 2019

Homeschool Art: The Fake Slime Spill

We did not do this project on the first day of April, but it WOULD make a terrific April Fool's Day prank!

You might remember that Syd has been obsessed with slime since... honestly, I think it's been since before slime became a universal tween obsession. It's been a looooooong time. We've been making oobleck and gak since the kids were babies, but Syd, especially, has taken ownership of the slimer lifestyle since at least 2015.

She did an entire science fair presentation on slime in 2017!

In 2018, while she was away at camp, I set her up with an entire slime studio space, and I haven't yet regretted having one place where all the slime stuff lives.

Well, I mean sometimes I regret it a little, because it usually looks like this:


But whatever. We don't like that carpet anyway. And we didn't keep our stuff nice even before we had kids, so it's not like they're even the main reason that all our stuff looks like junk.

For this art lesson, I found a slime tie-in and we also explored our other favorite pastime, tormenting Matt.

To begin, we watched this excellent video from PBS Digital Studios:


Our local university's art museum actually owns one of these Duchamp fountains, so we've seen it several times before. There are also these stories of artist's pranks to peruse:

I think the most salient point to make is that by utilizing an artifact to comment on an aspect of our social conditioning, you can defend the claim that this IS art!

What we're about to do, however, is not art. It's just messing with Matt.

I taught the kids that adding paint to white glue will dye the glue. Here, we're using powdered tempera, ideally to keep the consistency of the glue/paint mixture thick, but you can also use craft acrylics (we still have a couple of bottles of this particular set of homemade school glue dyed with acrylic paint, and they're still great!):


Cover a tray with a piece of waxed paper, then comes the best part: make a spill!


The kids tried a couple of different containers, but the most realistic, I think, was the exact same little deli containers that Syd uses to store her slime. Will made a fake spill from a plastic cup, but it didn't end up looking like anything that would be consumable.

After the spills are settled, you have to find an out-of-the-way spot for them to dry out for several days. I didn't mark the time on this, but I wouldn't have been surprised if it was at least a couple of weeks before the kids could peel their fake spills away from the waxed paper.

Shortly before Matt was expected to come home one evening, Syd chose her favorite of the fake spills and set it on the rug in our family room--not right in the middle, but off in a corner, where it could conceivably have gone unnoticed by us during the day. It was next to the coffee table, as if fallen from where a careless child had set it.

I wasn't in the family room when Matt came through, but I clearly heard him saying, "What is THIS?!? SYDNEY!!!!! GET IN HERE!!!!!!!" Bless her heart, she couldn't even keep a straight face for a second, which just made Matt madder until he reached down to pick up the slime container and the whole thing lifted neatly off the rug and the prank was clear. It was possibly one of the best moments of Syd's life to date.

Unfortunately, the prank only worked once, as a similar slime spill in our bedroom was ignored, and so was one in the playroom (fortunately for Syd, because that one was NOT one of the fake ones...). But the kids had made their point, using a created artifact to comment on the social norms of family life and the surface-level assumptions of what it means to be "clean" in society today.

Okay, I made that up. This one wasn't art--just a prank!

Thursday, February 7, 2019

The Kid Made Polymer Clay Flowers

Here's the very first thing that Syd ever made from polymer clay, back when she was all of four years old:


And here's the most recent:


Unless we're just absolutely out of time the girls make handmade gifts for all of their gift-giving occasions, and the particular occasion that inspired these delicate little polymer clay flowers was the birthday party of a friend from Syd's ballet classes. It's an interesting (and useful!) challenge to craft the perfect gift for a friend that one doesn't already know very well, and I was more than a little surprised, honestly, that Syd didn't automatically choose to make the child something ballet-themed.

But if there's one thing that you must know about Syd, it's that she always has A Vision. She envisioned embellishing a headband with a bouquet of polymer clay flowers, and that's just what she did!

Even if it meant crafting over a dozen tiny, delicate, detailed polymer clay flowers by hand:


I love this one the best. See how she used her own fingerprints as embellishments?


Syd took the following photos of her completed headband (and unfortunately she is not yet as interested in photography as she is the other arts, and it shows...), so you can see that the details did not stop with the bouquet. She added a braided length of waxed cord, embellished with beads, that dangles from the bouquet--


--and on the opposite end, a nice, big bumblebee!


Here the headband is in all its glory (and with all the hot glue strings tidied out of the way):


It certainly makes all the time I spent organizing her polymer clay supplies for her well worth it!

P.S. Syd doesn't use tutorials for her creations, but I do, and I have an entire Crafting: Clay Pinboard where I keep my inspiration.

Tuesday, November 6, 2018

Homeschool Book Review: The Art of Doodle Words

I'm happy to admit that art is the hardest subject for me to incorporate into our homeschool. Syd is a gifted artist and needs lots of art enrichment, but resents any art instruction that doesn't come from her father, who fortunately is also a gifted artist, but is not at her beck and call, and certainly not during the average school day.

Will's gifts lie elsewhere, which means that she needs art just as much but is often clueless about how to go about it, and reluctant to pursue it.

I try to incorporate a weekly hands-on art project that both kids can engage in despite their varying skill levels. I've tried and so far failed but have high hopes to try again in the winter semester to include a comprehensive art history study. What has worked most consistently, however, for several months now, is to include daily art time in Syd's weekly homeschool work plans. She is generally left to do what she pleases during this time--mostly mermaid drawings or more panels for her comic strip about office workers who are also cats--but is expected to be accountable for what she's been working on, and to keep a portfolio of her work.

Every now and then, however, I come across an art book that I think Syd will really love, and I'll assign it to her for her week's work. Such it was with The Art of Doodle Words, which I received for free from a publicist. I handed it off to Syd, said, "Here you go. Show me what you make!" and left her to it.

And she made lots!


The book is super clever, in that it shows you how to incorporate themed doodles into words, kind of like your own Google Doodles. It's the perfect book for a tween who loves to draw, loves things to be cute, and is extremely clever.

I love her whale:

Her cat is a little more abstract, but I can read it, especially the yarn ball "C":
Here, I think, is where she really started to get the hang of it. All of "BACON" is made of bacon--except for the "O", which is an egg, and her cotton candy looks just the way that I feel after eating cotton candy:


I actually didn't even see, at first, that the dots on the "I"s are the eyes of the smiley face. How clever is that?!?

I like the way that Syd started to play around with the concept more after a while. She didn't doodle the actual letters in "DREAM," but played more upon the overall idea of dreaming to make a more complex sketch:

And now she's moved into slogans!


The pizza would look cute in color, I think, but I really like the bites taken out:

 And the fox is very adorable and autumn-themed:


This was such an easy book for Syd to follow, and the concept was clear-cut and easy to recreate, but it was a very valuable way to spend a week of art, because the extensions to this idea are unlimited. We've got this book in our home library now, shelved with our other art books (because you know that I have our home library shelved according to Library of Congress call numbers, right?), so that Syd can continue to refer to it as her interests change and experience grows. Syd's also really into black and white right now, but I think these would look well with color, Prismacolor markers or perhaps even watercolors.

That was by far the easiest hands-on art unit that I've ever planned!

P.S. Want to learn more about our hands-on homeschool and all the fun projects that work (and, more importantly, don't work!!!)? Check out my Craft Knife Facebook page!