Monday, March 5, 2018

Hand-Dyed Wooden Beads and Blocks in Pumpkin+Bear

"Aww, look!" I thought. "The chicken wants to seee what I'm doing out on the deck on this gorgeous afternoon!"


"Isn't she pretty?"

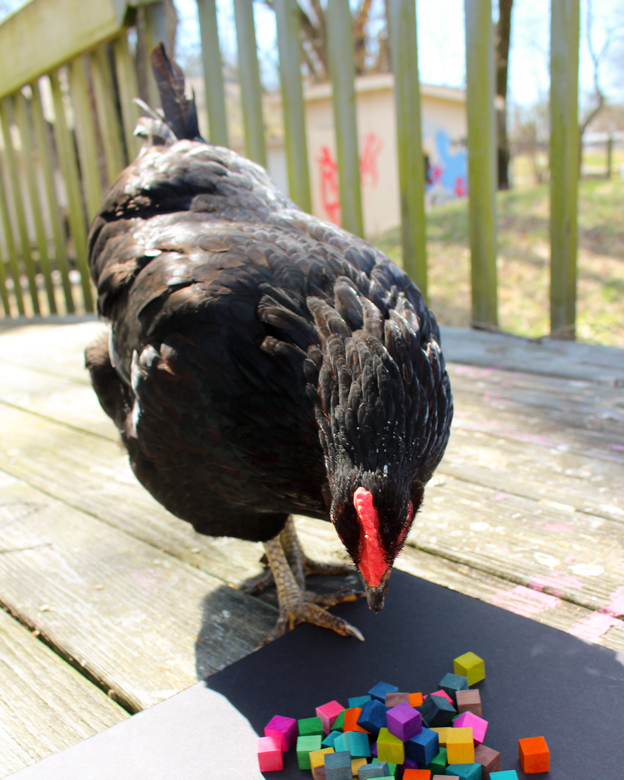
"HEY!!! Those are not berries!"

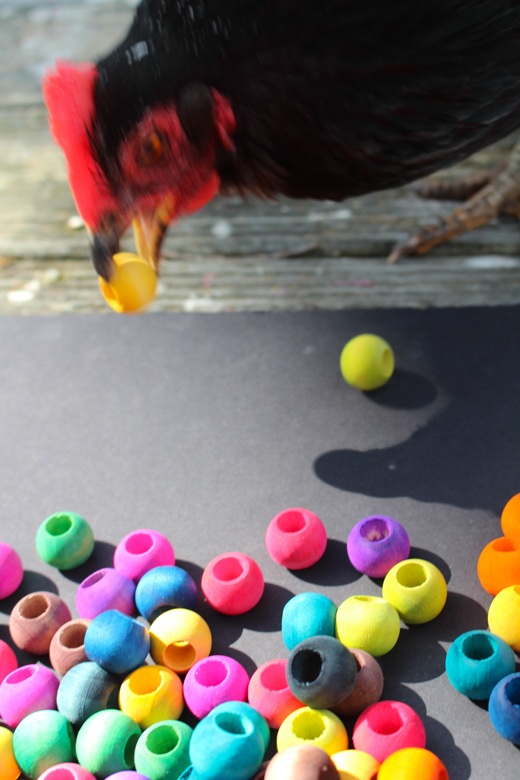
So there you go. My hand-dyed wooden beands and blocks are so pretty that chickens think they're berries.

I can't even tell you when I dyed these--a couple of years ago, perhaps?


We were doing several projects that involved hand-stained wood, and I was working out just the perfect technique to share over at Crafting a Green World.


While working out the technique to my satisfaction, I made waaaaaay more dyed wood pieces than we needed for the projects.


Apparently, I just squirreled the surplus away in my stash, because I am actually a hoarder.


I rediscovered them the other day while I was cleaning and decided I might as well peep into that plastic drawer in the closet--I'm still finding containers that I haven't unpacked after our move (which was four years ago now, for those of you playing the home game), so perhaps that drawer could contain my wedding ring, or my folk music anthology!


It didn't.

What it did have, however, were projects that I'd meant to list/relist in my Pumpkin+Bear shop. Some were projects that I used to have listed but wanted to rephotograph or rework in some way, and some where projects that I wanted to list in Pumpkin+Bear, but I'm guessing the light was poor on the day that I wanted to photograph them, or I got busy, and set them aside, consequently forgetting all about them.


Of course.

Fortunately, last week we had our first sunny, above freezing days in FOREVER, and there was nothing I wanted to do more than spend the afternoon out on the deck photographing stuff.


These cubes are 1/2" across, nice and light and brightly-colored now.


These beads are 3/4" diameter, with a 3/8" hole.


The kids actually use our stash of undyed wooden cubes as a sensory material. I pour them out onto a tray that sits on our homeschool table, and off and on all week I'll notice a kid fiddling with them as she thinks or reads. They're stackable, arrangeable, and they just feel good in your hands.


Syd really wants to turn some of these beads into Camp Halfblood beads, so that's a project we'll be taking on before too long.


I've used these stained beads to make magnetic mosaic tiles for our giant metal memo board. I'll probably use some of these to make more, and I'm tempted to upcycle a metal tin from somewhere and make a travel-sized version.


Of course, if you bought these from me, I'm sure I'd find something else to happily hoard and/or occupy my time with...

Thursday, March 1, 2018

The Kid Makes Handmade Slime

My tactile, hands-on, crafty, busy girl has busied herself at the big table that we bought for just that purpose, in the playroom that we designated for just that reason, ever since we bought this house. It's one of the reasons why we bought this house, that room that I knew could be a room of the children's very own. Will lounges on the floor, reading or coloring (which is why I have two giant floor pillows in progress taking up half of my study/studio space), but the table is mostly Syd's domain, for Perler beads, play dough, drawing, jewelry-making, and mostly slime.

Slime for days. Slime for YEARS!

All of Syd's slimes have original recipes. They all have original names. They all have peculiar qualities that she can tell you all about. None of the rest of us really give her handmade slime hobby the respect that it deserves, so the other morning I took my camera, found her in the playroom (making slime, of course)--


--and said, "Okay, Kid. Show me all your slime."

This is not EVEN all her slime, because my camera battery died. It is, instead, a fairly representative selection:

This is Pink Speck Slime:


It contains glue, red liquid watercolor, liquid starch, glitter, and the tiniest little bit of shaving cream:


This is White Fluffy Slime:


It's made from glue, shaving cream, and liquid starch:


This is Purple Putty Slime:


It's made from one teaspoon thermic powder (which did nothing), glue, liquid starch, and red liquid watercolor:


This is Blue Speck Slime:


It's made from glue, glitter, and liquid starch:


This is Purple Fluffy Slime:


It's made from purple powdered tempera, glue, liquid starch, and shaving cream:

This is Black Glitter Slime:


It's made from a giant heap of glitter, the smallest amount possible of glue, and liquid starch. It's the glitter that makes it black:


This is Yellow Butter Slime:


It's made from stale yellow Model Magic, glue, and liquid starch:


This is White Cloud Slime:


It's made from glue, shaving cream, and liquid starch:


This is Clear Jelly Slime:


It's made from water, clear glue, and liquid starch:


This is Mash-up Slime:


It's made from all of the excess slimes that wouldn't fit into their containers:


This is Pink Floam Slime:


It's made from clear glue, pink floam beads, and liquid starch:


This is Syd's personal favorite, White Snowy Slime:


It's made from clear glue, a bunch of glitter, liquid starch, and shaving cream:


This is another White Fluffy Slime or White Cloud Slime, although when I told Syd that she had  showed me both a White Fluffy Slime and a White Cloud Slime already, she rolled her eyes at me, and when I pointed out that she'd just rolled her eyes at me, she informed me that she was just looking up at the door instead:


It's made from glue, a lot of shaving cream, and liquid starch (and a sarcastic tone and a couple more eye rolls, it seems):


This is Blue Floam Slime:


It's made from glue, blue foam beads, and liquid starch:


This is White Normal Slime:


It's made from glue and liquid starch:


This is Green Sand Slime:


It's made from glue, a little bit of green kinetic sand, and liquid starch:


This is Clear Unicorn Pee Slime:


It's made from clear glue, liquid starch, and some glitter:


Since slime making is Syd's area of interest, I buy her whatever she asks for as far as slime ingredients go, and sometimes, if I happen upon a recipe with an unusual ingredient, I'll surprise her with something she hasn't asked for--that's how she ended up with the foam beads, which are a hit, the thermochromic powder, which she hasn't been able to make work so far, and some metallic pigments, which she hasn't experimented with yet.

I also bought her saline solution, which she used to make a whole series of slimes that led her to decide that she far prefers to work with liquid starch.

Here are Syd's favorite slime-making supplies so far:

  • 2-ounce plastic storage containers. These work well for giving slime away, especially on Valentine's Day.
  • 8-ounce plastic storage containers. These are the standard size that Syd uses.
  • glitter. Syd has recently also asked for large-flake glitter, so we'll make a trip to the craft store this weekend to hunt some down.
  • clear glue. I buy this by the gallon.
  • foam balls. The dye comes off of these balls when it's mixed into slime, so Syd says that you might as well just buy the white foam balls and dye the slime your color of choice.
  • glitter glue. Syd is just as happy dyeing and glittering her slime from scratch, but she likes these, too, so I buy them if I see them on sale.
  • white glue. I also buy this by the gallon.
  • Stay-Flo liquid starch. This is Syd's ingredient of choice for all of her slimes.
  • miscellany. Syd has experimented with all kinds of mix-ins for her slime, everything from sand to beads to dry rice and any other ephemera that comes her way. She also likes to find unusual ingredients to make slime from. She made some awesome slime from stale Model Magic, but the slime that she tried to make from leftover play dough turned into a slimy nightmare that still makes me shudder a bit to think of it.
I don't always appreciate Syd's passion for slime making; it's sticky, and messy, and that playroom table will likely never recover, sigh. But I figure that I bought the playroom table for the kids to use, and the stickiness and messiness is just the kid feeding her senses. She's being creative, she's exercising her STEM skills with all that creating and remixing recipes and discovering new combinations, and she's engaging in whole-body physics and chemistry by exploring the properties of a whole series of non-Newtonian fluids. 

And she's mastering the entire field of slime making, and experiencing the confidence and satisfaction of that mastery. What more could I ask glue and starch to do for a person?

Friday, February 23, 2018

Homeschool Science: Testing for Organic Compounds in Food

A few years ago, when I was doing a biology unit with the kids, I began working through an MIT OpenCourse biology class. It wasn't long before I was stymied, however, as it turned out that biology was all chemistry, and the professor kept assuming chemistry knowledge that I didn't have. So I switched to an MIT OpenCourse chemistry class, and was quickly stymied there because it turns out that chemistry is all math, and the professor kept assuming mathematical knowledge that I didn't have.

So I switched to Khan Academy to fill in those gaps, but that's a whole other story, and I'm only telling you that so that I can tell you that I was not surprised when the children's biology textbook went exactly one chapter before moving to chemistry.

Because biology is all chemistry!

Chapter 2 of CK-12 Biology explains the role of carbon and its many organic compounds that are crucial to life. I supplemented this chapter a LOT, and I'll tell you the other resources and activities we used another time, but for this particular activity, I found myself turning to Teachers Pay Teachers for hands-on activities and science labs that contextualize the material and give it more depth. I don't usually like to pay even a few dollars for resources that I could make myself, or have the kids make from scratch, but we're a busy family this year and I appreciated the shortcuts!

After reading 2.1 and completing the questions at the end of the unit, I gave the kids this organic compounds foldable to create. They could mostly find the information in their textbook, although they did have to do a little outside research, and instead of making the foldable exactly as instructed, they ended up cutting it up and placing it piecemeal in their science notebooks--you can spy it in the photos that I took of the lab, as they used it for reference.

When the kids were solid on organic compounds, we cleared off the kitchen table and did some biochemistry!

I bought this lab, Testing for Organic Compounds in Food, and bought the chemicals that I needed for it from Home Science Tools. While I was shopping, I went through our lab manual, The Illustrated Guide to Home Biology Experiments, put the procedures that I knew I wanted the kids to do onto our syllabus, and also bought any supplies that I needed for those. So fun to get a little box full of test tubes, rubber stoppers, and dangerous chemicals in the mail!

As I mentioned earlier, I almost always create our resources from scratch, but it WAS nice to have everything all set up and already written down for me! The lab included step-by-step set-up instructions for me, and step-by-step instructions for the kids, as well as charts for them to fill in, comprehension questions, and questions that got them thinking beyond just the procedures, as well. All I really had to do was supervise, make sure they kept up their safety standards, and enjoy watching my young scientists at work!


Here's Will halfway through explaining that real scientists ALWAYS drink from their test tubes.


Don't worry--she didn't actually drink from a test tube... that I know of.


The process feels enough like chaos with two kids and one adult at one table that I shudder to think of what this looks like in a classroom.


Actually, it's probably super well-organized when it's in a classroom! Our homeschool is just chaotic by nature.


And yet even though it feels like there's a lot going on, I love to see how intently each kid focuses:


This lab, and the chemicals needed to perform it, were well worth the money. Although the kids completed the entire lab, and then completed a second lab in which they were required to come up with new substances to test, you could repeat this lab tons of times and still find new things to explore. It's repeatable even later in this very biology study, because I know we'll touch on nutrition when we're in the human biology units. It's repeatable when we study chemistry, and there are even a couple of Girl Scout badges that this lab could apply to.

It turns out that there are LOTS of scientifically sound reasons to experiment on your food!

Wednesday, February 21, 2018

Homeschool Science: CK-12 Biology Chapter 5--The Cell Cycle, Mitosis, and Meiosis

The kids and I are using CK-12's 9th/10th grade Biology textbook as the spine for this year's biology curriculum--for Will, who is in the eighth grade but who is taking high school-level coursework, this will be recorded as Honors Biology on her transcript.

In addition to that textbook, we're using The Illustrated Guide to Home Biology Experiments as our lab manual, and of course we've got a plethora of other reading/viewing/listening resources and hands-on activities to enrich our study.

The kids read chapter 5 in sections, completing the questions at the end of each section. At the end of the chapter, they took the test (from the CK-12 Biology Quizzes and Tests book) with an open book.

For Chapter 5.1: Cell Division and the Cell Cycle, they completed the first page of this Cell Cycle Coloring Diagram, and used it as a study guide.

For Chapter 5.2: Chromosomes and Mitosis, Syd watched the BrainPop video, "Mitosis." The CK-12 Biology textbook can be a little challenging for her (it's written at the 9th/10th grade level, and she's in the sixth grade), so these BrainPop movies are particularly useful for making sure she understands the topic. She's expected to pass the quiz, and then she usually plays around on BrainPop for a while longer.

After reading Chapter 5.2 (and watching BrainPop!), the kids completed Procedure IV-3-1: Observing Mitosis, from The Illustrated Guide to Home Biology Experiments. We used prepared slides of mitosis in an ascaria egg and mitosis in an onion root for this, although you can also prepare your own own root tip slides. In this procedure, I did not ask the kids to answer the review questions or follow the instructions completely; instead, I required them to identify, if possible, and sketch a view of each of the stages of mitosis. They're both still getting used to using our new, upgraded microscope, so this was plenty challenging, and at times frustrating, for them both. Using a microscope is such an exercise in patience!

Will supplemented Chapter 5.3: Mitosis and Reproduction with a reading on Meiosis from The Biology Book (I assign this often in this study to add historical context to what we're learning), and then both kids went back to the microscope for the more challenging task of identifying the stages of meiosis in a prepared slide of lilium pollen. I referred them to this website illustrating the stages of meiosis in lilium pollen to help with the identification.

And then we did something fun! The kids could have been more scientifically accurate in their creation of these stages of meiosis cookies--


--but it turns out that meiosis is delicious, regardless!


Here are the YouTube videos that I used to supplement this chapter:


I could not find any stellar supplemental reading (other than The Biology Book) for the cell cycle, although whenever we study any aspect of cell biology, the kids and I are always reminded of A Wind in the Door, the last of the Wrinkle in Time quintet that we were able to slog through together.

Let me know if YOU find any supplemental resources that bring the cell cycle alive for children, lol!