Sunday, March 24, 2024

Tutorial: Quilt-As-You-Go Scrappy Bookmarks


Use up your scraps while making this cute and useful quilt as you go scrappy bookmark!


Y’all know how much I love myself a DIY bookmark! So when I decided that I wanted to give out a few Valentine’s Day gifts this year, it wasn’t hard to settle on these as my gift. I’d just spend a few minutes sewing each one, swing by the Half-Price Books Outlet and pick out a book each person would like, add in a little store-bought candy, write a note, and just like that, Valentine’s Day is won!

Tangent: it would have been cool if I’d decided to send out Valentine’s Day gifts more than 26 hours before I absolutely needed to put those gifts in the mail, but whatever. A manufactured emergency caused by procrastination happens to be my crafting sweet spot!

Being as I had a few hundred other things I needed to accomplish in that 26-hour window, ahem, I made the quickest and easiest bookmarks I could think of. Coincidentally, they’re also the absolute cutest, and happily, they’re also made ENTIRELY from scrap! I love how sewing with scraps lets me revisit my favorite fabrics in new scenarios. I am down to less than a fat quarter of that super cute pink skulls fabric, and so far there has not been a single square inch wasted.

The quilt as you go method is a terrific way to sew extremely quickly, and combined with how small these finished products are, you’ll be surprised at how soon you have an adorable bookmark in your hands. They sew up so quickly that I always make tons extra, because otherwise it’s barely worth the time it takes to set up my sewing machine!

Supplies


Here’s what you need to make your own scrappy bookmarks:

  • backing fabric. I like something a little heavier/stiffer with no stretch for this. I used scrap Eco-fi polyester felt, but I also like denim, canvas, and interior design fabrics.
  • front fabrics. Quilting cotton works best. I really like combining fussy cut novelty prints with solids, but you should do you!
  • ribbon. I considered a few different ribbons, but then I discovered an entire package of vintage rickrack hiding in my bias tape bin!
  • cutting/sewing supplies. Among other miscellaneous supplies, I used a gridded quilting ruler, a rotary cuttermy sewing machine with a universal needle, and a seam roller.

Step 1: Measure and cut the backs and the ribbon.


I think 2″x6″ is the perfect size for a bookmark, so I cut my felt to that size.

I eyeballed the rick rack, but all of my pieces were about 10″ long.

Step 2: Begin the quilt as you go method.


Fold the ribbon in half and place it towards the top of the backing fabric, with the ends overlapping the backing fabric by at least 1″ and the loop coming off the top.

Choose your first fabric scrap and place it at the top of the bookmark, sandwiching the ribbon between the fabric scrap and the back. I like to line up the top of the scrap with the top of the back to save myself trimming it later.
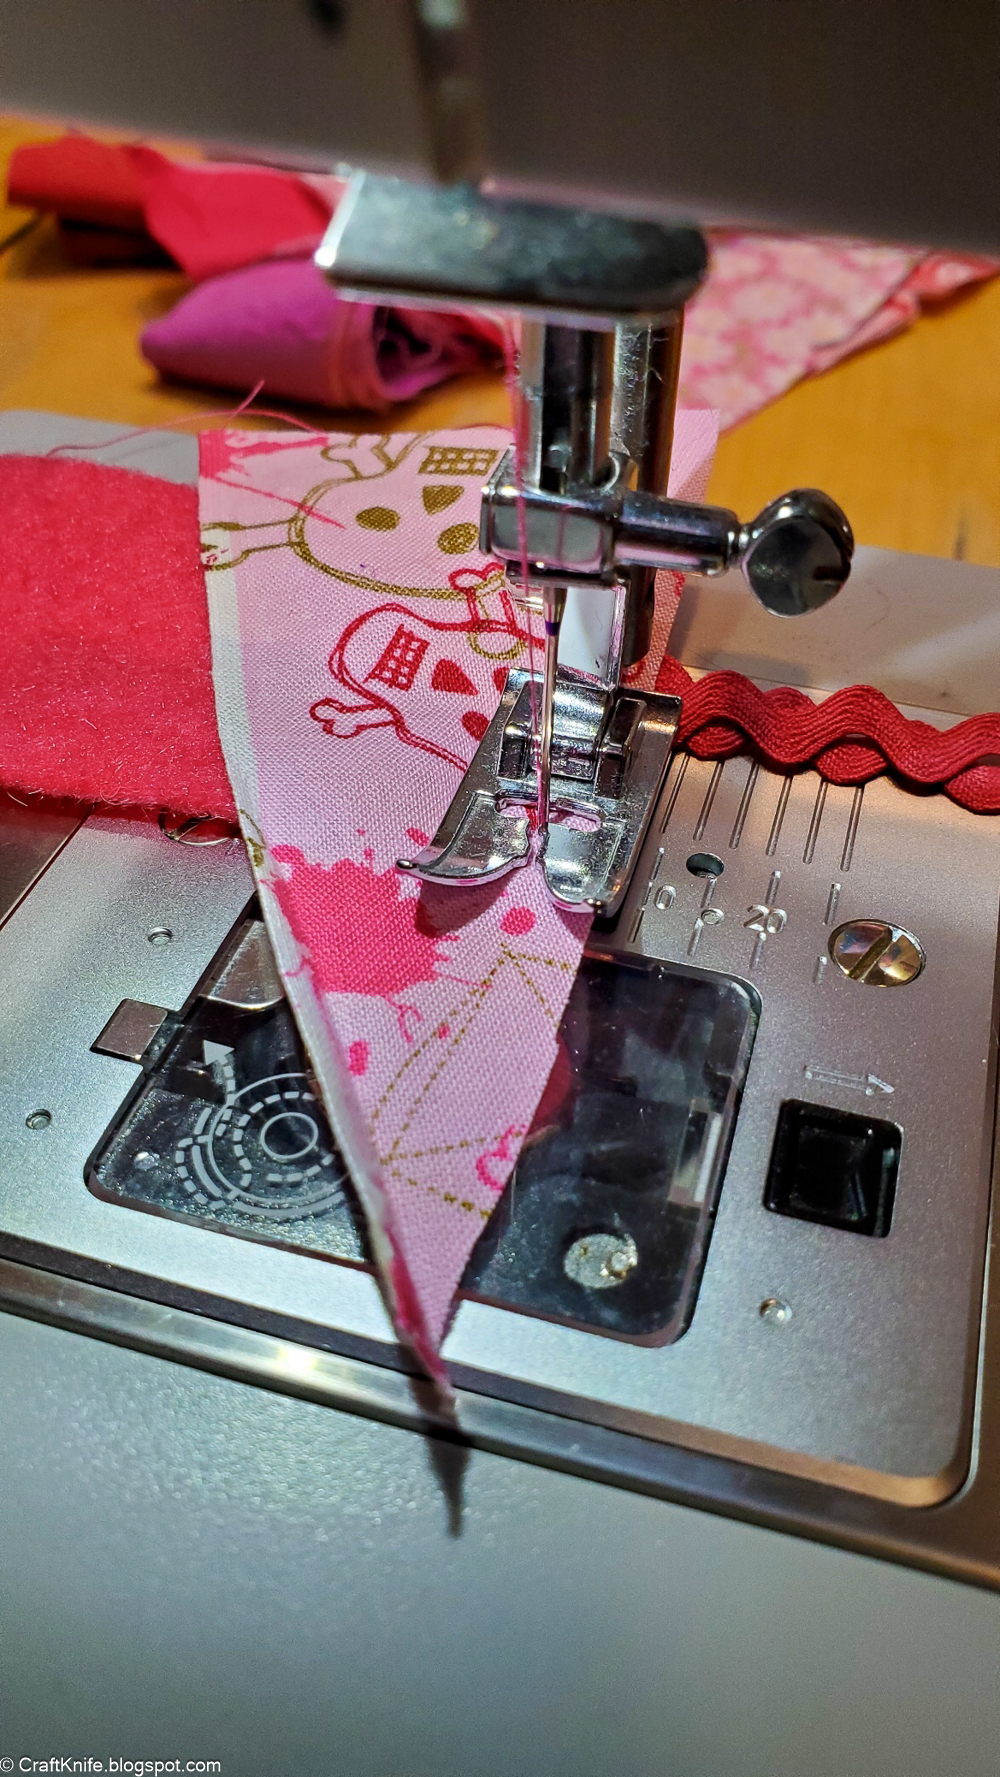

Stitch across the top of the bookmark, backstitching over the ribbon. You can stitch off the bookmark back on both sides, as you’ll definitely be trimming that extra scrap fabric away. Don’t worry about backstitching, because you’ll edge stitch this entire bookmark later, and that will lock these stitches.

Step 3: Continue to quilt as you go.


Choose another fabric scrap, and place it right side together with the first scrap. Stitch across the bookmark to sew it down.
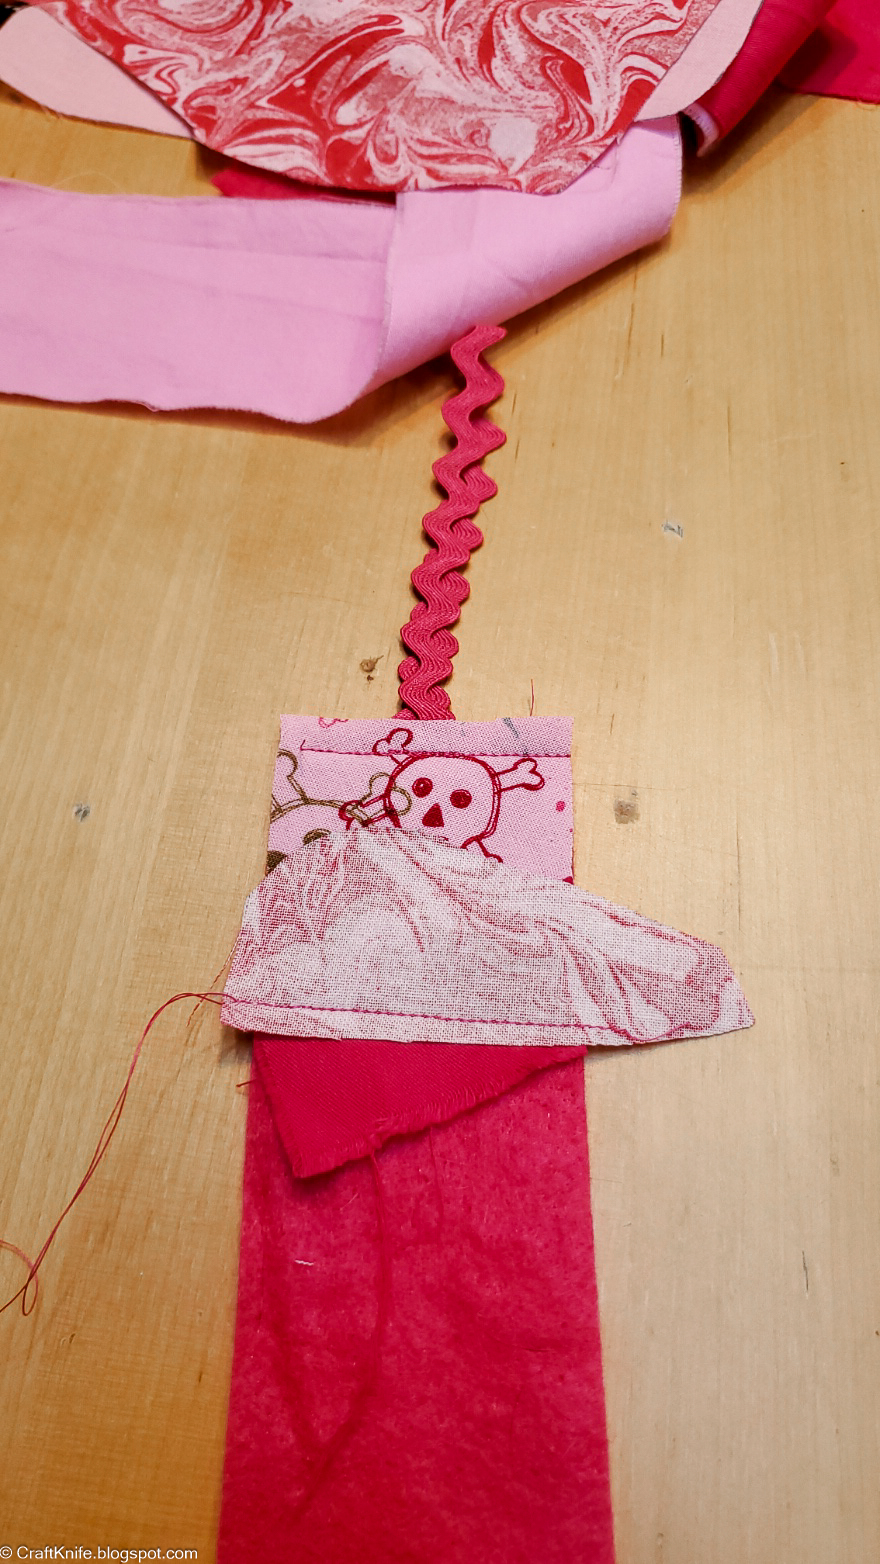

Fold the scrap fabric back so that the right side faces up and the seam is hidden, then press down with the seam roller or an iron (don’t forget to lower your heat if you’re also sewing with felt!). If you prefer, you can trim the excess fabric away every time you sew a new scrap, or you can wait and trim the entire bookmark at one time.
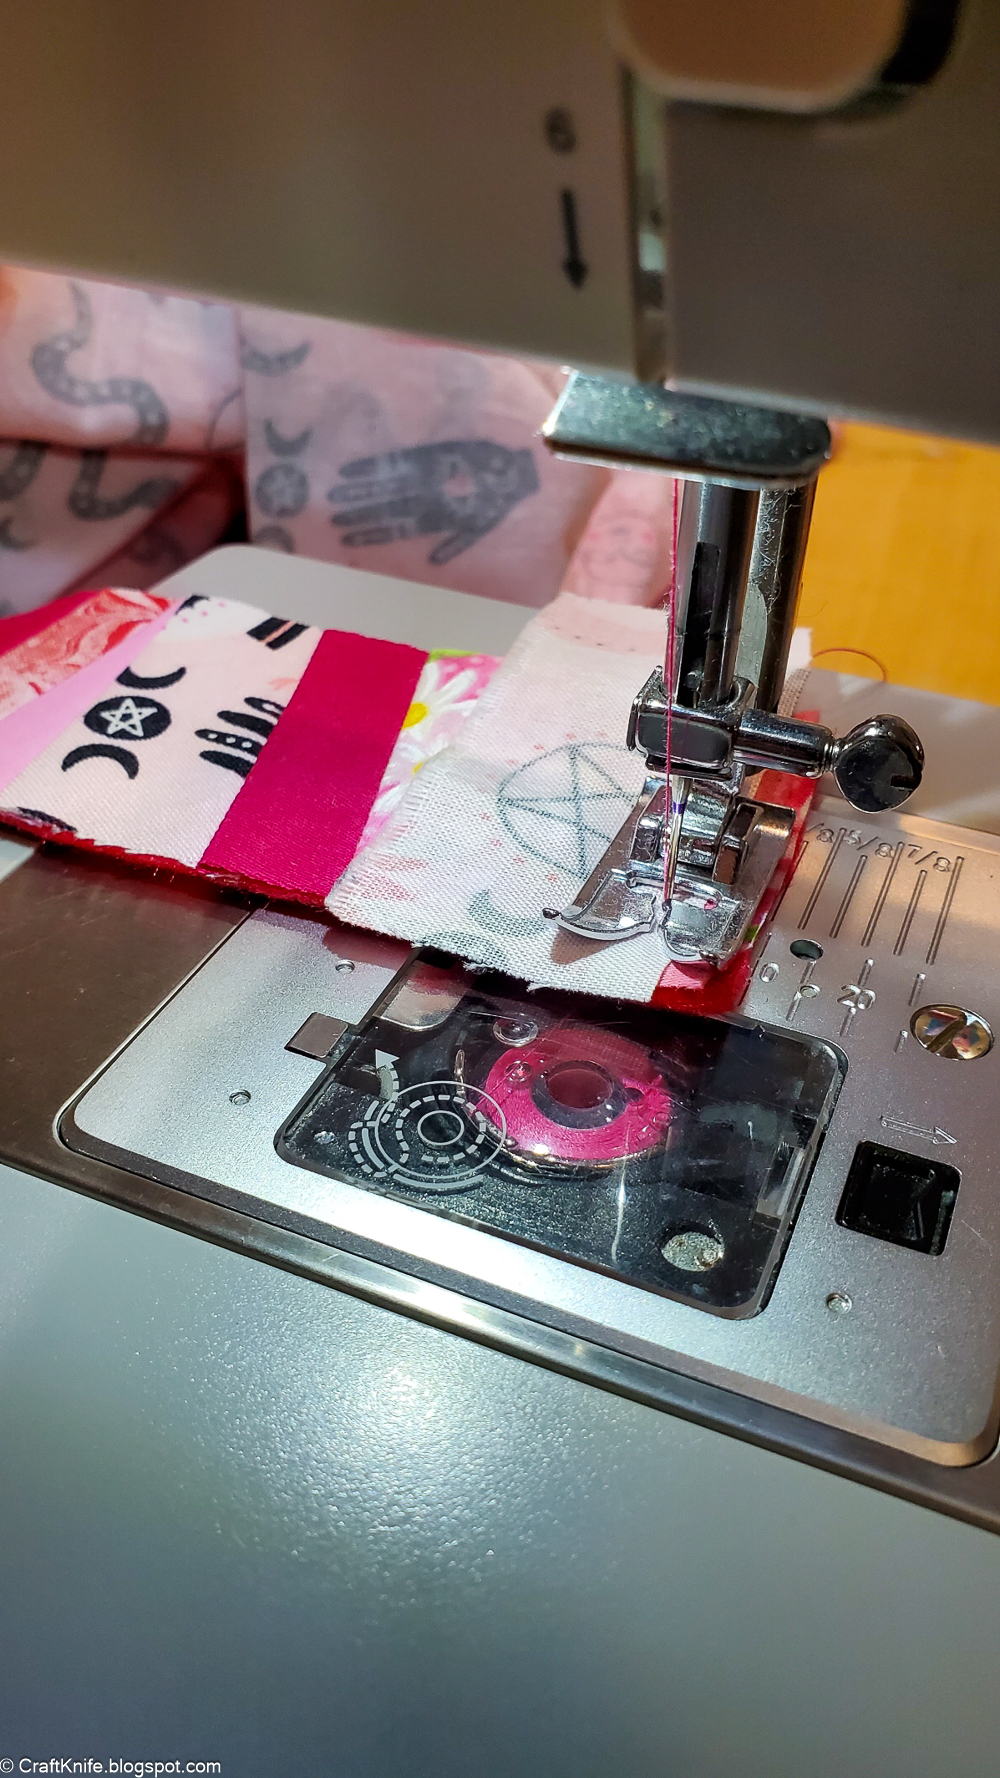

Continue to add new scraps to the bookmark by placing them facedown on a previous scrap, sewing them together, and then unfolding and pressing. Feel free to play with your placement by setting scraps at fun angles, and to fussy cut novelty prints to show off your favorite elements.

Step 4: Edge stitch to finish the bookmark.


When you’ve covered the entire bookmark back with quilted fabric, edge stitch around the perimeter of the bookmark.
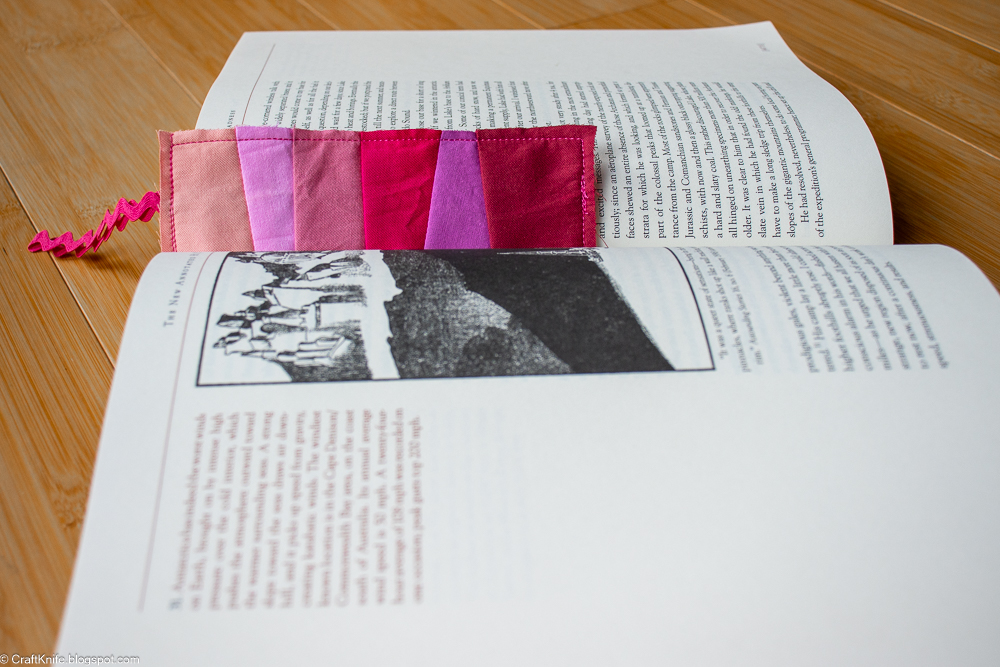

My favorite thing about these particular bookmarks is how easy it is to make them all look completely different. I didn’t think I even had that many pink fabrics, but look how many different pink bookmarks I made!

I’m already mentally compiling my list of green fabrics that I might have kicking around my scraps bin, because don’t you think that all the kids in my Girl Scout troop would also love their own quilted bookmark as a Bridging gift?

P.S. Want to follow along with my craft projects, books I'm reading, road trips to weird old cemeteries, looming mid-life crisis, and other various adventures on the daily? Find me on my Craft Knife Facebook page!

Tuesday, March 19, 2024

The Most Comprehensive Solar Eclipse Unity Study for Homeschoolers


Because if there is one thing that I am great at after homeschooling for 14 years, it is making a comprehensive unit study for homeschoolers!

My favorite thing about creating a unit study around an upcoming event is that the entire world becomes your hype man. Kids pick up on how excited everyone is about the eclipse, and learning more about it becomes just another way to engage with that excitement, mwa-ha-ha! 

What you see before you is THE most comprehensive solar eclipse unit study for homeschoolers. Almost all of it can be leveled up and down, usually just about simultaneously so you can work with your kids of different ages together. Pick and choose what you've got the time and materials for, interspersing activities you know your kids will love with activities that will stretch their skills and interests a little. 

Anchor Charts, Infographics, and Other Decorations

Because when you homeschool, even your decorations are educational!


solar eclipse bunting. Sew this from stash fabric and upcycled blue jeans. 

free printable easy reader book. If you've got a kid on the cusp of independent reading, you know the pain of keeping them in those teensy books! There can never be enough! Well, here's one more!
image credit: NASA/Tyler Nordgren

NASA posters and graphics. This poster is a good US Geography resource for a middle-grade kid to use to trace the eclipse's path on a map. The back of this poster is an excellent anchor chart to use with any age to inspire further research.

printable map of the Moon. Use this with binoculars or a telescope to identify the Moon's features, or simply display it because it's pretty!

solar eclipse diagrams. They're a little dry, which in my home makes them perfect for taping to the wall directly facing the toilet in the kids' bathroom. Ahem.

April 8 Eclipse Activities

Do these activities during the partial phase of the eclipse.


Are your eclipse glasses safe? Okay, do this one BEFORE April 8! My town is getting a total solar eclipse, and so eclipse glasses are EVERYWHERE right now. I love that, but I do NOT love how I've seen some of those glasses being stored and handled by the places offering them. PRETTY PLEASE triple-check your eclipse glasses well before the eclipse, have extras on hand in case of accidents, and store them so super carefully to keep them from scratches. 

Eclipse Soundscapes project. This Citizen Science project is a great way to encourage all ages to be mindful and present during the eclipse, as well as to document their observations. If you don't want to do something this formal, you can simply talk about being observant with all the senses during the eclipse, then have kids write--ideally the same day!--about the eclipse using as much multi-sensory detail as possible. Younger kids can draw their observations and impressions.

GLOBE Eclipse Citizen Science Project. If you're in a country that will experience the eclipse, you can use the GLOBE Observer app to record observations and meteorological measurements during the eclipse. Elementary kids can do this with family help, while middle and high schoolers can work more independently. For a longer meteorology study, use the GLOBE Observer app regularly. This project would work as a lab for a high schooler wanting to study Astronomy and earn a Lab Science credit on their high school transcript.

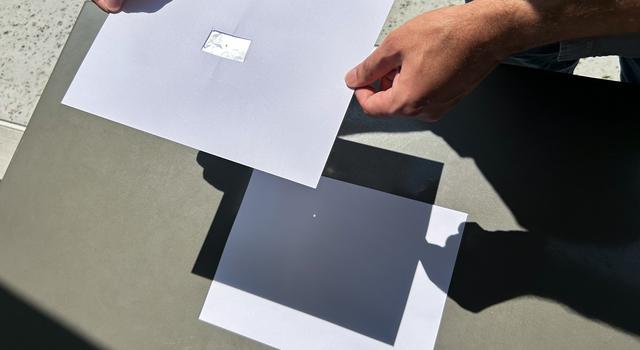
pinhole projector. This NASA one is a little overengineered, but the experiment they suggest would keep younger kids busy and engaged during the partial phase of the eclipse. Here's a more basic one that's more than sufficient for your purpose--my kids have made this kind, and it works great!

Art and Craft Projects

Because if you're not doing a weird and unwieldy craft project, are you even homeschoolers?


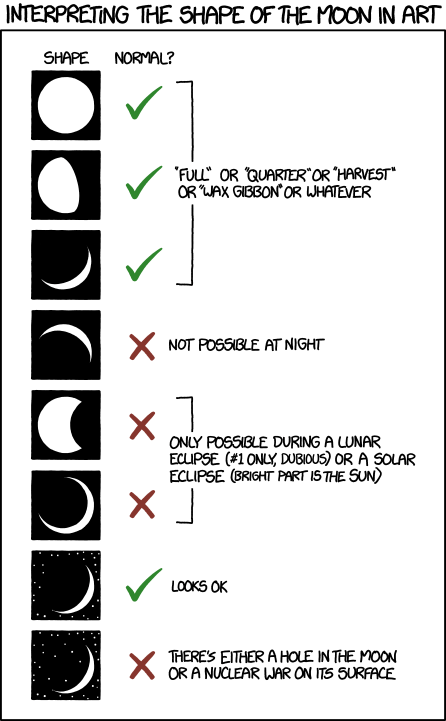
image credit: xkcd

Aztec Sun Stone drawings. This slightly guided, mostly creative art project is a sun-themed craft that works with a history/geography study of the Aztec people. If you didn't want to dedicate a huge amount of time to the study (but you still wanted that cute sun craft for eclipse decor!), you could get away with reading a couple of picture books or documentary clips, as long as the importance of the Sun Stone was covered.

chalk and construction paper solar eclipse. The easiest and best model that a kid can make of a solar eclipse is also the cheapest! I'm trusting you as a homeschooler to have chalk and construction paper in your house.

coffee filter partial eclipse. I wouldn't go purchasing a set of coffee filters just for this project, but if you've already got them on hand, go for it! Add some more interest and sensory art experience by having the kids color the filter not with crayon, but with washable marker, then let them drip water from an eyedropper to watch the ink bleed. 

cupcakes. This is the easiest and cutest eclipse treat I've seen yet, and it's pretty accurate-looking, too! Even young kids can help with these, and older kids can simply up the independence-level, and/or bake the cupcakes completely from scratch.

glow-in-the-dark solar eclipse T-shirt. Because who doesn't love an excuse to play with glow-in-the-dark paint?

moon map for coloring. My kids had SO MUCH FUN one week when I printed and assembled this Moon map, taped it to my wall, and invited them to color on it with markers. 

mosaic sundial image via Marvelously Messy

mosaic sundial. You can incorporate this into the sundial lesson in the Astronomy section, below, but especially if you've got younger homeschoolers, it's totally okay to just make this simple (but beautiful!) sundial together as a family and have a fun summer exploring how it works. Learning how to mosaic is actually a surprisingly accessible skill even for younger kids, and you might find yourself with a whole new Mosaic Special Interest.

solar eclipse cake. Marshmallow fondant is shockingly easy to make, so other than the difficulty coloring it (I've never found a good black food coloring, so tbh I'll probably just buy some pre-dyed fondant), this entire cake is dead easy. My teenager and I are going to make this for our own solar eclipse guests, but I'll probably do a Victoria sandwich and skip the habanero...

solar eclipse sandwich. Even younger kids should be able to make this eclipse sandwich layout mostly independently, and it's a great way to encourage them to try a couple of perhaps new-to-them foods. 

Sun, Moon, and Earth masks. Get out the cardboard and the paints to make these giant masks with the kids... then send them outside to chase each other in them!

total eclipse tostadas. My kids LOVE themed meals! We'd make an entire spread of eclipse-themed food and then eat it while watching a nerdy NASA documentary.

Astronomy Activities, Crafts, Games, and Resources

This time period around the eclipse is the BEST time to get a kid excited about astronomy, not to mention make memories of this special, once-in-a-homeschool-education opportunity.


cookie Solar System. If you're learning about the Moon and the Sun, you might as well learn about the entire Solar System! This activity is suitable for preschoolers through high schoolers, with scaffolding for younger kids and more detail, creativity, and independent calculations and research encouraged in older kids.

If they're not doing science with dirty fingernails, how do you know they're homeschoolers?

Investigating prisms. This is a great time to dive into everything sunlight. The youngest homeschoolers can enjoy process-oriented, experiential play with prisms, while older kids can start to learn about the science of light refraction. Middle schoolers can develop their own experiment, and high schoolers can write that experiment up in the Astronomy Lab Notebooks for a lab science credit in their transcripts.

Moon journal. The most educational way is to have kids make their own from scratch by tracing a bottle cap into their observation journal or onto a piece of paper, but here's a printable template if you'd rather have a leg up. Have them sketch the Moon's phase every night and record the date, time, and weather. Incorporate a simple meteorology study by also having a kid record the temperature, air pressure, wind speed, etc. Kids can make DIY versions of all those measuring tools, or you could splurge on a simple weather monitoring tool.. or a fancy one!


paper telescope models. These paper models are quite fiddly, so I wouldn't even offer them to anyone other than the craftiest of high schoolers. My kid was practically born with a craft knife in her hand, and even SHE found them tricky! But if you've got a mechanically-minded kid who's very interested in the instruments of astronomical observation and exploration, it can be worth even making these yourself so that they can have a tactile representation of these instruments. The models aren't so delicate that younger kids couldn't incorporate them into their small-world play.


phases of the Moon demonstration and model. THIS is how you teach the phases of the Moon to kids of every age! The Oreo model is just for fun, but the prospect of making it is very good incentive to attend to the lesson, ahem. And here's a similar worksheet to keep them busy during their sibling's gymnastics lesson...

phases of the Moon flip book. Here's another great way to give kids an understanding of how the Moon waxes and wanes, especially if you can bring them outside regularly to watch it happen for themselves. You can make this flip book for the youngest kids to enjoy, but kids even a little older can help with assembly, and even older kids can use this as a jumping-off point for a flip book or animation study. My younger kid went through a HUGE DIY flip book phase when she was little!

Planet Hunters TESS Citizen Science Project. High schoolers can help scientists discover exoplanets by analyzing images from the TESS mission to look for eclipses of other stars. The project is technically complete as of right now, but does expect to obtain more data to analyze. This would work as a lab for a high schooler wanting to study Astronomy and earn a Lab Science credit on their high school transcript.

sidewalk chalk Solar System model. In the lead-up to the 2017 eclipse, my kids researched each planet and drew its picture on a labeled index card, then taped the cards to popsicle sticks. One beautiful afternoon, we headed out on our straight city-wide walking trail and we measured and placed the planets in their correct spots along the trail. It was just as fun walking back to the car, because instead of being tired and cranky, the kids kept racing ahead to find and reclaim their planets! SUCH a good way to reinforce a sensorial understanding of measurement AND astronomy!

solar eclipse foldables. For those whose kids love lapbooks and mini books, I've got you! These fill-in-the-blank infographics are also helpful for kids to use as illustrations when they write paragraphs or essays about the eclipse. This mini book is better for younger kids, who can sneak in a little scissors practice, too, mwa-ha-ha!

Solar Jet Hunter Citizen Science Project. High schoolers look for and mark solar jets to help scientists understand this phenomenon. This would work as a lab for a high schooler wanting to study Astronomy and earn a Lab Science credit on their high school transcript.

Solar oven. Even the littlest homeschoolers can help make a solar oven that will melt a s'more! Add a hot dog solar oven for a complete camping meal. Don't do this pizza box oven, though, because it's kind of crap. Older kids can do their own experimentation and engineering, and if you're really serious about it, you can invest some time and money into making an absolutely superb solar oven that will properly cook food.

sundials. Shadows are an accessible way to introduce any age of homeschooler to a study of the Sun, and kids who are studying shadows LOVE to make sundials! There are a million ways to make a sundial, from the preschooler-friendly to these more sophisticated papercrafts

Sungrazer Citizen Science Project. This project is for high schoolers or very interested middle schoolers. In it, you scan through images of the Sun taken by the SOHO Observatory, looking for previously undiscovered comets! This would work as a lab for a high schooler wanting to study Astronomy and earn a Lab Science credit on their high school transcript.


Sun prints. All you need is a pack of cyanotype paper to make the coolest prints and shadow art! When we did that set above, way back in preparation for the 2017 eclipse, we were all fascinated by the way the sun print plus the shadow print of the rectangular prism made a perfect cube on the paper. If your kids (or you!) are extra crafty, you can even buy cyanotype FABRIC! To add some academic rigor, combine sun prints with this free worksheet set

word searches. I recently reintroduced word searches to my Girl Scout troop, and they were all super into them! I feel like we as a people don't do enough analog puzzles these days, sigh. Here's a pre-made set of word searches, but you can also have kids make their own with graph paper as a template. 

History, Geography, and Social Studies Activities, Crafts, Games, and Resources

Learn about the cultural significance of eclipses around the world and throughout time.


Again with those dirty fingernails! I'm pretty sure that was the year that I put a nail brush in her Easter basket...

gingerbread Stonehenge. This is a delicious way to study ancient astronomy and the importance of the Sun to our ancestors. To be sure, it's not the most academically rigorous project, but it makes a fun capstone to a short unit on Stonehenge and its astronomical purpose.

track the path of the eclipse. Make, print, or buy a line map of the United States, then help kids use their resources to trace the path of the eclipse. Depending on the kids' interest levels, this can be the spine for an entire US geography study.

Video of Navajo and Cherokee teachings. It's probably a little too dry for the youngest homeschoolers, but if you engage with the video along with your kids you could make it fun for kids who are a little older, and middle and high school kids ought to be fine.


Cool Stuff to Buy

If you've got a little extra room in your homeschool budget, splash out with these educational materials that will encourage and expand your kids' interest.

  • glass prism set. Younger kids can spend years playing with these, exploring rainbows and shadows and angles and light. Now that my kids are grown (sob), I've made little macrame hangers to put them in all my sunny windows so I can still enjoy them!
  • planet stickers. My kids loved these even into high school! I let them place them (in planet order, of course!) on the wall of our long front hallway, and it's a decoration that we still all enjoy. I mean, if you don't have giant stickers of all the planets in order in your front hallway, how will your guests know that you're homeschoolers?
  • Moon sticker. We had to put this in a different room from the planet stickers, obviously, because otherwise the scale would be wrong.
  • star stickers. Kids do not seem to know about star stickers these days, because every kid I've ever showed them to has been SO EXCITED--especially when I explain that they go on your bedroom ceiling! My own homeschooler, as a high schooler studying astronomy, actually used star stickers to put all the major constellations all over the walls and ceilings of our entire house. It's kind of my favorite thing!
  • sunprint paper. Explore shadows or make awesome art.
Okay, that basically encompasses everything that a homeschooler needs to know about eclipses! My kids wouldn't even tell you that they particularly love astronomy, but I know that our eclipse units have been among our all-time favorite homeschool studies. I mean, we got to watch these amazing astronomical occurrences FOR SCHOOL!

Your kids are going to love these activities, too.

P.S. Want to follow along with my craft projects, books I'm reading, road trips to weird old cemeteries, looming mid-life crisis, and other various adventures on the daily? Find me on my Craft Knife Facebook page!

Friday, March 8, 2024

Homeschool High School Honors World History: DIY Art History Artwork Cards

The teenager's Honors World History: Ancient Times course uses an AP World History textbook, a college-level art history textbook, and all the other additional resources you'd want in order to flesh the study of ancient history out into a full-year high school honors course.

Among the other many resources I've compiled and DIYed for this study, one of my favorites is the new set of DIY artwork cards that I prepare for every new chapter of Gardner's Art through the Ages, which in turn I've keyed to the relevant chapter(s) in Duiker's World History

Artwork cards are a major component of a couple of different pedagogical approaches to homeschooling, and you CAN buy sets of them--Memoria Press is generally considered to have the nicest, if you're in the market. But if you buy sets of them you're not going to get exactly the artworks that you want in the sizes that you want, and depending on where you buy them, copyright can be an issue. 

Another option, one that I also use, is buying museum gift shop postcards. I LOVE my sets of artwork postcards, and it's nice because they're always high-quality, I know they're not pirated, and I didn't have to do any of the work of sourcing, printing, and cutting out the images. But they're hard to buy online, and they're pricey! I would NOT have the collection of artwork cards that I do if I was paying a buck-plus for each of them. I mean, geez, my kid is going through twenty or so of these cards per chapter in just her current study! And that's not even counting the separate political art or history of photography studies that we've completed fairly recently, yikes.

So you've got options, but if you want the highest-quality, cheapest, most bespoke sets of artwork cards, you probably want to DIY them like I do. 

Step 1: Go through the study materials and select the images you require. 

I always pre-read the kid's textbook chapters so that I can collect additional resources and set up extension activities anyway, so while I'm reading her art history textbook I also note the artworks that are referred to in that chapter. Occasionally, there are also a couple that her history textbook refers to that the art history textbook doesn't, or I might want to collect different types of images referenced there, like the cuneiform tablets from the Mesopotamia chapter, or the Neolithic stoneworks from the Ancient Great Britain section. 

Step 2: Find the images online and save them.

There are three ways to find good images online. First is just to do a Google Image search and filter the results for Large images:

This is a screenshot from when I was collecting images for our History of Photography study, but the process is identical.

You'll often come across pirated images this way, but you're not using your images commercially, so I'll allow it, ahem. 

Another good way is a Wikipedia search, especially for more iconic artworks. You won't get any pirated images here, but you WILL get some lower-quality images, as many will be photos that contributors took themselves of the artworks in their museum settings. 

And then ANOTHER good way is to go directly to the website of the museum that hosts a particular artwork. A lot of museums do offer free downloads of digital images of many of their artworks. My special favorite is the British Museum, which will often let me download an image so high-quality that I can print it life-sized--I've done that for both the Rosetta stone and for several cuneiform and hieroglyphic pieces, and it's so cool and useful for detailed study! 

Here's one list of museums that offer open-source images, but it's definitely not comprehensive because the British Museum isn't even on it. 

Here's the British Museum's image site; I usually download or request the super-high-quality images, because why not! Wouldn't some large-scale Greek vase images look so awesome framed and displayed in my future Life of Theseus-themed bathroom?

Here's the Metropolitan Museum of Art's image site. I like that if you're not looking for a specific artwork, but rather a time period or style, you can filter your results by open-access so that everything you see is obtainable.

The National Gallery's image site provides open-access images and also provides many of the Wikimedia images. 

Here's the National Trust images site. Only some of these images are free, but there are images that work very well with British history and geography studies. 

The Smithsonian's image site pulls from all its museums and holdings across genres, so it's a great resource not just for art, but also historical artifacts and even primary sources. 

Step 3: Print and cut.

I prefer to print my images with a laser printer onto cardstock, because I want them to look and feel nice. To make the artwork cards a standard size, I print them four to a page--


--then cut them on a guillotine paper cutter:


I label the back with title, artist, date, and, for these art history cards, geographic location, and currently I have them filed by textbook chapter.

My teenager is also keeping a comprehensive ancient history timeline, so I print another set of these images as thumbnails onto regular copy paper, and then she glues them into her timeline and labels them. 

Okay, so how do you actually USE these artwork cards? There are so many ways!

  • Flash cards. Memorize the artwork, title, artist, date, and geographic location to add to one's working knowledge of art history. Having a ton of artworks memorized will make it easier for you to slot future pieces into your memory, and allow you to build context and make better comparisons/contrasts, add to your understanding of social history, and write some kick-ass essays, etc.
  • Sort and organize. Having these visuals at hand allows you to easily make comparisons about style and other features of artworks that may be less noticeable when each image is trapped in the pages of a specific chapter of your textbook. How do the early Native American earthworks compare to Neolithic European ones? How does portraiture vary, and how would you sort portraits stylistically when the images are separated from geohistorical context? 
  • Order chronologically. We play a lot of history card games in which we have to try to put something in chronological order. We have almost all of these Timeline games, but you can play the same game with art, and not only is it interesting, but it builds a chronological understanding of art on a sensory level.
  • Display. Once upon a time, a worker who was doing emergency repairs on our old, poorly-maintained, homeowner's special home came out of the kids' bathroom after installing a new toilet and asked me if I homeschooled. I was all, "Yes?" I thought it was the weirdest, most random thing for someone to figure out about me with zero evidence! But when I told this story to the kids later, they were immediately all like, "Um, it's because you tape educational posters to the wall facing the toilet?" Because riiiiight... when I want the kids to memorize something but I don't want to go through the emotional torment of MAKING them memorize something, I just print that thing out onto 8.5"x11" paper and tape it to the wall facing their toilet. I also once put tape onto ALL our things and made the kids label them in French and that's all still around, and every once in a while I printed out and assembled a giant line map of someplace we were studying, made them label that, too, and then hung it in the hallway until I was ready to make them study some other place. I also use pushpins to make little clotheslines across our bookshelves and I have the kids clothespin these art cards to them, and sometimes I'll display them on our magnet boards. I thought I was being sneaky like this, but apparently I wasn't, lol!

I should probably act like, since these images cost only the amount of the paper and the ink, and they're just cardstock, I'll recycle them when my last homeschooling kid graduates in a couple of months, but you know I won't. I won't have the kids to label me new giant maps for the hallway, so perhaps I'll retire them all permanently on display there!

P.S. Want to follow along with my craft projects, books I'm reading, road trips to weird old cemeteries, looming mid-life crisis, and other various adventures on the daily? Find me on my Craft Knife Facebook page!

Monday, March 4, 2024

Kid-Free in New York City: Day 3 is When We Go to the Library!

This whirlwind trip was, indeed, a whirlwind! Still reeling with excitement from Hadestown, the Rangers game, doughnuts, bagels, Van Gogh, karaoke-singing waitresses, and the view from the High Line, we got up early, checked out of the Republican stronghold, and set out for just a few more precious hours in New York City.

Even on a random Wednesday morning in February, all the other tourists in the city had the same idea, and so we all met up at Rockefeller Center:


Then all the tourists in New York City all headed over to FAO Schwartz together. My partner basically had to run a deprogramming campaign on me to convince me not to buy these SHOCKINGLY expensive and TINY stuffies for the kids, but I doubt it's going to stick since now I have the store's web address. Yes, this keychain-sized stuffed dragon IS LITERALLY THIRTY DOLLARS, but it's so freaking soft. This croissant purse is forty dollars, but it is a Croissant Purse. I don't even know what to tell you if you don't think that is worth dipping into your retirement savings for.

Ah, well. Stymied for the short-term, I let myself be dragged bodily from FAO Schwartz, and instead we, along with all the other tourists in New York City, headed for someplace that was actually free:


In its smartest move yet, the New York Public Library just went ahead and made an entire permanent exhibition out of its coolest stuff. As soon as we stepped inside, my partner and I essentially abandoned everything else on our to-do list for the morning (Sorry, Hamilton! I'll go check out your grave another time!) and stayed here until we absolutely had to leave for the airport. 

Beethoven's sheet music in his own handwriting


Manuscript page of The Secret Garden in Francis Hodgson Burnett's own handwriting


The real Winnie-the-Pooh and friends


I love their sweet little faces! I am devastated to tell you, though, that Roo was lost in an apple orchard...


Please pay special attention to my precious Eeyore. I took a lot of notice, when I was a kid, of how he wasn't afraid to show that he was sad, and how the creatures around him never seemed annoyed by that:


I love how well-loved they all look. I just wish that every now and then, maybe once a year or so, they'd get to come outside their box and play with some real kids again. 

Noah Webster's spelling book


manuscript copy of Ptolemy's Geographica

On this map of Greece there's a label for Hades, so apparently they knew where that was!


Hunt-Lenox globe

This globe's claim to fame is that it's one of only two from the Medieval OR Renaissance eras to include the label "Hic sunt dracones!" 


marketing materials for the Montgomery Bus Boycott

I'm so excited that I got to see this--this is the first time that I've ever seen real-life primary source materials from the Montgomery Bus Boycott in person! The handwritten ride-share flyer, in particular, is such a precious artifact.


typewritten poem "Malcolm X" by Gwendolyn Brooks

I've never seen this wealth of primary source material before. So many manuscript pages and works in progress! I'd be very interested to know if this was Gwendolyn Brooks' own typewriter, or if she had an assistant who did her typing. Either way, I'm fascinated by the noticeable wear on some of the letters--the "g", especially--showing their frequency of use.


Shakespeare First Folio

I used to work in a Special Collections library, so there were a few items here--the double elephant folio of Audobon's Birds of America, for instance, and this Shakespeare first folio--that I'm already acquainted with. But that just means that I could greet them with not the excitement of novelty, but the happiness of again spotting a well-loved old friend.


cuneiform

Here's another old friend--y'all KNOW how much I love cuneiform!


manuscript copy of Rachel Carson's Silent Spring

This makes me wish that I HAD made time to bring my now-collegiate environmental scientist here the last time we were in New York City, because she would have freaked out with excitement to see this. But I did get immediately onto my public library's website and put a copy of Silent Spring on hold to read when I got back.


first edition of A Vindication of the Rights of Woman

I didn't catch why, but the NYPL has an AMAZING Mary Shelley collection, including materials about/by her famous mother, Mary Wollstonecraft.


portrait of Mary Wollstonecraft

This painting, a copy of one that hung in baby Mary Wollstonecraft Shelley's family parlor, was commissioned by AARON BURR(!!!) for his daughter, Theodosia.


Gutenberg Bible

Another old friend! The Special Collections library where I once worked also had a life-sized model of a Gutenberg printing press that my kids could probably draw with their eyes closed, I've made them look at it so many times over the years.


handwritten manuscript of "Transformation," by Mary Shelley

I've never read this Mary Shelley work! I was so interested to see her handwriting and all of her in-text edits.


Frankenstein first edition

This was one of only 500! Not shown here but also on display: literal fragments of Percy Bysshe Shelley's skull(?!?).


the Green Book

Another primary source first for me! My teenager has been so interested in African-American history during her AP US History study this year that I wish she could have seen some of these materials in person, too.


SO MANY COOL THINGS!!!! In the end, only my horror of not showing up at the airport far too early for my flight got me out of that library. 

After dragging myself, weeping, out of the NYPL, my partner and I bought some bagels to take home (once again, we did not check our order before we left the store, and once again WE GOT SHORTED BY A BAGEL?!?!), rode the subway to the train and the train to the airport, got screamed at and patted down only a little at security, and then made our way back home to chickens, cats, dog, and one teenager who in our absence had kept up with her schoolwork and ballet, maintained the house and pets in excellent condition, and tbh did not seem super excited to have her quiet haven wrecked by our noisy excitement and cluttery luggage.

She was happy to see the New York bagels, though!

P.S. Want to follow along with my craft projects, books I'm reading, road trips to weird old cemeteries, looming mid-life crisis, and other various adventures on the daily? Find me on my Craft Knife Facebook page!