Saturday, May 30, 2020

How to Latch Hook


This post was originally published on Crafting a Green World.

If you had a grandma who lived in the south in the 1980s, it's quite likely that you already know how to latch hook.

You might think that you don't remember lying on the living room carpet, working on a Rainbow Brite latch hook kit while your grandma sits in the recliner behind you and watches 60 Minutes, but I assure you that once you pick up a latch hook, it's all going to come flooding back to you.

There's one big difference, however, between this project and those awesome 80s kits, and that difference is what makes getting back into latch hooking a terrifically eco-friendly activity: whereas latch hook kits almost universally use acrylic yarn, the latch hook creation that you make yourself, from a pattern that you create yourself, can use ANY YARN YOU WANT. Any yarn! Wool yarn! Plarn! Cotton yarn! Or, my favorite of all yarns to use--STASH YARN!

Latch hooking is a fabulous stash-busting project. Creations can be as big or small as you want, with pile as short or long as you like, meaning that you can find a way to reuse any amount of leftover yarn.

Supplies & Tools


Here's what you need to get started:

  • Rug canvas. This is a mesh canvas, ideally 100% cotton, that's stiff and sturdy and able to stand up to heavy usage. Use your least precious scissors to cut it to size! Rug canvas isn't all you can latch hook on, however. Any mesh, such as produce bags or plastic canvas, is workable, providing you use the appropriate size latch hook.
  • Latch hook. The standard size of latch hook that you can buy online, at any larger craft store, or in a latch hook kit will work for rug canvas. If you want to play around with smaller canvases, use a smaller latch hook.
  • Yarn. My yarn stash is upsettingly large, which is largely why latch hooking is so appealing to me at the moment, and my solemn vow is to use ONLY my stash until it's mostly resolved. You, however, can use any standard-weight yarn that appeals to you. Cotton and wool are both great choices, but you can also play with bulky blanket yarn if you size up your canvas accordingly.
  • Template To Measure Yarn. Your template should be half the desired length of yarn. Cardboard is the ideal material.
  • Scissors.
  • Thread and a tapestry needle.


Directions


1.  Measure And Cut The Yarn


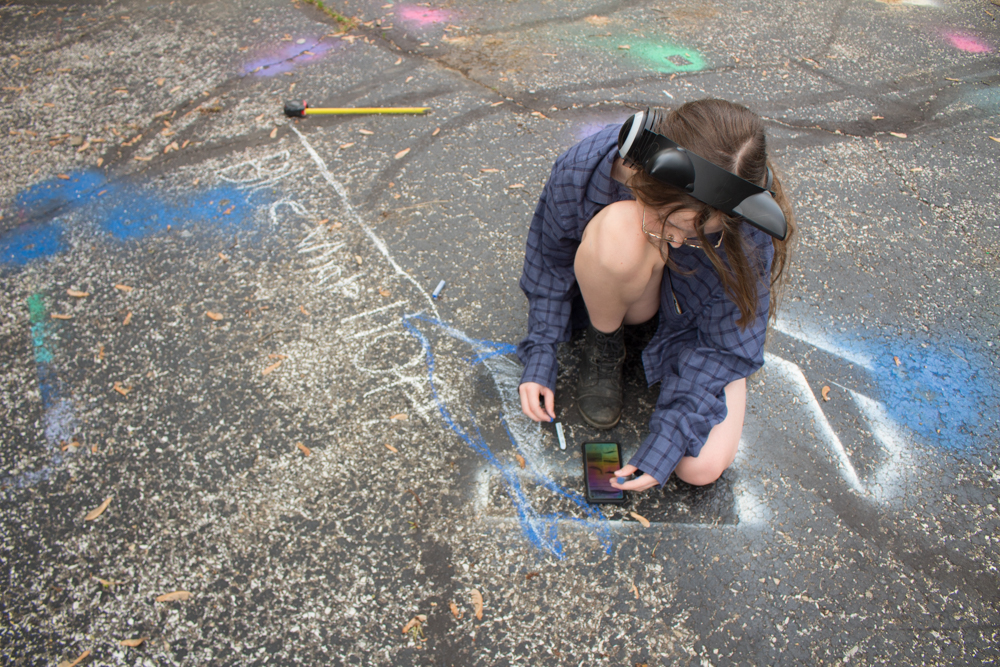
In this post's top image, the yellow and blue piece is made from 2" yarn; the purple and blue piece is made from 4" yarn. The process of latch hooking will halve that length, plus take away another fraction of a centimeter for the lark's head knot.


Cut your template to be as wide as the desired final length of nap of your project. To make the yarn pieces, wrap the yarn a zillion times around the template, and then cut straight across one side. You'll be left with a zillion pieces of yarn that are exactly twice as long as your template is wide--perfect!

2. Cut Your Rug Canvas To Size And Transfer Your Design


Cut the rug canvas at least .25" to .5" wider on all sides than you'd like the finished size to be, so that you have room to fold and hem the raw edges later.

It's possible to draw a design directly onto the rug canvas, although I've never found a material that works perfectly for this. Chalk rubs off, pencil rubs off more slowly, Sharpies smudge... try a few possibilities, and see what works best for you.

3. Begin Latch Hooking!


There are a few slightly different methods for latch hooking, but this is the way that my grandmother taught me. If it doesn't start to feel intuitive to you after a few tries, snoop around the Internet and see if you like someone else's method better. Hold the latch hook in your dominant hand, and use your non-dominant hand to double up one piece of yarn.


Wrap that yarn around the latch hook, and hold both the latch hook and the yarn in your dominant hand.


Push the tip of the latch hook underneath the strand of mesh that you want to attach the yarn to. This step can be a bit tricky, so mind that you don't snag the mesh with the latch.


Open the latch, then use your non-dominant hand to draw up that loop of yarn. Both strands of yarn should be pulled to one side of the latch, then the other way around the hook.


Pull the latch hook back out of the rug canvas. You might have to keep hold of the ends of the yarn at first to maintain tension, but then the latch will close itself as it's pulled through the canvas, and the hook will pull the yarn out with it.


What you're left with is a perfect lark's head knot! You can pull the ends of the yarn to tighten it, and then go on and make a billion more!

4. Hem The Raw Edges


When your creation is finished, turn it over and observe how lovely it looks from the back! All that's left is to hem the raw edges. Thread a tapestry needle with a thick thread or embroidery floss.


Fold one raw edge over so that one row of canvas lines up with another, then hem the canvas by catching just those horizontal strands of canvas with your thread.


Continue this for all sides of your creation. If you don't sew, you can also bind the raw edges of your project with iron-on fold-over binding (there's some especially made for rug canvas!), or, if you don't anticipate your creation being machine washed or put to heavy wear, just hot glue it, Bro!


The possibilities for latch hook creations are endless! Yes, you can make actual rugs, but wall hangings are also popular, as are pillow covers. I've seen wreaths, tote bags, and chair covers, and I'm nearly positive that someone in my family had a pair of latch hooked slippers back in the 1980s. If you, too, hung out with a Southern grandma back in the early 80s, please tell me what YOU latch hooked!

P.S. Want to follow along with my craft projects, books I'm reading, road trips to weird old cemeteries, looming mid-life crisis, and other various adventures on the daily? Find me on my Craft Knife Facebook page!

Thursday, May 28, 2020

Homeschool Science: Would a Blue Whale Fit in Your Driveway?


It would in ours!

Although, to be fair, we DO have a really long driveway...

Measuring whale lengths was the very last activity that I wanted the kids to complete to earn their Girl Scouts of Hawai'i Aloha fun patch, way back when it was actually a unit study based on our 2019 vacation to Kauai!

We just never got around to it last summer, though, and once autumn hit we had so many autumn things to look forward to that it was less tempting to dive back in. Now that we're spending so much more time on our property, however, and ESPECIALLY now that Will's AP exams are over (yay!), we actually do have the time to dive back into some of our unfinished business... and finish it up!

This activity was loosely based on the time that we drew life-sized dinosaurs all over a local park's basketball courts. My dream *had* been to go back to the basketball courts and draw life-sized whales, but we obeyed our governor's strictest stay-at-home order to the letter, and so to modify the activity to be able to be done on our own property, I wondered if we could measure life-size whale lengths on our driveway, and then just draw models of the whale next to its measurement.

Reader, we COULD!


I swear, these Smithsonian Handbooks are some of the best homeschooling resources that I own:


We have a whole stack of them. We used them constantly from the time the kids were toddlers... to today!


The kids each chose a couple of whales that interested them (fighting over who got to pick the narwhal, because OF COURSE), then I helped them measure that whale's length on our driveway.

Once they got the length measured, they focused on drawing a good model of their whale and learning its gross anatomy and some facts about it to share with everyone.

Here's Syd working on her blue whale, which does, indeed, just fit in our driveway!


I think everyone's favorite part of homeschooling is how we can interact with and love on our pets all day. They seem to know when the kids are doing something especially interesting or unusual, and they always want to join in!


Both kids really enjoyed this project!


Ah, here's one thing that I do NOT so much appreciate about homeschooling. Guess who's fighting again?


Someone threw a piece of chalk at her sister, and someone else kicked her sister. It's fine.


I also like homeschooling because generally, we're pretty chill about distractions here. Want to take a break from memorizing whale anatomy to chalk your father's freshly-washed hair?


It's art!


Spots also participated in Homeschool Art, which is what she gets for lying down on somebody's chalk rainbow:


Eventually, the kids remembered their whales, and finished their whales, and we all took a whale walk along the length of each whale, and then listened as each kid explained interesting facts about that whale's life and significant details of its anatomy:


And that's how we finally finished our unit study of Hawaii!

Eleven Years Ago: Wildflowers, Interpreted
Twelve Years Ago: At Last, a Tie-Dyed Quilt!

Tuesday, May 26, 2020

I Bought a Vintage Disney Puzzle off of Ebay


So, you know, that's about how I'm doing during this pandemic!

I've actually been looking for this Disney Fantasy puzzle, manufactured in 1981, for decades. I don't really remember gobs and gobs from my childhood, but one of my most vivid--and happiest!--memories is working this puzzle with some of the adults in my life at my grandparents' giant wooden dining room table.

The funny thing is that I remember the puzzle being super challenging--like, it had EVERY Disney character on it! So many Disney characters!--but I was probably only about 5 or 6 years old. 

And the puzzle actually only has 300 pieces!

Fridays after our school day and Matt's work day have ended are what I've come to think of as Happy Hour. I set up a new puzzle and a podcast (Welcome to Night Vale or The Magnus Archives are current family favorites), or some coloring and an audiobook (we're currently medium-way through Dracula), or just crosswords and Syd's Spotify playlist (she's no longer heavy on the Billie Eilish!), and, most importantly for getting the kids' buy-in, SNACKS. Matt makes the adults cocktails, and we just hang out around the table and chill. 

It turns out that a 300-piece puzzle is just about perfect for chilling around a big table on a Friday night, with margaritas and Cheez-Its and Zebra Cakes (because SNACKS!).


It took one to two adults and one to two kids about two-and-a-half hours to put together this puzzle--


--and it's just as adorable and interesting as I remembered!

Syd asked, "Where are all the princesses?", and that's one of the most interesting things, because in 1981, there weren't many princesses! 1981's Disney was still very much associated with anthropomorphized cartoon animals:


Alas, all the racist characters are present--see the crows from Dumbo? And the Br'er animals from Song of the South?


But you've also got some pretty deep cuts from the other Disney cartoons. When is the last time you've seen Clarabelle Cow?


Syd also noticed this one--why the snot is Tinkerbell's dress PINK?!?


Ugh I love it SO MUCH!!! I don't know what happened to the one that I had when I was six, but this one I am keeping forever, and I am FOR SURE going to put it together again while watching Disney movies when we buy a month of Disney+ later this summer (HAMILTON IS COMING TO DISNEY+!!!!!!!!!).

But only the movies that came out by 1981. And not the racist ones.

I'll let you know what color Tinkerbell's dress is!

P.S. If you, too, remember liking Disney circa 1981, this 1981 Disney newspaper is hella cool. I *might* have gone to Disney World the first time around then (although the only thing that I remember about that trip is the Main Street Electrical Parade, particularly Pete's Dragon scaring the shit out of me), so it's interesting to see what was going on!

Sunday, May 24, 2020

Wood-Burned Popsicle Stick Plant Markers


Our spring is so rainy, and our property so much wants to be a marsh, that the opportunities to actually get out and get seeds into the dirt during that precious getting-seeds-into-the-dirt window are few and far between, and you have to jump on them when they appear.

Like, you're just looking out the window, minding your own business, and you're all, "Oh, sun! Hey, there was some sun yesterday, too, so maybe if I go out in the yard I'll only sink up to my ankles in mud, not my thighs! I should go plant ALL THE THINGS!!!"

That's how, a couple of weekends ago, I ended up in a frenzy of planting all the things (not ALL the things, because we weren't far enough from the last frost to plant the sunflower seeds, but definitely all the OTHER things!), and I discovered that I needed some plant markers, stat!

I don't expect these popsicle stick plant makers to last beyond this season, because popsicle sticks aren't terribly hardy, but they turned out to be exactly what I needed at the moment I was in need:


I'm moving most of my garden plots around AGAIN, so since these popsicle sticks take just a couple of minutes to wood burn, it was easy for me to be all, "Okay... I think I'll try the radishes here this year and then the carrots can go here and, why not, how about I stick another row of radishes behind them," and then pop inside and quickly make the markers and put them in the ground before I forgot which was which and what I put where:


I already have a nice, bark-free stick saved up from a recent hike in our woods to wood burn something a little nicer for the perennials, but honestly, I'll probably just throw those radish and carrot markers in the fire pit when I'm through with them...

... because they clearly can't go back in the same garden plot next year, as Spots would rather sleep in it. Le SIGH!!!

This sage is from a pack of old-ish seeds that I found. I'm SUPER excited that it's growing!

I move this pot of catnip to a new hiding spot every time a cat finds it, because otherwise they'll eat it to the ground and then they won't have anymore catnip!


I'm excited about my little garden this year, because this is probably the first year since I've gardened that I won't be going away at all, and therefore I can dote on it all summer long. No chance of coming home after two weeks to a half-overgrown, half-dead, totally weedy plot that's been invaded by every rabbit within two miles!

I mean, I'd rather have the big trip that I planned with my Girl Scout troop and a ratty garden, but at least I get carrots and radishes and tomatoes and basil along with my miserable frustration and disappointment.

P.S. Want to follow along with my craft projects, books I'm reading, road trips to weird old cemeteries, looming mid-life crisis, and other various adventures on the daily? Find me on my Craft Knife Facebook page!