Friday, June 12, 2020

How to Sew a Cloth Face Mask with Ties

That's poison ivy on his neck, the poor dude. The two indoor/outdoor cats like to rub against it, then come inside and rub it all over us! In our family, a poison ivy rash is just proof that a cat loves you.

Here is how to make my absolutely perfect cloth face mask with ties instead of elastic!

I took my general sizing from the CDC's recommendation of cloth face coverings, but I took the length down a little, because that extra fabric isn't really doing any extra work. I also adjusted this face mask from my elastic face masks, making the pleated sides more professionally finished and reducing some bulk by doing away with now-unnecessary side seams. 

The result, I think, is a mask that's quick to sew, sturdy and washable,  comfortable and adjustable to a range of sizes.

And although I hate having to see my loved ones wearing face masks, I think these look very nice!

To make this cloth face mask with ties, you need the following supplies:
  • cotton fabric, two pieces that measure approximately 8"x 6". Quilting cotton is my preference for this, although any fabric around that weight should work, for instance most polyester/cotton blends, linen, or silk. I personally think that jersey knit is too light and denim is too heavy, although I have seen homemade masks sewn from both.
  • double-fold bias tape, 1/4"x 2 yards. I'm less picky about the bias tape, mainly because pre-made 100% cotton bias tape is hella expensive and making my own is not the way I want to spend my afternoon. I'm very happy with this bias tape, which is a polyester/cotton blend that I've bought for years from the same supplier
  • Matching needle and thread. My sewing machine is CRANKY, so I'm also picky about needles. I use a jeans needle for this project because my sewing machine protests the bias tape otherwise. For sewing just the two pieces of quilting cotton together you can either test the jeans needle first on scrap fabric and adjust the thread tension, because otherwise it's a little overpowered, or switch to a universal needle
  • iron
  • measuring and cutting supplies.

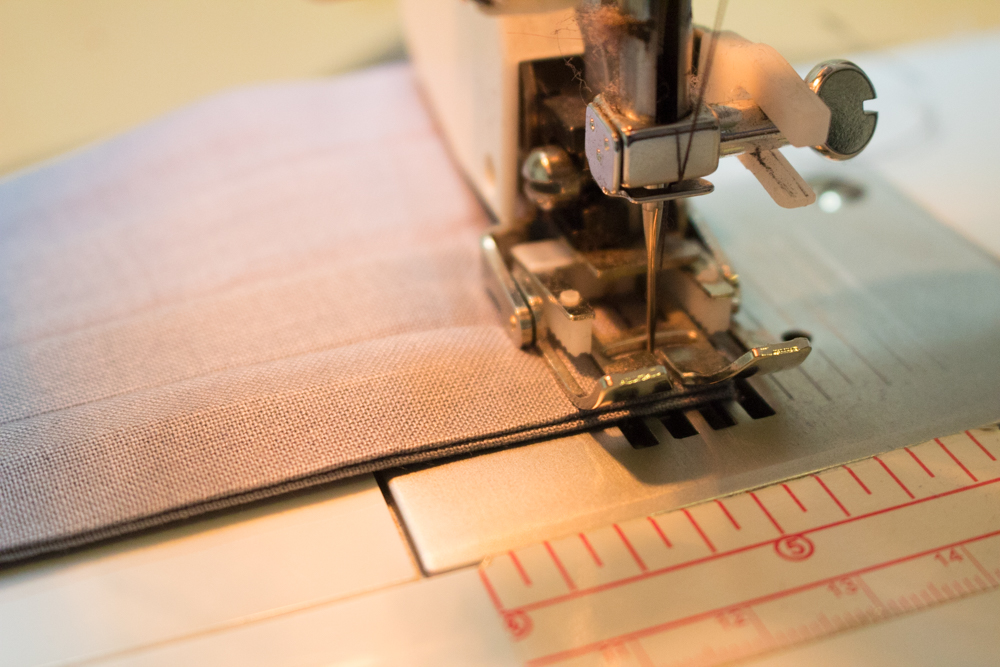
1. Facing the two pieces of 8"x 6" fabric right sides together, sew down the two long sides. I like a 1/4" seam allowance for this. I also like to use up my weird thread for these types of seams, since you'll never, ever see that thread on the finished mask.


2. Turn the tube that you've made right side out, and iron flat. Run your finger down the seams from the inside, first, to press them outwards so that they're nice and precise when you iron:


If you do that, there's no need to edgestitch those long sides to keep the seam neat. You've just saved yourself a step!


3. Fold and iron the pleats. I like the pleats to be as even as possible, so here's the best way to do it:
  • From the bottom of the fabric piece, measure up and mark in chalk 1", then 1.5".
  • Fold the 1.5" line down to meet the 1" line. Iron to crease. If necessary, pin it to keep it in place.
  • On the back side of the fabric, the top of that pleat should measure 1" from the bottom of the fabric. From that point, measure up and mark in chalk another 1".
  • Fold the 1" line down to meet the top of the pleat. Iron to crease. If necessary, pin it to keep it in place.
  • On the back side of the fabric, the top of the highest pleat should measure 1.5", and there should be about 1.5" of unpleated fabric above it. Measure up and mark in chalk 3/4" from the top pleat.
If you don't have 1.5" of unpleated fabric above that top pleat, don't freak out! Just measure up and mark in chalk the halfway point.
  • Fold the chalked line down to meet the top of the highest pleat. Eyeball to see if the top of the fabric now matches the bottom. If not, adjust it a little so that they look even, then iron to crease. If necessary, pin it to keep it in place.
4. Baste both short sides to keep the pleats in place.


As you can see, you can still use whatever color thread you're looking to get rid of!


If your pleating has skewed the short sides a little, trim them to square them off.


5. Cut your bias tape in half. Now, you should have two pieces that are each one yard long. Fold each in half, iron to crease, then unfold.


6. Sew the bias tape to the short sides of the mask. NOW you need to switch to thread that matches your bias tape!

Match the center crease of the bias tape to the middle pleat on the face mask on each side, and pin into place.


Sew the bias tape closed down its entire length. If you're worried about the fabric feeding unevenly, you can start sewing at the top of the fabric mask down to the bottom end of the bias tape, then reverse it and sew the top tie closed.

Knot the end of each tie, if you like, and then try it on for size!


Here are the approximate finished measurements of the face mask:


This face mask should fit most adults and teens, and even most tweens, but sometimes for smaller faces all that fabric can feel claustrophobic. Next week, I'll show you how to size the face mask down to fit big kids and little kids.

And if you don't want to make your own face mask at all, you can buy a face mask from me. I'll even let you pick all your own colors!

Thursday, June 11, 2020

New for Summer on Pumpkin+Bear: Doll Candles, and Face Masks for Everyone (Including Dolls!)


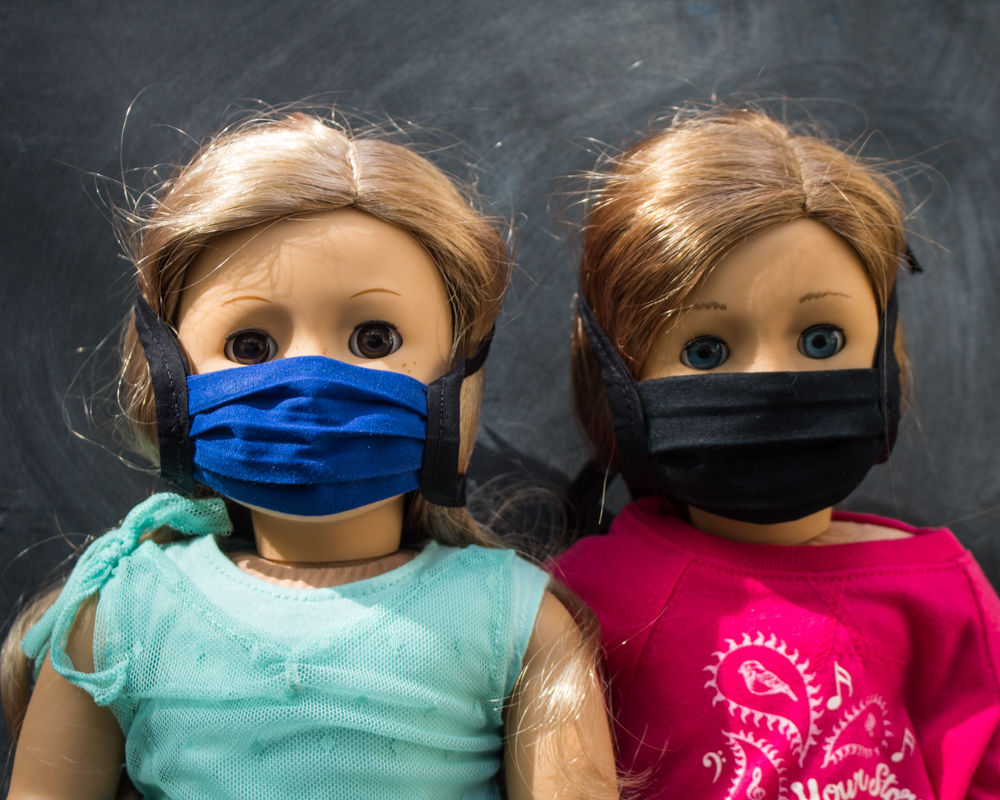
The only thing that hurts my pandemic-sore heart more than seeing a child's doll in a face mask is seeing that child, herself, in one:


But if they've got to wear them, they're going to be as sturdy and well-sewn as I can make them, and as close to as exactly what the children want as I can manage.

I don't know if I've ever spent that much time getting a pattern absolutely, exactly right. It's an improvement even over the elastic face masks that I was also super happy with, until the elastic started bothering my ears and I decided that the side seams needed more of a finished look.

As usual, bias tape to the rescue! These face masks with bias tape ties aren't quite as grab-and-go as the elastic ones, but even so, tying the ties only takes a few seconds, and these masks are much more forgiving in fit. Syd, for instance, had to have my original elastic band mask adjusted to fit her, but she can easily wear these bias tape face masks in both the Big Kid size, which is that hot pink mask she's modeling in these photos, and the Adult size, which is what I actually sewed for her.

Black on black, of course.

And here's her doll's mask to match, now listed in my Pumpkin+Bear etsy shop, where you can choose to have me make your doll a face mask in your favorite colors, too!


Will is, in fact, modeling her own mask, sewn in the exact colors she requested, and here's HER doll's matching mask:


Sisters!


It can be tricky to make proportions look correct in doll sizes, so I'm pleased that the bias tape that I'm using looks good with both human and doll masks--


--and since I'm working only in solid colors, not patterns, I don't have to worry about prints looking oversized on the dolls.


Here's my assistant and costume designer at work:


And then I snookered Matt into modeling my Adult mask, grey on navy, and additionally snookered him into letting Syd gel his hair for the photos:


I sew the human face masks, also available in custom colors in my Pumpkin+Bear shop, in three sizes, to better fit all the humans I can think of. I've got Adult masks--


--Big Kid masks that I think should work for most kids ages 7-12 (and older, as you can see!)--


--and Little Kid masks that I think should fit most kids who are old enough to wear a mask through at least age seven:


My etsy listings include all of my exact measurements, though, and so whenever possible, I recommend that you measure your human first.

I'm sewing all of my masks, human and doll, as custom orders, which means that when you order you can pick the exact color of bias tape (a poly/cotton blend)--


--and exact color of mask fabric (100% cotton):


The bias tape and fabric match closely, so you can go completely monochrome if you want, but the mask is double-sided (and reversible!), and there are two sets of bias tape ties, so if you want a different color for everything, that's a totally reasonable jam and I'll make it for you.

My other new listing is completely unrelated to the pandemic--whee! I was looking through some photos of busy summers back in the Before-Times, and I found a whole photo shoot that I did with Syd while Will was at Space Camp one summer. We had a birthday party for her dolls, wherein she baked and frosted a doll-sized cake, and I made a rainbow of doll-sized candles for it:

It was magical:


Is it possible that I did not understand at the time what a precious and small fairy child I had? I can't have possibly treasured enough my time with this magical little creature. I mean, you guys. She made a TINY BIRTHDAY CAKE. FOR HER DOLLS. AND THEN SERVED IT TO THEM ON DOLL-SIZED DISHES.

I can't even.

A friend and I have this shared fantasy, in which time travel is invented, and we each go back to find ourselves on some hard day we were just about to have with two very young children. You know, one of those days that just dragged on, where the kids kept wanting books read to them and getting all their clothes dirty and you'd trek outside with them to the sandbox and then back in for a snack, get out the play dough and then read fourteen books, tromp them all to the park and then back home for some coloring, and you'd look at the clock to see if it was maybe almost time for your co-parent to get home and see that it was something like 10:00 am and sigh and make another snack.

So, we're each going to show up at our old houses on one of these mornings, and our old selves will of course recognize us, because we're US, just old, and we'll tell our young selves to take the day off, have a nap, order a pizza and eat it while reading a book, etc. And they'll go off to do that, having no problem leaving their kids with us--because, you know, it's US--and we will spend that long, tedious day absolutely treasuring the chance to be with those precious and small fairy children again. We'll read them picture books! And change their tiny little clothes! Dig with them in the sandbox! Make them a plate of cheese cubes and strawberries! It's a win-win situation, ideally to be repeated weekly.

Until time travel is invented, I guess old photographs will have to do. 

Oh, and there are rainbow doll candles now in my Pumpkin+Bear etsy shop.

Saturday, June 6, 2020

I Made a Jewelry Organizer from a Vintage BINGO Game

I first published this tutorial on Crafting a Green World.

I originally bought this vintage BINGO game from a thrift store when my two kiddos were a toddler and a preschooler.

Fun fact: EVERY little kid loves BINGO, and this game stayed in heavy rotation on our games shelves for a shocking number of years. Heck, we still played it even after we lost a couple of the numbers. Knowing that some numbers will literally never be called just adds to the challenge!

My little kids are teenagers now, and their plan for the ultimate game night is no longer BINGO but Cards Against Humanity (don't tell them, but I took out all the really awful cards before they saw them, mwahaha!). Normally, I'd happily donate something that we no longer use to another thrift store for someone else to discover and love for another decade, but my philosophy is that I do NOT donate something that's broken or has missing pieces.

Not only is it a waste of effort and space to put that thing on a thrift store shelf, but it's disrespectful to the person who might then buy it and be stuck with it. And what if they're frustrated and decide that it's not worth it to buy secondhand anymore? Then you've just done a disservice to the entire planet, all because of one BINGO game!

I spend a lot of time carrying around potential anxiety. It's a thing.

tl;dr: a super-old BINGO game that's missing some vital pieces is not something that you donate. It's something that you upcycle!

The first project on the list: I turned the vintage BINGO board into a jewelry organizer. It was a quick and easy project and it turned out great. Here's how I did it!

Supplies


You will need:

  • Vintage game board with pegs: You'd be surprised how many board games include plastic parts that would work for this project. If you've got an old Trouble game or some Hungry Hungry Hippos, then you're all set. Want to get crazy? Throw up a dartboard with darts!
  • Paint (optional): You can embellish your jewelry organizer any way you'd like.
  • Sharpies: Sharpies draw on plastic like a dream, so a Sharpie is a great choice for adding enough color to allow the embossing on this BINGO board to stand out.
  • Picture Hanger: Since I'm using this as a jewelry organizer, I upcycled a couple of jewelry findings for this. If you're looking for the cheapest solution possible, paper clips are totally valid picture hangers, I declare.
  • Hot Glue: Hot glue also works well on plastic.

Directions

1. Scrub Your Vintage Game Board

This BINGO board was actually really gross, once I stopped playing with it and instead took a good, close look at it. Fortunately, some dish-washing soap, a scrub brush, and time to air dry put it to rights.

2. Use A Sharpie To Highlight Details

As you can tell from my photos, all that white on white is just about impossible to photograph, and it's just as impossible to see the details of. I wanted all the little numbers, especially, to stand out clearly, which means that I had to add the contrast myself. I traced over all of the embossings with a navy Sharpie.

Don't the numbers stand out so much better afterward?

3. Clean Up Any Sharpie Mistakes

If you get Sharpie somewhere you don't want it, the secret is to remember that a permanent ink still has to be soluble in something, or it wouldn't be a liquid. With Sharpies, the liquid that the ink is soluble in is plain old rubbing alcohol.

That means that if you don't want that Sharpie ink somewhere, you just have to wet a cotton swab in rubbing alcohol and gently dab the stain away.

It's magical (Psst! Don't forget to only buy biodegradable cotton swabs!)!

After the rubbing alcohol is dried, you can also seal your jewelry organizer if you really want to. I didn't seal this project because it's not going to get any hard wear, and if it randomly does, the Sharpie is easy to reapply.

4. Add Hangers To The Jewelry Organizer

Since the BINGO board is so light, this was another thing that I could play around with. I hot glued brooch clips to the top of the BINGO board, and then just clipped them onto the nails to mount my new jewelry organizer.

This DIY jewelry organizer is working really well for me, although if I'd been less selfish, I'd have put it in the kids' bathroom instead. Don't you think a game board jewelry organizer would look especially cute in a teenager's bathroom? The next time they're in a major snit about something, a little whimsy might remind them to chill out just a tad.

Or maybe that's just wishful thinking. I'll let you know if my whimsical jewelry organizer keeps ME from wallowing in my next major snit, okay?

If you've got any cool ideas for upcycling BINGO numbers or BINGO cards, please share them with me in the comments below. I mean sure, I've given a new life to one part of this old game, but there are lots more left to remake.

Thursday, June 4, 2020

Our Hawaii Study: Round-up and Resources (Repost)


I published my first round-up list of our unit study of Hawaii back in 2015. Last year (okay, we actually only finished it up a couple of weeks ago, but we STARTED it last year!), the kids and I accomplished another unit study of Hawaii, and it was just as fun with older kids doing more advanced work.

Instead of making two separate unit study write-ups, I went back and revised my 2015 blog post on our Hawaii study to reflect all of the new activities that more advanced students can do, and the specific areas of interest to older students. 

This is that blog post!

This is an overall roundup of two different unit studies that the kids and I have worked through on the topic of Hawaii over the years. The first time we studied Hawaii was in preparation for our first visit there in 2015, when the kids were around the ages of nine and eleven.

The second time we studied Hawaii was in preparation for and after our second family visit to Hawaii, and specifically for the purpose of earning the Girl Scouts of Hawai'i Aloha fun patch. Earning the fun patch is really... well, fun!... but if your kids are older or have studied Hawaii before, then the requirements to earn it may not seem rigorous enough. I adjusted the requirements to be more rigorous and challenging while still fitting the eight themes that the patch program covers, which I'll tell you about below. You still want to follow along in the official patch program guide, because it contains valuable information written by the Girl Scouts of Hawaii to other Girl Scouts around the world, but you can substitute the actual activities.

Here we go, then!

1. Geography and Geology of Hawaii

A good beginning goal for a unit study is to memorize the location of Hawaii on a world map, to memorize the state symbols associated with Hawaii, and to understand the geology that has shaped it--and is continuing to shape it!

One of the larger geography activities in this section meets the Kaua'i requirement for the Aloha fun patch.

A. map of Hawaii

I printed out a giant map of Hawaii from Megamaps, and taped it together for the kids. They then painted the ocean and labeled the eight major islands:

I put their map on the wall and we used it for daily memory work to help the kids memorize the islands. 

When the kids did this project again in 2019 (because yes, giant mapmaking is still fun for thirteen- and fourteen-year-olds!), they were able to complete it entirely independently, and with this list of instructions giving them further locations to map to research, identify, and label:

1.       Label each island.
4.       Label the ocean.
5.       Label the following landmarks:
a.       Volcanoes National Park
b.       Hawaii’s state capital
c.       Pearl Harbor
d.       Pipeline
e.       Mauna Kea
f.        Mauna Loa
g.       Princeville (our resort!)
h.       Waimea Canyon
i.         Ka Lae
j.         Wailua River
k.       Napali Coast

In both studies, when we read about any interesting geographical feature of Hawaii, or made plans to visit some place such as Ka Lae, the southernmost point of the United States, I had the kids mark and label that site on the map. I think it helped orient them somewhat during our visits.

In preparation for each visit to Hawaii, I had the children look through several guidebooks to see what they wanted to visit. They actually enjoyed this activity more, however, when we were in Hawaii--how fun to look through a guidebook, point to something, say, "I want to go there!", and have the magic tree house rental van take you there right then!

If you want to focus on the ocean around Hawaii, the Blue Planet episodes "Coral Reefs" and "Coral Seas" are fantastic. Here's an interesting and simple demonstration of salt water vs. fresh water

B. Hawaii state symbols

I had the children memorize Hawaii's capital, and I printed this Hawaii state symbols coloring page for them to complete, although I had them research images of each of the symbols to get the colors correct, not just rely on the printed legend. And yes, we had to look up the pronunciation for many of the Hawaiian things that we studied! Here's how to pronounce the name of Hawaii's state bird.

In the process of this research, the big kid became very interested in the Hawaii state capitol building. We'd have gone to visit if it had been in session, because she really wanted to see the representatives wearing Hawaiian shirts! The state capitol building's web site does have some activity books for children, although we didn't use them.

C. Volcanoes

The goal for this unit was to give the children a good working knowledge of the science and geology of volcanoes. 

One of these volcanoes activities meets the Hawai'i requirement for the Aloha fun patch.

The kids watched BrainPop videos on volcanoes, earthquakes, and tsunami, taking the quizzes and completing the accompanying worksheets. The big kid and I used my DIY bendy yarn to mark the location of the Ring of Fire on our big world wall map, even though Hawaii's volcanoes are actually not due to the Ring of Fire.

Our underwater volcano demonstration works particularly well, as this is how the Hawaiian islands were formed. You can also make a gelatin volcano to model how eruptions work. And if you've never made a baking soda and vinegar volcano before, now is the time!

To see real volcanic activity really in Hawaii, check out these volcano webcams.

To connect Hawaii's history of volcanoes to its particular geography, make a corrugated cardboard topographic map of the Big Island. Those mountains are volcanoes!


If kids are very interested in the process of Hawaii's formation, here's a much more detailed and sophisticated lesson

We used these geography and geology resources:

2. Hawaiian culture

I knew that the kids were going to see some really inauthentic, touristy versions of Hawaiian culture on our trip, and that's fine, because those are iconic parts of a Hawaiian vacation, but I wanted the kids to also have an understanding of real Hawaiian culture and its value to the Hawaiian people.

If your kids are younger or like paper dolls, there's a Hawaii set in this cute collection. Might as well print all the dolls and explore all their cultures!

Here's a good place to start exploring Hawaii's myths and legends. Do more research on the specific ones that interest you.

A. Hawaiian language

It's important to understand that Hawaii has its own native language and native speakers of that language, especially because at one time native Hawaiians were actively dissuaded from participating in their own culture.

One language activity meets the Ni'ihau requirement for the Aloha fun patch.

I wanted the kids to understand that Hawaii has its own native language, one that is still very much alive on the islands, and I also wanted the kids to have a go at learning some words and phrases. To that end, they both spent several weeks working daily through the first lessons in Mango Languages: Hawaiian. I won't go so far as to claim that they're in any way conversational, but it was an excellent way to get them to immerse themselves in Hawaiian writing and pronunciation. Here they are practicing!

There's a terrific YouTube channel dedicated to teaching the Hawaiian language. We watched all of their videos several times, including this one, our favorite:


B. Hawaiian music

It's fun to listen to traditional Hawaiian music, but don't forget the musical artists who are Hawaiian, no matter the genre they perform in. Music is also a good segue into studying other aspects of Hawaii's history and culture.

One music activity meets the Kaho'olawe requirement of the Aloha fun patch.

I have a free account on Spotify, and I used it to let the kids listen to loads of Hawaiian music. Here's my Hawaii playlist with our favorite Hawaii-themed songs. This song, in particular, is the telling of the Hawaiian creation myth that we saw in the Bishop Museum.

If you want to make your own music, here's a great lesson on the 'ili'ile and how to use them. The ukulele is also an accessible and fairly affordable instrument. The little kid was interested in learning, so I bought her this ukulele and this tuner, and off she went!

C. Hawaiian dance

To begin a study on hula, we found this intro video to be helpful. We then spent most of one morning watching YouTube videos from the Merrie Monarch festival, the world's premier hula dancing competition. Make sure that you watch performances by both women's groups and men's groups! We also did these hula tutorial videos together, and although the little kid, surprisingly, did NOT enjoy them and in fact left the room in a strop, the big kid, surprisingly, LOVED them and happily danced along with me. This was actually really great, because there was a hula tutorial at our luau in Hawaii, and she happily jumped right in, with the background knowledge that she likes doing the hula! If you're not planning to visit Hawaii, an excellent enrichment activity would be having the kids help plan an at-home luau, complete with roasted pork and hula dancing.

D. traditional foods of Hawaii

Hawaii has a fascinating food culture, not just of traditional dishes but also of dishes influenced by its immigrant cultures, by the crops grown by colonizing forces, and by foods eaten during wartime scarcity.

One traditional foods activity meets the Lana'i requirement for the Aloha fun patch.

Whether or not you get to actually go to Hawaii and eat the real deal--sushi! Spam! shave ice!--making at-home versions is really fun. You could make sushi, play with recipes that include Spam, learn about macaroni salad, or make your own shave ice. Do NOT forget the snow cap!

Kona Coffee is a huge deal on the Big Island. We toured Greenwell Farms during our trip, and I highly recommend it, but their website also has some great educational videos on coffee farming. Good enrichment activities for that would be teaching the kids how to grind coffee beans and make you a delicious cup of coffee, or baking a coffee cake or another treat that includes coffee as an ingredient.

The Aloha fun patch guide has instructions for hosting a luau, including recipes for what to serve. We did this for a family dinner one night and had a delicious time eating crock pot Kalua pork, haupia, and coconut cake.

E. sports and games

Surfing is an important part of Hawaii's history and culture, but there are other games historically played in Hawaii that are also fun to experience.

One sports and games activity meets the O'ahu requirement for the Aloha fun patch.

The little, in particular, got really into watching big wave surfing videos on YouTube. 

We learned how to play two traditional games of Hawaii, konane and lu-lu. If your kids love math, you can use lu-lu to practice creating probability trees!

We used these additional resources to study Hawaii's culture:
 2. Hawaiian history

The goals for this unit were to understand that Hawaii has a vast pre-colonial history, to understand that it was colonized and its sovereign government overthrown by the United States, and to understand its iconic role in World War 2. 

There's a terrific timeline of Hawaiian history in the Aloha fun patch book. The kids used it for a research project in which they picked one event to learn more about and teach to the rest of us.

A. Polynesians

Here's how we carved our own petroglyphs the easy way!


This tiki mask project isn't super authentic, but the results are fairly similar to the kinds of statues that you see at heiau, in particular. This tapa cloth is also made from paper and not bark, but it's still a fun activity.

The second time we studied Hawaii, we found ourselves interested in Captain Cook, here's a little more about him, and here's a Crash Course video about him:


B. Hawaiian monarchy

Unfortunately, this subject was difficult to find ample resources for outside of Hawaii, although once we were there we really did find ourselves immersed in the history of Hawaii's monarchy and were able to explore some wonderful places important to the monarchy and see some beautiful treasures.

I printed out this large infographic of Hawaii's monarchs and had the children put it on the wall under our map for easy reference. I also tried to get the kids to watch this American Experience episode on Hawaii's last queen, but it was super dry and didn't hold their interest. My partner and I later watched it by ourselves, and it hardly held my interest, either, but I wanted the information so I muscled through.

We used these resources on the Hawaiian monarchy:
C. Pearl Harbor

We actually incorporated this lesson into our larger study of World War 2, so you'll want to add in your own pre- and post-Pearl Harbor context to this lesson.

I wanted the kids to understand the logistics of the attack, of course, but I also wanted them to be able to visualize it, because that's how they'll remember. Much of our study took place at the actual Valor in the Pacific National Park, where the kids earned Junior Ranger badges and we took at ferry out to the USS Arizona Memorial. The big kid, especially, also really loved the Pacific Aviation Museum, and I appreciated being able to see some of the actual aircraft models used at Pearl Harbor and Midway. Both of these places have excellent online presences, as well. The kids didn't enjoy Tora! Tora! Tora! enough to watch the entire thing, but they did watch the Pearl Harbor attack, and it's a really, really accurate version.

We used these further resources to study Hawaii's history. In particular, all three of us adored Under the Blood-Red Sun--we listened to it on audiobook in the car, and the entire family was riveted.
4. Biology, botany, and ecology of Hawaii

For many kids, exploring the special plants and animals found in and around Hawaii is the most exciting part of this study. That exploration should go hand-in-hand with learning the importance of conservation.

One biology activity meets the Maui requirement for the Aloha fun patch.

A. ecology of Hawaii

The ecology of Hawaii is extremely important, extremely delicate and, in many places, extremely in danger. 

One ecology activity meets the Moloka'i requirement for the Aloha fun patch.

To help the kids understand the importance and fragility of Hawaii's ecology, I used some of the curriculum materials from the Moanalua Gardens Foundations. It's geared to an elementary audience, but since it covers topics that are more familiar to that elementary audience than they would be to children outside of Hawaii, much of it still works even for older learners. In particular, we played Ecosystem Encounters--the kids loved it, and we learned SO much about feral pigs and happy-face spiders!

If you don't have time for an entire lesson plan or even a board game about feral pigs and happy-face spiders, this Ted-Ed video about invasive species is very informative:


I had each of the kids spend a few school lessons looking up native Hawaiian plant or animal species and creating infographics about them using Piktochart. If kids are very interested in the subject, here's an entire lesson on Hawaii's endemic species, or a pdf board game about Hawaii's watershed.

B. seals

I also had the big kid read this biography of the monk seal KP2. I thought that it might be too dry for her, but she actually loved it, and when we looked up KP2's home, the Waikiki Aquarium, we saw that there's a webcam of him! We still watch KP2 sometimes!

C. whales

Whales are always fun and fascinating to study. To make the kids' fact-finding projects about whales more interesting, we measured their lengths out and drew them in chalk:


D. sharks

One summer, the kids and I fell down a rabbit hole and spent three months studying sharks. It was AMAZING!

Fun stuff

Here are some fun, non-educational resources that have Hawaii themes:

My favorite thing about a Hawaii study is that the subject is so rich that it adapts itself to all levels of learners and a wide variety of interests. Kids who love animals have so much to study in Hawaii! Kids who love volcanoes, too! And kids who love history, who love music and dance, who love storytelling... a study of Hawaii is a great way to engage any learner.

P.S. Want to know more about our adventures in learning, and the resources that we use to accomplish them? Check out my Craft Knife Facebook page!