First up this semester was a meteorology unit that I timed to work concurrently with the US hurricane season. I'd actually originally intended it to just be a hurricane study, but as with everything that we do, it quickly got out of hand.
Our spine for this unit was the Civil Air Patrol's Air Environment curriculum, supplemented with this home weather station, the Girl Scouts of Central Texas Hurricane Relief patch program, and, of course, lots and lots and LOTS of other books, videos, and activities.
Here's what we did!
DAILY:
Once a day on school days, the kids checked the following websites and recorded relevant hurricane information on our US and world map:Twice a day, they checked our home weather station and recorded the current information about temperature, barometer reading, and rainfall in a daily log.
If there was hurricane activity listed in one of the websites, they'd consult with me about what major US city might be in the path of the latest hurricane(s), use the internet to check the current weather information about that city, and record its temperature, barometer reading, and rainfall in its own daily log.
WEEK 1:
The kids read the short Chapter 1 in Air Environment.Syd watched BrainPop's Earth's Atmosphere video, and Bill Nye the Science Guy season 1, episode 9, "Atmosphere."
Both kids made a layered book foldable to illustrate and record important information about the layers of the atmosphere. They noted not just the order of the layers, but also the temperature differences between each layer and interesting facts, such as the layer where weather takes place, the layer that international flights take place in, etc. This was a handy reference for the rest of the unit.
Here are a couple of other reference materials that we used:
- Caesar's Last Breath: Decoding the Secrets of the Air Around Us
- An Ocean of Air: Why the Wind Blows and Other Mysteries of the Atmosphere
WEEK 2:
The kids read Chapter 2 in Air Environment.We watched the first two episodes of Orbit: Earth's Extraordinary Journey, and the following YouTube videos:
The kids worked through several demonstrations of convection currents:


We also used chalk on a spinning chalkboard globe to illustrate the Coriolis Effect--

--and a fan, tissue paper, and a mountain made of books to illustrate wind currents over landforms.
Here are a couple of other living books that we used:
WEEK 3:
The kids read Chapter 3 in Air Environment.
Syd watched the Wind and Temperature BrainPop videos.
We watched the following YouTube videos:


We also played with our giant solar bag to explore how temperature affects air pressure:

It's a mini version of homeschool PE to get the solar bag inflated!


The idea is that early in the morning on what will be a warm, sunny day, you fill the bag with ambient air, then sit it in the sun. As the sun warms the air inside the bag, which is narrow and black, the bag will rise into the air, like your very own hot air balloon.
We didn't realize it until we went troubleshooting afterwards, but we accidentally put a small rip into the bag somehow, and that's why it didn't completely launch. Still, it worked well enough that the kids got the idea, and I *think* I repaired the bag well enough that we can try again some other time:


We reviewed the physics of temperature lesson that we completed about a year ago during another, briefer study of meteorology. It included making this working thermometer, which is still one of our favorite homeschool projects:


For math enrichment one day, I had the kids learn the conversion formulas for Celsius and Fahrenheit and complete some drill problems for practice.
Here are a couple of other reference materials that we used:
- Chilled: How Refrigeration Changed the World and Might Do So Again
- 50 Physics Ideas You Really Need to Know
Week 4:
The kids read Chapter 4 in Air Environment.
We completed an activity to measure, demonstrated and record dew point using aluminum cans, ice, and salt water:


I didn't photograph the cloud in a jar demonstration that we did, but here's when we did it last year. The kids also conducted daily cloud observation, and identified and sketched the clouds that they spotted.
Here are some other reference materials that we used:
Week 5:
The kids read Chapter 5, the final chapter, in Air Environment.
Syd watched the Bill Nye the Science Guy episode, "Storms," and we all watched the final episode of Orbit: Earth's Extraordinary Journey on Netflix, and the Nova episode, "Decoding the Weather Machine."
We made a model of rain--


--and we attempted to demonstrate lightning, but it was so humid all week that there was no static electricity to be elicited, alas.
Here are some other references that we used in this final week:
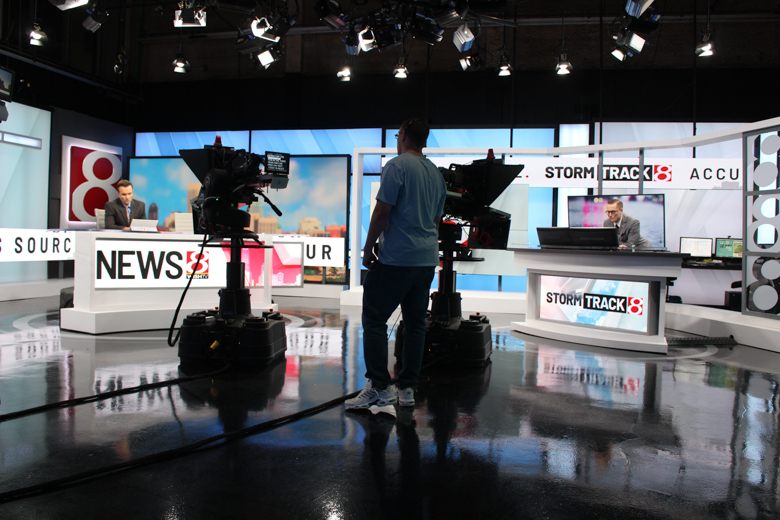
As one of the culminating activities of this study, I organized a field trip for our homeschool group to the studios of WISH-TV, one of our semi-local news stations:

I was surprised at how interesting this tour was! Little about the news station was how I'd expected it to be. There were remote-controlled video cameras on wheels, people doing other stuff just off camera at any given time, sets all over the room where the various anchors would just walk over and do their bits, and an entire kitchen set in which actual food is cooked on camera every day. It was absolutely fascinating!
Here's part of our group sitting quietly out of the way and watching the meteorologist give a report. Next to him is a screen that shows what's being broadcast:

The meteorologist is one of the only anchors who doesn't use a script. Here he is on the other side of the room several minutes later giving another report using a different screen:

Here, both anchor desks are off camera while an on-site reporter is being aired. See them both pecking away at their computers, working on their business? The screen behind that one video camera is showing the same script that's also shown on the front of the camera for the anchor to read:
Neither of my kids came away from the tour actually wanting to be a meteorologist or a news reporter (they were decidedly more intrigued by the cooking show host, though...), but it was a terrific way to see meteorology in action and to learn about one profession that uses meteorology.
We had a couple of culminating projects for this meteorology study. The kids made graphs using some of the weather data that they'd been recording for the previous five weeks. Here's one for temperature and one for rainfall:


It was interesting to see how the temperature trended, and how the rainfall added up. The girls compared the information to what they'd collected from cities in the paths of the various hurricanes they'd tracked during the course of our study. We could see some trends in temperature, since hurricanes develop over warm water, and, of course, we could see the Coriolis Effect in real-life, tracking how the hurricanes rotate and move.
The kids studied hurricanes in more depth as they completed their final culminating project, earning the Girl Scouts of Central Texas Hurricane Relief patch. They'd already done a related service project with their troop, so just needed to complete the rest of the requirements to finish earning the patch:
They learned how hurricanes form and how they are categorized by using the following resources:
They researched how young people can contribute to emergency preparedness. There are online games for this, and an entire emergency preparedness high school curriculum if you want to go into even more depth.
They researched FEMA and other levels of disaster response and case studies.
Finally, they researched and compiled the supplies to create individual disaster kits for every member of our family. The goal was to create kits that contain enough supplies for each of us to shelter in place for three days, but also portable enough that we can grab them and go in case we need to evacuate, instead.
We used these other reference materials while studying hurricanes:
Meteorology turned out to be a very successful study! It had lots of great hands-on and real-world connections, incorporated math and practical life skills, included some interesting documentaries, and led us on an awesome field trip that I never would have thought to organize otherwise.
Currently, I'm planning our next Topics in STEM unit, chosen by Syd. We'll start Programming and Robotics after Christmas!


