Showing posts with label dollmaking. Show all posts

Friday, January 14, 2022

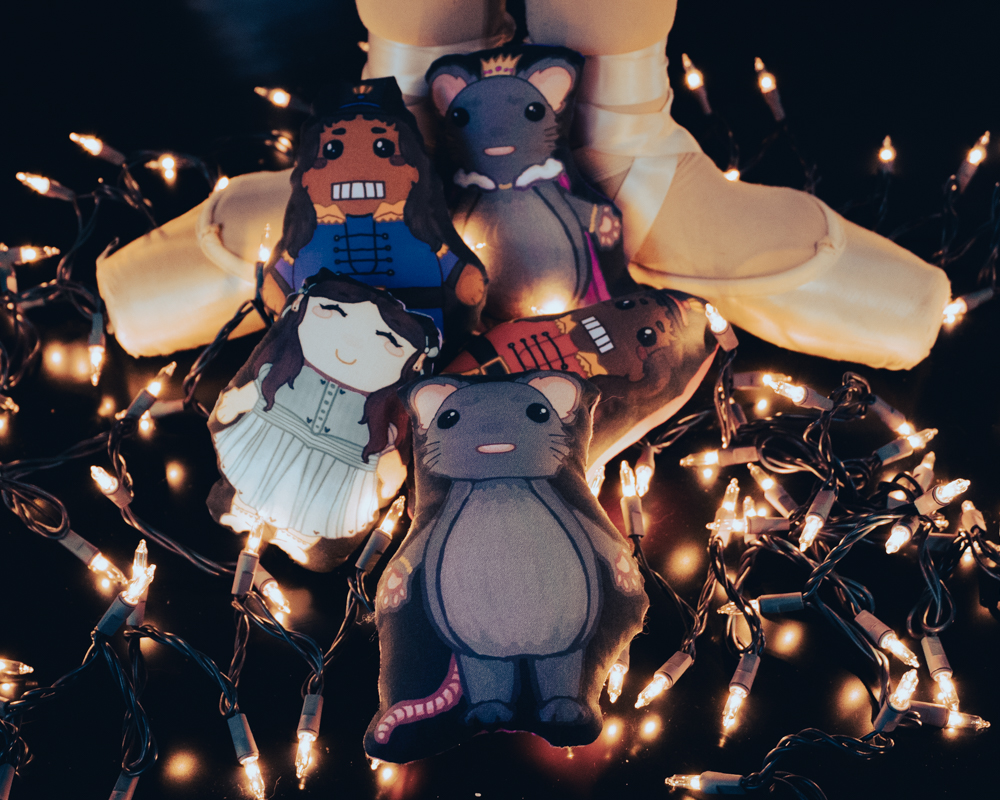
Handmade Christmas: Homemade Nutcracker Stuffies


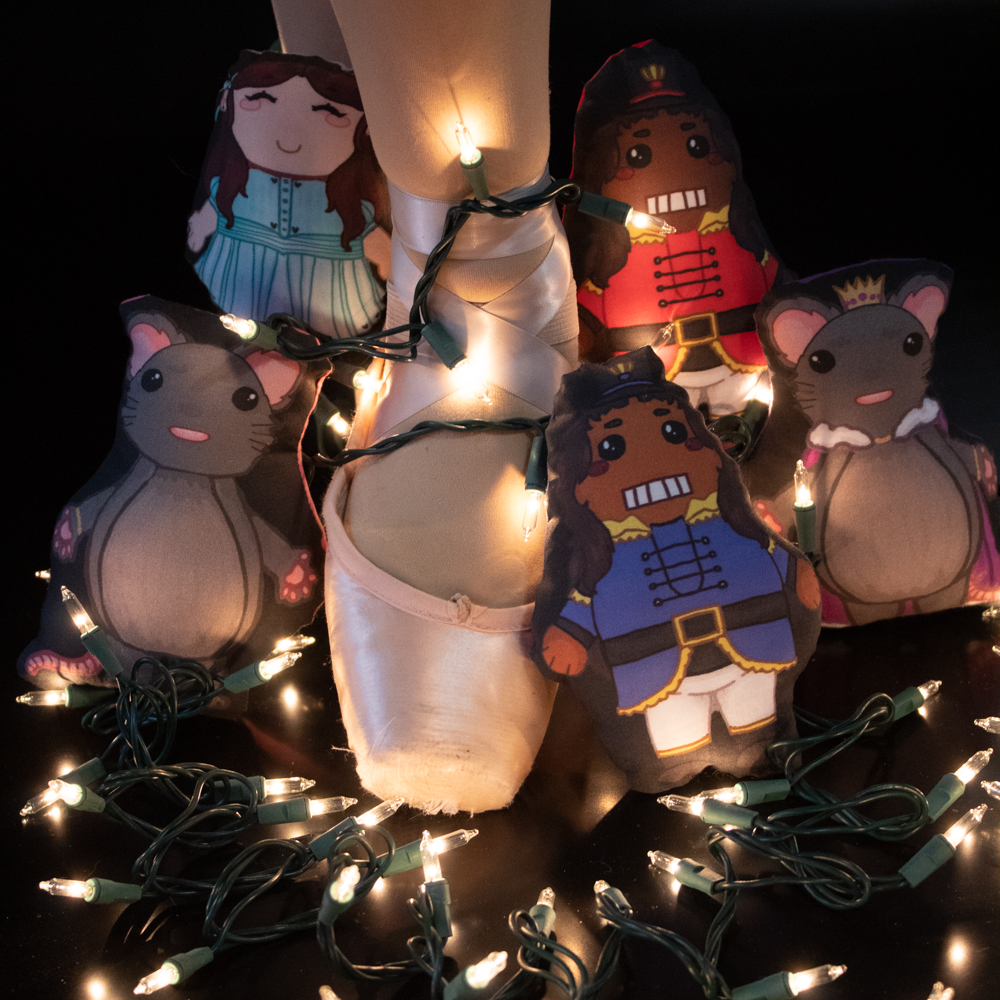
Syd and Matt helped me make the BEST Christmas gift for our favorite baby.

I wanted to make our favorite baby a set of Nutcracker-themed stuffies to go with a board book retelling of The Nutcracker that I'd bought for her (Will's bookstore scratch-off birthday present has been a great excuse for me to do a bunch of shopping in local independent bookstores), but I couldn't find ANY patterns for anything close to what I had in mind...

... so I commissioned my favorite artist to make some!

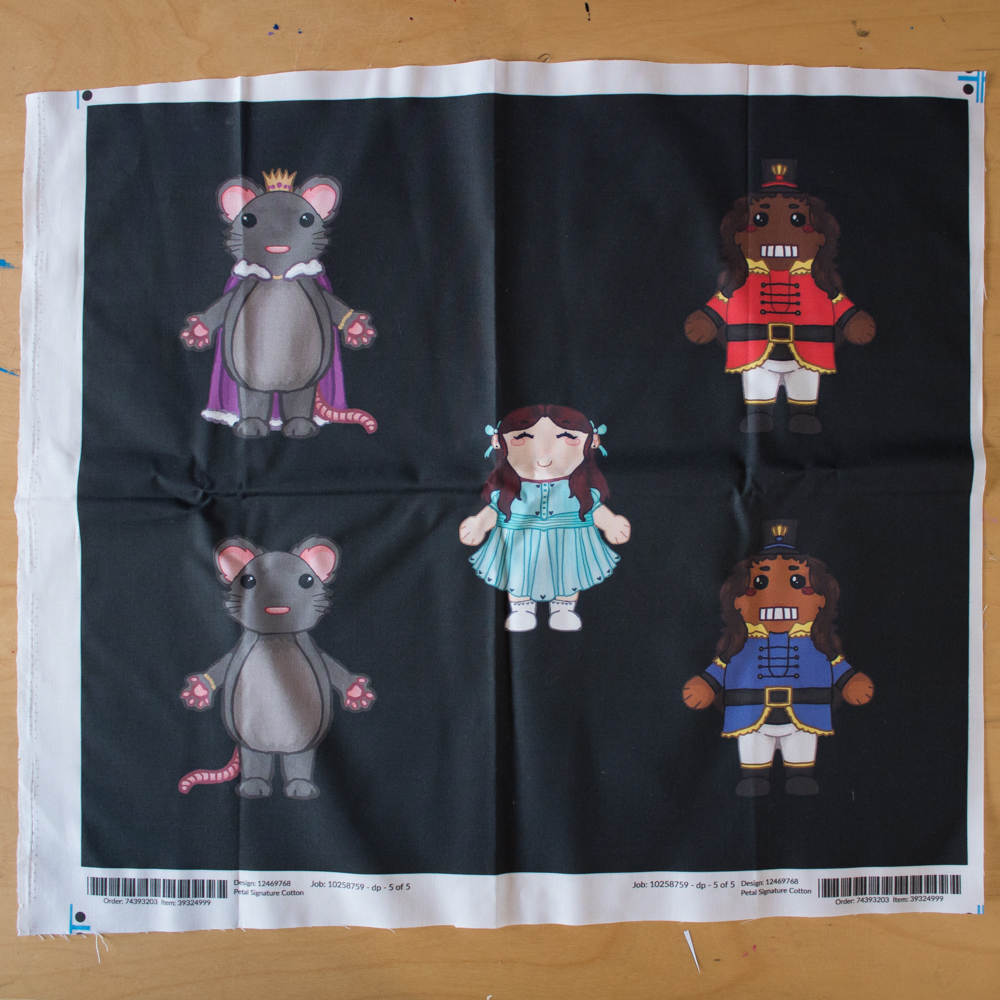
Syd drew me five Nutcrackers on her Wacom, and then I commissioned my favorite graphic designer to lay them out in just the right way that I could have them printed as a fat quarter from Spoonflower:

And then I took over doing some actual work myself!

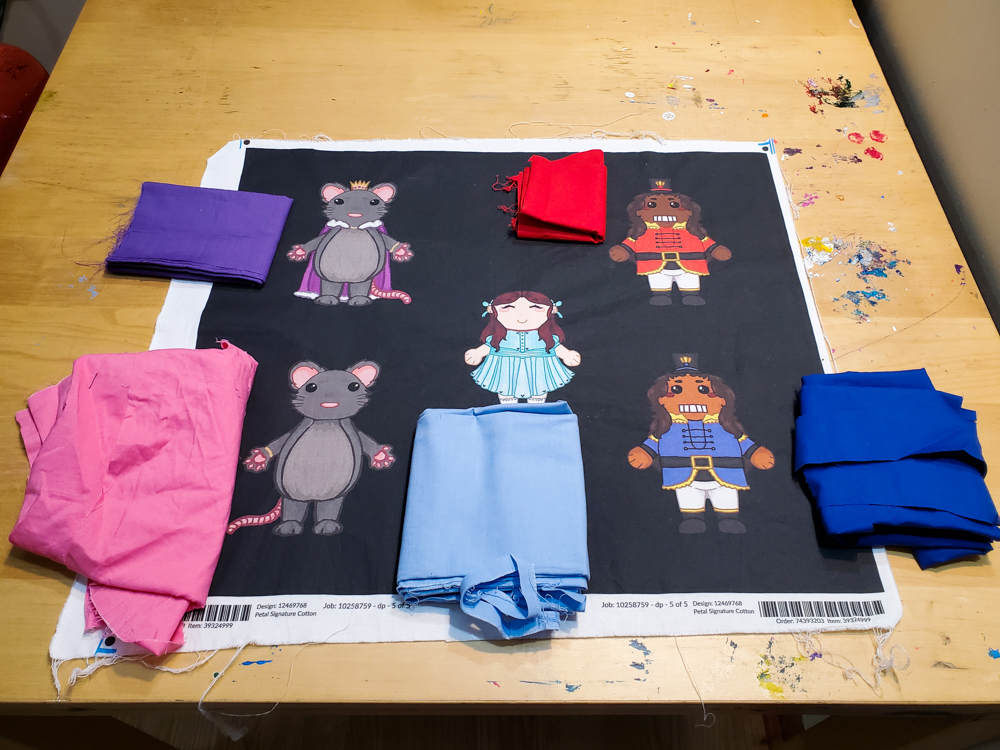
I matched each character up with a complementary color of solid cotton from my stash--

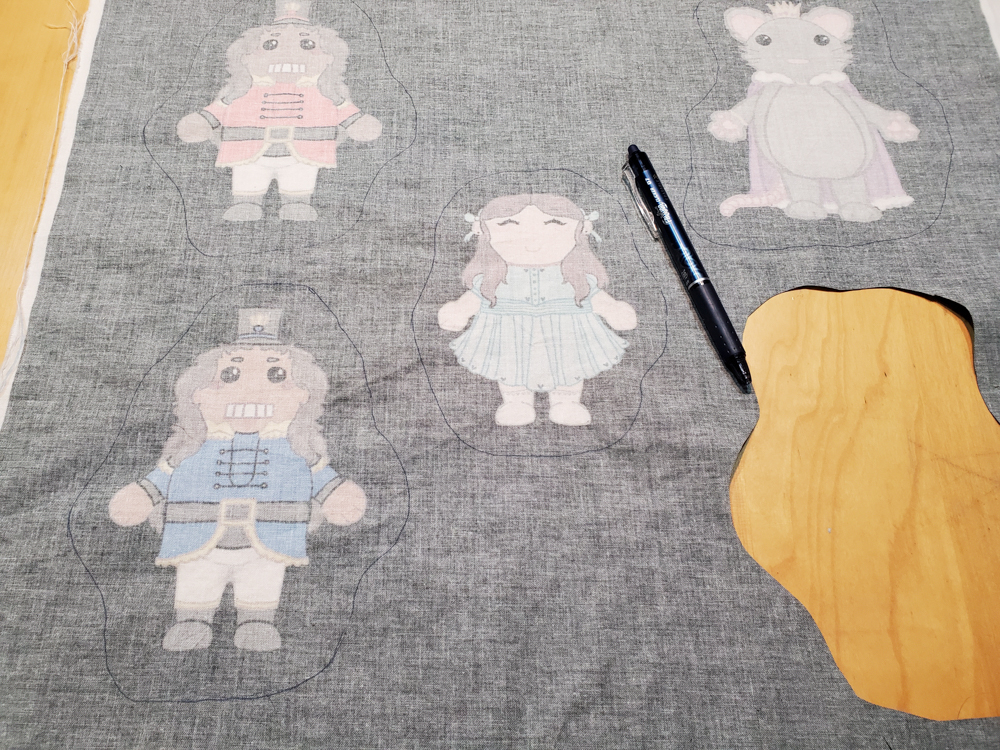
--drew a simple outline around each character (Frixion heat-erasable pens for the win!) and cut them out--

--and finally put each one right sides together with its backing fabric, sewed it most of the way around, turned and stuffed it, and ladder-stitched the opening closed. 

I am delighted with our little set of Nutcracker stuffies--


--and I think they're the perfect size to cuddle or play imaginary games with.

Since I had to mess around with Spoonflower so much to figure out how to format Syd's design and get it published to the site, I went ahead and did the whopping four extra steps required to actually list our design for sale!

You can find our Nutcracker stuffie patterns here. The set is ideally printed as a fat quarter, but if you buy a full yard you *should* be able to get four sets? I'm in the process of testing that theory out as we speak, because I want to have a few finished sets on hand to list in my Pumpkin+Bear etsy shop, so I'll let you know! I also have an eye towards asking Syd to make one more character for the set--perhaps Fritz or the Sugar Plum Fairy?--and maybe I'll find some copyright-free graphics of Nutcracker sheet music that Matt can also make into a fabric print. I think it would be fun to back the stuffies with that instead of having to find your own backing fabric.

My favorite part of making something brand-new isn't the original inspiration, or the problem-solving and creating required to bring my idea to fruition--it's the inspiration THAT project brings for ever more and better iterations of itself!

Saturday, August 1, 2020

How to Sew a Nine-Patch Quilt for an American Girl Doll

I originally published this tutorial on Crafting a Green World.

A nine-patch quilt is the easiest type of quilt to sew, although I might be biased since as a child I first learned how to sew by back-stitching, under my grandmother's supervision, nine-patch quilt blocks of my very own.

A nine-patch quilt block is made from nine pieces in two different fabrics. The pieces are all square and are sewn together in alternating fabrics in three rows of three. This pattern works well with both a dedicated color scheme and layout or a seemingly random mishmash of color and contrast, which is another reason why it's such a favorite with sewers of all ages and levels--and their recipients!

Just as the nine-patch quilt is the easiest type of quilt to sew, I find a doll quilt to be the easiest size of quilt to make. There's nothing like a tiny quilt to give one instant gratification! An American Girl doll quilt, in particular, is a great size to start with--at just 12" x 18", you can make the whole thing in a single afternoon.

Here's what you'll need!

Supplies

  • Fabric and cutting supplies
  • Sewing machine and matching thread
  • Double-fold bias tape
  • 12" x 18" fleece piece


Directions

1. Measure and cut the fabric pieces

The most important thing that you can do to make a beautiful quilt is to cut the pieces completely accurately. Each piece in this quilt is a perfect square, 2.5" x 2.5". Each nine-patch quilt block uses two different fabrics and a total of nine pieces--four of one fabric and five of the other. You will need six total nine-patch quilt blocks for this quilt.

The nine-patch quilt lends itself to an easy hack if you'd like to make two at a time--for two children, say, or two dolls. All you have to do is cut nine of each fabric piece, and then you'll easily have two complementary, but NOT identical, nine-patch quilt blocks in the making:

2. Piece each nine-patch quilt block

Have your iron at hand, because you always want to iron every seam flat. To sew a complete nine-patch quilt block, first sew the three separate rows of three pieces--

--ironing each seam flat as you go, and then sew the three rows together to complete the block:

Repeat for each additional nine-patch quilt block until you have six completed blocks.

3. Piece the quilt

Arrange and rearrange all of the nine-patch quilt blocks until you're happy with the look of the quilt as a whole.

Use exactly the same method to piece the full quilt as you did to piece the individual blocks. First piece the quilt blocks together into rows, then piece the rows together until the quilt is complete.

4. Back the quilt with fleece

Because this is a doll quilt you get to skip some of the more fiddly steps involved in making a full-sized quilt. You don't have to sandwich batting between the front and back of your quilt, unless you really, really, really want to, and you won't actually have to quilt or tie this quilt--unless you really, really, really want to!

A neat trick to give a doll quilt a thicker, fluffier feel without bothering with batting is to back it with fleece, instead. If you simply must have three layers to your quilt, you can always use a double layer of fleece, but I promise that the quilt top plus one layer of fleece gives this doll quilt an authentic heft and feel.

5. Bind the quilt

Binding a full-sized quilt can also be time-consuming, so you're lucking out again with this doll-sized quilt. I use a lot of different methods to bind quilts (one of my all-time favorites is back-to-front blanket binding), but my go-to method for a quick-and-easy doll quilt is to use double-fold bias tape. Bias tape can be store-bought (although you should look for bias tape made from natural fabrics, not polyester--blech!) or handmade nearly as easily, and 10mm double-fold bias tape is absolutely perfect for this project.

Your completed nine-patch quilt is the perfect size and scale for an American Girl doll to snuggle up under. Size up the quilt blocks to 4.5" to make a matching quilt for that doll's favorite person, or size the blocks down to 1.5" to make a Barbie doll-sized quilt.

P.S. Want to know more about our adventures in learning, and the resources that we use to accomplish them? Check out my Craft Knife Facebook page!

Thursday, June 18, 2020

How to Sew an American Girl Doll Face Mask with Ties


My kids don't even play with their American Girl dolls anymore, and I don't even care--I'm still sewing them matching outfits and adding cute DIY accessories to my dollmaking Pinboard.

It's not a non-possibility that when both kids move out one day I'll turn their bedroom into an American Girl doll world and set up a bunch of little handmade scenes that the dolls can prance through wearing their handmade clothing and accessories.

Just... come find me there sometimes and bring me snacks, okay?

Anyway, for obvious reasons I deeply needed to make the kids' American Girl dolls face masks that match the kids' own face masks that I made them. It took some fiddling to get those tiny pleats just right, but I'm super happy with the pattern now, so much so that I've also been selling American Girl doll masks in custom colors in my Pumpkin+Bear etsy shop, and I'm going to show YOU how to make them, too!

Here's what you need to make your own fabric face mask for an American Girl doll:

  • fabric. Unlike with my human face masks, it does not matter what kind of fabric you use for these face masks, because your doll doesn't care whether or not the fabric touching its doll skin is 100% natural. The important things are that the fabric is thin enough to pleat and can be ironed on hot. I HIGHLY recommend using up your fabric scraps for this project!
  • bias tape. I use a poly-cotton blend 1/4" bias tape for my human masks, and the great thing about it is that it also works perfectly for these doll masks. I wouldn't go any wider than this on the bias tape, because you want it to look proportional to the doll. 
  • matching needle and thread. I like a universal needle for sewing the mask fabric, and a jeans needle for sewing the bias tape.
  • iron
  • measuring and cutting supplies

1. Cut the fabric and bias tape to size. Cut two pieces of your fabric to 3.5"x3". Cut two pieces of bias tape 21" long. I really like this photo that shows all the cut fabric sizes for adult, big kid, little kid, and doll masks. The doll mask fabric is the tiny one at the bottom!


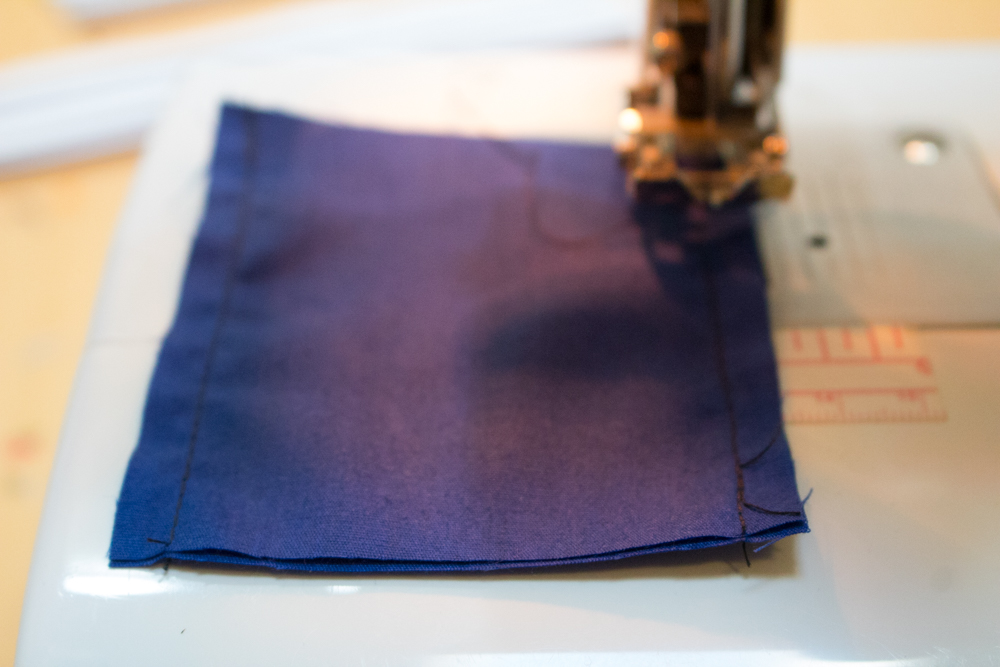
2. Sew the fabric. Put the two pieces of fabric right sides together, then sew down both 3.5" lengths with a 1/4" seam:


Turn it right side out and iron the seams to press them flat:


3. Pleat the mask. Because your piece is now approximately 2.5"x3.5", the pleats are a little fiddly to make. First, measure and mark a chalk line approximately 1/4" from the bottom of the fabric. Crease the fabric again a little more than 1/2" above that mark and fold the crease down to that mark. You'll make two more pleats above the first one, each a little more than 1/2" from the top of one pleat to the fold of the next. For your last pleat, take care to make sure that the fabric above the fold visually matches the width of the fabric below the bottom pleat, even if it means that the top pleat is a little uneven. 


Baste the pleats in place.

4. Attach the ties. Fold each piece of bias tape in half and iron the fold to crease it, marking the center. 

Center the bias tape on the middle pleat of the mask, then pin it well, encasing the raw edges of the side seams in the bias tape:


Sew down the entire length of the bias tape, sewing it shut and sewing it to the fabric mask.


Here's what the masks looks like when worn by my kiddos' American Girl dolls:


They're not too hard to tie onto the dolls, 
and I think the proportions look just right!


Want to make a human-sized face mask to match the doll masks? Here's how to make a fabric face mask for an adult, and here's how to make a fabric face mask in two children's sizes.


Whether you're a human or an American Girl doll, please stay safe!

P.S. Want to follow along with my craft projects, books I'm reading, dog-walking mishaps, encounters with Chainsaw Helicopters, and other various adventures on the daily? Find me on my Craft Knife Facebook page!

Friday, October 19, 2018

Homemade Leggings for Nearly All of Us

Because Mr. Craft Knife said that he didn't want leggings, the silly boy. Leggings are way more comfortable than basketball shorts and tracksuit bottoms, Dude!

I just want to say right off that you don't sew your own leggings to save money. Sweatshop leggings bought from big-box clothing stores that earn an F on their Fair Trade practices are waaaaay cheaper. Like, WAY cheaper. And when I can find thrift store leggings that don't have holes or grass stains, I snatch those babies up!

So why DO you sew your own leggings?

So that you can make dreams like this come true for your kid:


I mean, it helps if your kid's dream is to own leggings made from holographic blue mermaid scale fabric...

This particular fabric (actually, as is all of the fabric that I'm going to show you) is from Spandex World. Yes, I shopped at an online store named Spandex World. I really liked them for this project, in particular, because they offer the stretch percentages for many of their fabrics. If you're just starting to sew leggings, so you can't yet tell what will work just by feel, that's even more helpful than shopping in person in a place where that info isn't offered, in my opinion.

Also, I feel like half the craft bloggers out there have a free leggings "tutorial," but they generally all consist of "Step #1: Trace around a pair of leggings that you already own. Step #2: Sew those leggings," and I call hijinks. That nonsense works for little kids, when their bodies are just straight little noodles, but it's not happening for tweens, teens, and adults.

My own personal Step #1 was to search for a digital pattern that I liked, and buy it. For the little kid's leggings, I bought the Felicity Sewing Patterns Children's Leggings pattern, and I'm perfectly happy with it. I had to fiddle with it a bit--which is another thing that's MUCH better than "trace your clothes," because with a real pattern, it's so much easier to make the waist a size 10 and the length a size 12, with a low-rise waist, like so:


Here are my new favorite things about sewing leggings:
  1. You don't have to hem the bottom of full-length leggings. I do hem the bottom of the biker shorts that I've made the little kid, but when they're ankle length, I think they look nice unhemmed.
  2. There's only one pattern piece. It's super quick to cut out.
  3. They sew up so quickly! Yesterday, I was able to whip up a new pair of leggings for myself in the hour between when we got home from the apple orchard and when I had to leave for the Girl Scout volunteers meeting, and that included the time  that it took for the little kid to dress her doll in a complete outfit to complement the doll leggings that I also sewed in that time and to do a photo shoot of me and the doll wearing our leggings.
Another favorite thing?

This kid was absolutely THRILLED about her new mermaid leggings, and *I* made that happen!

I wanted to do a photo shoot of the little kid's new leggings, because if I'm going to buy the fabric and make them and they're going to turn out awesome then heck, yeah, I'm going to show them off! Excuse how much eye makeup the kid is wearing in these photos, because apparently mermaids just wear a lot of eye makeup.

Do you see how she laid out her play silks to look like a mermaid's fin? This kid.


I don't have an immediate use for four-way stretch fabric scraps, so I've been trying to use up every square inch in this leggings project. There was enough leftover from the little kid's full-length leggings to make her a pair of bike shorts--


And you might also have noticed that her American Girl doll has her own pair of mermaid leggings. The American Girl doll leggings pattern is from Artsy-Fartsy Mama, and I've sewn it a billion times now. I don't always put elastic in the waistband, and in consequence, I've cut some inches from the waist of the pattern.

Of course, if I'm going to make special leggings for the little kid, then I've got to make leggings for the big kid, too. The big kid is probably the worst person to sew leggings for, because she's crazy rough on clothes, and unlike her sister or I, will not take pains to keep something nice. Sigh. Nevertheless, here are her brand-new leggings (along with bike shorts for the little kid and leggings for the American Girl doll from the scrap fabric):


The big kid's pattern is the Patterns for Pirates Peg Legs pattern, which is so good that I absolutely cannot believe that it's free! I would pay good money for such a terrific pattern! There are even free add-ons so that you can do even more cool things to the leggings! The sizes run pretty small, but they go up really high, so it works out. I used an XL for the big kid, and she claims that it fits well and didn't even want me to put elastic in the waistband.


The little kid also loves her doll's new galaxy leggings, which came out just perfect:


Like I said, these are NOT money-saving leggings, but they're not too terribly expensive, either, especially considering that I can make two kid leggings plus one doll pair from one cut of fabric, so there will more than likely be at least one more order from Spandex World in our near future.

After all, they do make that holographic mermaid scale print in several colorways...

AND the little kid says that she'd also really like a skater dress, also in mermaid scale fabric, so there's another fun sewing project to get to!

P.S. Want to follow along on more of my crafting adventures? Check out my Craft Knife Facebook page for lots of pics and WIPs!

Wednesday, October 25, 2017

How to Make Miniature Book Girl Scout SWAPS

I've been ALL about the Girl Scout SWAPS for a few weeks now. You'd think that since they're crafty I'd have been all over them from the beginning of our Scouting experience, but I dunno... SWAPS aren't a huge deal in our council like they are in some, and a lot of them are... kind of cutesy? I'm really not a crafter of cutesy things. Ducks in bonnets aren't really my jam.

But then I joined this Facebook group of Girl Scout troop leaders and volunteers across the country, and they're super into it and not all of them are into the cutesy nonsense, either, and THEN I made plans for the kids and I to go to the Girl Scout National Convention, where not only do adults also exchange SWAPS but you've also got to bring your A game because there are also people from across the country there...

...and yeah. SWAPS are a thing now.

ANYWAY... I'm taking my Girl Scout troop to an event soon where there will be SWAPS to exchange, so I've been doing a lot of prepwork and encouragement lately (the one bad thing about SWAPS is that you have to make a LOT of them, because what? You want to go somewhere and exchange just one SWAP with just one person? No! You want to exchange just one SWAP with every person! At the event we're going to, that's 40-50 SWAPS!), and setting up a lot of invitations to make a lot of different SWAPS, because my kids, at least, don't really have the interest to make 50 of the exact same thing; they'd rather make five of something, get bored, make 10 of something else, find it tedious, then come gripe to me, etc.

Here, then, is a pretty quick-and-easy tute that I made to make miniature books. Stick a safety pin in them and they're SWAPS. Don't stick a safety pin in them and the kids can use them in their doll house or with their Barbies.

You will need:

  • thumbnail-sized book cover images. Google your kid's favorite book and you'll find plenty of small images of that book's cover. Save it to your computer, paste it into your favorite word processor or graphic design program, and do it again until you've got a page full of book cover thumbnails.
  • colored copy paper. You'll be using this for the rest of the book's cover, so you can match the color to the book cover image or not. I let the kids pull whatever paper they wanted from our paper stash.
  • old book pages. You want writing on the inside of your book, but it doesn't have to match what the book's about--here is where you use resources wisely! I pulled an old, torn paperback out of my books-as-crafts stash, and we used that. It just happened to be an Old Sweet Valley High book, and so now I have to request some of those from the library, as the children were FASCINATED. I guess I hadn't noticed that Sweet Valley High isn't a thing anymore!
  • scissors, glue stick, stapler, pen, safety pin

1. Cut out the thumbnail book cover. Use that as a template to cut out one piece of colored copy paper twice the width of that book cover, then use THAT as a template to cut out two pieces from the old book page:

When you're done, you'll have the following pieces of your book:
See how all the other pages are twice as wide as the book cover?

2. Glue the book cover to the right side of the colored paper:

3. Stack the two book pages behind it and fold in half:

4. Staple exactly on the fold. To make a SWAP, put a safety pin through the fold near the top:


And they look amazing!!!

You need to include a little information with your SWAP to identify your location and to make it clear, if it isn't already, how the SWAP is Girl Scout-related. We include our troop number and city/state, and the kids wrote Book Artist on these, because they're a call-out to the Book Artist badge that they're currently working on. Inside the front cover or on the back would be good places to include this information.

Syd liked these so much that she managed to make 30 before she got bored and wanted to try a different SWAP idea. Will only made five or six, but she's not really into crafts. 

Rather, she's not into paper crafts, because I firmly believe that there's a hands-on creation for everyone. With that in mind, I bought a bunch of dog tag blanks and played around with metal stamping them, and later today I'm going to see if a kid who isn't into paper and glue so much might be into metal and hammers...

I think maybe yes!

Friday, May 27, 2016

Giveaway! Win a Pair of 18" Doll Shoes

I have a giveaway up at Crafting a Green World for just another 15 hours, which is just enough time for you to hop on over there and enter!

You can win a pretty great, super cute pair of 18" doll shoes, and I know you want to. Your kid wants them. If your kid doesn't want them (although your kid does), then your kid's friend wants them at his/her next birthday party. If your kid's friends don't want them (although they do), then your family's kids want them for Christmas. Wouldn't it be nice to have one gift, at least, all sorted?

But because I don't want you to win anything janky, don't worry, I took up the burden of getting a free pair of doll shoes, too, to check out, and I'm not gonna lie--I wrapped them, gave them to Syd for her birthday, and when she gasped and squealed and said, "Thank you!", I was all, "You're welcome!" Here Syd is running the shoes through their paces:


Yeah, I'd say that she likes them pretty well!

P.S. Go enter! Go win!

Wednesday, September 23, 2015

Newborn Baby Gown to American Girl Doll Outfit

This hack of a newborn baby gown into a complete American Girl Doll outfit *does* work, although I'm not nearly as pleased with the outcome as I am when I make the much simpler newborn baby onesie to American Girl Doll T-shirt. A baby gown, even the newborn size, is just roomier than a onesie, I guess, so although the skirt works fine, the shirt is too loose:

Anyway, here's the complete outfit:

And even though you might think that simply cutting off the bottom half of the baby gown would be simpler than making a skirt from scratch, you still have to make a casing for the elastic, pull the elastic through, then finish sewing the casing closed.

It's actually much simpler, I think, to make my favorite double-sided wrap skirt with Velcro tabs, and that skirt looks nicer, as well:

Ah, well... there's much to be gained just in the process of experimentation, and Syd, at least, doesn't seem to mind the fit:

That purple/My Little Pony Skirt and grey/Dalek skirt are both in my pumpkin+bear etsy shop, by the way, along with rainbow candles, a beeswax moveable alphabet, and a couple of sets of bean bags, among other treats and treasures. After we get back from Hawaii, I need to shift my shop prep into high gear for Christmas, because those sales are my Christmas budget, and I suppose that my own kids would like something besides rainbow candles and bean bags for Christmas, sigh...

Friday, August 21, 2015

Last of the Line: My Little Pony--and the Police!

This last of the American Girl doll wrap skirts that I've listed on my etsy shop is actually the first style that I made for Syd, based on her current absolute favorite cartoon: My Little Pony.


I've got a ton more American Girl doll patterns that I want to try out--pants, shirts, doctor's scrubs, a party dress--but I've also got some commissioned pieces and etsy orders that I need to be working on, so more American Girl doll crafting may need to go on the back burner for a bit.

In other news, I have to tell you about the AMAZING field trip that my Girl Scout troop went on yesterday! I was so engrossed in the trip that I didn't take a single photo, so you'll have to bear with my wall of words instead:

When we first got to the police station, the receptionist looked a little surprised to see this large gang of children and assorted adults in attendance, and we had to wait for a really long time before an officer came to get us--I imagine that the conversation in the back went something like "Oh, crap! who forgot to put a FIELD TRIP on the calendar?!? Okay, everyone, short straw has to lead the tour."

I was also a little leery when a parent who was dropping her kids off with me asked the officer, "How long do you think this will take?" and he answered, "Oh, about 15 or 20 minutes." At that point, I figured, "At least there's a playground behind the police station!" A twenty-minute tour followed by an hour on the playground--that could work, I guess.

I like to prep my Scouts well for our activities, so I'd asked each child to bring a notebook and pencil, and to write two questions for the police officers in that notebook. Our tour guide, Sgt. Forston, led us to the briefing room, sat us down, gave us a little lecture on what a briefing looks like, then said something like, "Okay, before I show you the rest of the station, does anybody have any questions?"

Little hands rose into the air! Sgt. Forston, in what is surely the greatest display of patience ever seen by humankind, answered question after question after question. Are you in charge? (No.) Who IS in charge? (The chief of police.) What kind of crimes are most common? (Theft.) What kind of things do people steal? (Money, bikes, electronics, really anything.) If someone stole a computer but it has a password on it, what would they do? (Throw it away.) Have you ever been shot at? (No.) Do you ever feel like you're in danger? (Yes.) Do people call you on the phone here? (Yes.) What do they call you about? (They want to report a crime, they're not happy with something a police officer has done, they have a question about a law.) Do they call other people on the phone here? (Yes.) Is 911 here? (No.) Where is 911? (At the central bus station.) Do people ever fight you? (Yes.) What happens if you think that someone committed a crime but you don't know for sure? (We keep looking for evidence.) Do they get to go free while you look? (It depends on what kind of evidence we have already.) Is there a police dog here? (Yes.) What's his name? (Ike.) What kind of dog is he? (German Shepherd.) Can we see him? (Maybe. I'll call his handler and ask.)

For each of these answers, also imagine a thoughtful explanation. Every time Sgt. Forston came to terminology that he thought that the children wouldn't understand, such as "bond" or "chain of command" or whatever, he would reword it so that the children understood. It was perfectly suited to an audience of children.

By the time this flurry of questions had calmed enough that we could keep moving, we were already well past the twenty-minute estimate of the entire trip, but Sgt. Forston seemed totally in the groove, and never hinted that we were taking up too much of his time or that it was time to finish up. In fact, he kept thinking of even more awesome things for us to see and do! We saw an interrogation room, where children and adults were both kind of thrilled to see the chain that attaches to a suspect's handcuffs. We saw the room with the breathalyzer and a line painted on the floor for people to walk; everything in these two rooms is videotaped. We saw the evidence lockers, which are actually just lockers! They are literally evidence lockers!

A guy came by as we were standing in front of the evidence technician's door, and Sgt. Forston was basically like, "Look! The evidence technician! Show the kids your light!" So after the technician put away all the evidence that he was bringing back from the lab (Sgt. Forston gave us an excellent lecture about this and a lecture and demonstration about how to properly handle evidence), he showed us how his black light showed up hairs and such from clothing and other surfaces.

Imagine, of course, that all through this children are just peppering Sgt. Forston with questions. Does each locker have its own key? (No, they all use the same key that the evidence technician has.) What goes in the little locked refrigerator? (Blood. Long pause. Just blood. Good editing for a child audience, Sgt. Forston!). What's in that jug? (Distilled water.) What's the distilled water for? (If you flush a syringe with it, you may get dried blood that you can then get DNA from.)

We covered DNA swabs and how to bag evidence, and then Sgt. Forston set the children up with plastic CD cases that he'd touched, fingerprint powder, and brushes, and he let the children actually dust for fingerprints! It was the coolest. Thing. EVER! He talked the kids through gently tapping the brush into the powder, and then just sort of gently swirling the brush along the surface. You still have to really look to be able to see the fingerprint, but if you hold it up to the light, there it is! It was so great, and the kids were really into it. I mean, of course! We also saw how to use a piece of tape to lift the fingerprint off the surface, although apparently it's preferred now to take a digital picture of the print, rather than lifting it.

We saw the undercover police officers' office and where the detectives work, the conference room where those in charge talk strategy, and then Sgt. Forston got ahold of the K-9 officer and found that although he was in the middle of a training session across town, he could leave then and be with us in 10-15 minutes. Sgt. Forston looked at me and asked how we should pass the time. "Tell the children all about first aid!" I said.

And so he did. Bless that man.

On the way outside to meet the police dog, I got the children's attention and said, "Now, Children, when the police dog shows up, I want you to..."

"Remain calm," many children finished for me. They know me so well!

Officer Keaton pulled up to the parking lot where we were, and he gave us a little lecture on police dogs and how and why they're used, and got to experience his own flurry of questions, himself. How old is Ike? (I don't remember the answer to this one--I'll have to ask my troop!) What happens to Ike when you go on vacation? (He goes to a special kennel in Indianapolis where they're used to police dogs.) Does he ever go inside the police station? (Not usually, because he's trained to defend Officer Ike, and could bite an officer who was just roughhousing with him.) Why isn't he neutered? (Because he's never out of his officer's supervision.) Do your kids get to play with him? (No, but sometimes they're allowed to pet his back.) We found out that Officer Keaton gives his dog, Ike, commands in German, we passed around his special remote control that shows him what the temperature is inside his car and has a panic button that he can press when he needs Ike to come rescue him. It opens the door on the right, which Ike only uses when he needs to chase down somebody.

We got to examine the special police car that Ike rides in, and then we sat in the grass while Officer Keaton showed us how Ike finds drugs. He'd hidden a little magnetic box inside the wheel well of a car, and as we watched, Ike sniffed all around, then sniffed back and forth in the same area over and over again, then got low and sniffed, and then finally scratched at the exact spot where the drugs were. As a reward, he got a tennis ball on a rope, and he was so happy!

At exactly two hours and 17 minutes after we first arrived at the police station, Sgt. Forston asked, "Anymore questions?" and for the first time, nobody raised their hands. I told him, "I don't think that ANYBODY has ever run them out of questions before!" And then we thanked the officers VERY wholeheartedly and all the children ran off to the playground.

Seriously, this was service WAY above and beyond the call of duty. Can you imagine the patience of someone who had originally intended to spend 20 minutes with a group of children, and then went on to indulge them for a full two hours, never hurrying them, never saying "Just one more question," going out of his way to find them interesting things to look at and do? It was one of the most impressive adult-child interactions that I have ever seen.

I know a certain couple of police officers who are going to get handmade thank-you letters and a big delivery of bagels and doughnuts sometime soon!