Monday, June 25, 2018

Take Your Kids to an Air Show

I took my kids to the Dayton Air Show, and it. Was. AWESOME!

The trip was somewhat spontaneous, in that I *only* started planning it a month or so ago. Will's interest in Aviation Challenge led us all down the rabbit-trail of aerospace studies, including the girls working on earning this Girl Scout Cadette Aviation badge. When I started researching activities for that, I suddenly remembered something that I haven't thought about in probably 20 years, at least: when I was Will's age, I was really into airplanes, too! How could I have forgotten that?

I think my love of astronomy, turned into a love of astronauts and then the space program, was my gateway, because I found Tom Wolfe's The Right Stuff and read it, and it's just as much about the astronaut's careers as test pilots as about their careers as astronauts. I read The Wild Blue, too, and loved it, and Catch-22, and didn't really understand it. I pored over those glossy coffee table books of fighter jets, and oh, my gosh, I actually owned little die-cast metal airplanes. I was for sure older than Will. Wow, I really have been a dork my entire life, haven't I?

Most of all, though, I loved the air show that my little hometown used to host every year at their tiny regional airport. It was also an Air National Guard base, and the big draw was always that they got the Thunderbirds to come and perform every year. I remember going when I was little enough that Pappaw took me, and going when I was big enough that I took myself and met up with friends there.

So when I was researching enrichment activities for exploring aviation with the kids, it was only natural that I'd look to see if there were any air shows around here this summer. And when I found one, only three hours away, it was only natural that I'd get us tickets.

And that's how we ended up back in Dayton, hanging out at the airport, at the kids' very first air show and my first air show in at least twenty years. Squeal!

We spent a few hours in the morning touring all of the aircraft on the ground, and still didn't see everything:


The kids thought that it was really cool to be able to actually see inside the cockpit of this American Eagle. You don't think much about it, but kids these days don't get to see the cockpits of commercial jets:


They also quite enjoyed sitting in the first class seats and pretending to be fancy. "Bring me some champagne!" Syd called, in her snootiest voice.


Look what we can see in the distance!


It's the Blue Angels!


This is a big FedEx plane. The kids were the most impressed with the cargo lift:


The FedEx pilots have a MUCH roomier cockpit than the American Eagle pilots do!


This plane was super cool:


It's the Orbis Flying Eye Hospital, with a classroom, exam room, surgery, and recovery room all inside:


We didn't tour half of what you could see--


--or get enough time to check out the Air Force band--


--before it was time to fly!

Syd was very dubious about this entire trip, going so far as to call it "Mom's weekend" to make clear that it was me forcing my children off on a self-indulgent getaway. She dragged her feet through the Air Force Museum we'd visited the day before (more on that another time!), perked up for the hands-on museum we'd visited afterwards, was happy about the special doughnut shop I'd found, but declared the motel swimming pool that she'd been looking forward to was "too cold," was disappointed--not bratty about it, but still disappointed--that I wouldn't buy the children frozen lemonade or tickets for the jump houses, and rather sulked her way through touring all of the ground aircraft.

This was not her thing, she tried to make perfectly clear. She was trooping, but she was not having fun.

And yet, about a minute into the opening ceremonies--


--this was her face--


--and I assure you that it remained so for the next four and a half hours.

Everything was completely thrilling. The US Army Golden Knights had smoke bombs on their feet:


I'm bummed that I don't remember who this stunt pilot was--I guess I should have bought the $5 program!


This, though, was the Memphis Belle recreation. I don't think I've ever seen a bomber in flight before. It was suitably impressive:


Here's Redline, another duo of stunt pilots:


Here are our seats. I paid more for "pavilion" seating, which meant that we got special parking, a shuttle bus, and a table, chairs, and umbrella. It was for sure worth it, especially after we saw how crowded the general viewing area was--the kids wouldn't have been able to see a thing, and I'd have been anxious and miserable jockeying to get them a view.


I'd thought that the Blue Angels would be everyone's favorite, but this stunt pilot, Vicky Benzing, was Syd's actual favorite. She was thrilled to see a female stunt pilot in action!


This was Will's favorite, and possibly my secret favorite, too, although I just can't bring myself to say that I didn't love the Blue Angels the best. This, though, is the F-22 Raptor, the coolest plane in the world right now:


My photos of it aren't very interesting, because it was too fast and didn't leave contrails, but imagine it screaming around overhead, crazy loud, afterburners glowing, knowing it wasn't even showing off a tenth of what it could do.


When I was looking at the schedule of the air show, I side-eyed the "Tora! Tora! Tora!" show, because somebody turned the bombing of Pearl Harbor into entertainment? I guess it's been long enough that we can do that?

I guess it has been, because it was super cool!


You actually did get the effect of total chaos in the sky, with the planes diving and things exploding and an air raid siren going off and the announcer screaming a play-by-play:


The Screamin' Sasquatch performed while the air cleared--


--and then, when we could not possibly get more hyped, we got the Blue Angels!


I can't even explain to you how beautiful their performance was. You have to go to your own air show and see them. The kids later told me that they'd preferred the more chaotic stunt pilots, but they did admit that nothing compared to the Blue Angels' impeccable choreography. It was breathtaking.


And that was the kids' first air show! Four hours later, we were back at home with Matt, the dog, both cats, and all the chickens, nothing but sunburns, smiles, and a thousand photographs to show we'd ever been away.

Except that Syd finally admitted that she'd had a lot of fun. And Will has a favorite fighter jet now. And I have a new connection between my children and a happy part of my own childhood that I thought I'd left behind long ago.

And I put The Right Stuff on hold for me at the library, so that I can re-read it yet one more time, and then pass it on to Will.

P.S. Want to see the selfie that I took after I lost BOTH of my children at the hands-on museum in Dayton? Check out my Craft Knife Facebook page, because it's really embarrassing!

Thursday, June 21, 2018

How to Make a Scrabble Tile and Butter Knife Plant Marker

I freelance over at Crafting a Green World, an eco-friendly crafting blog. Every now and then, on a non-regular basis, I'll share one of my favorite tutorials with you..

...such as this one! I originally published this Scrabble tile and butter knife plant marker tute here on Crafting a Green World.

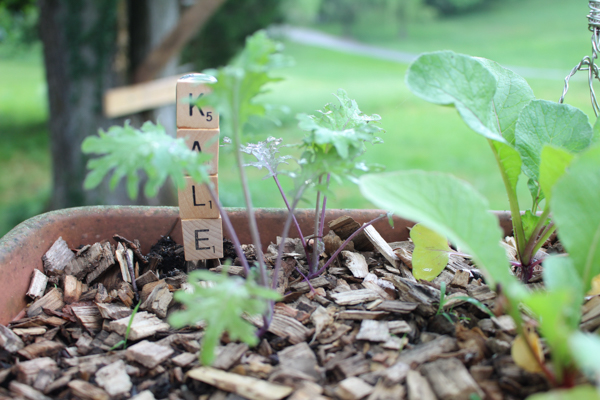
plant markers made with scrabble tiles and a butter knife

 You just can't have enough plant markers. Honestly, I have to mark every single plant if I really want to be safe, and still one year I ended up lovingly nurturing some kind of ragweed that sneaked into the garden plot instead of the ground cherry that I thought I'd planted somewhere near there. The best plant markers are easy to make, easy to place, and impossible to move unintentionally! My favorite plant markers are the ones that I can assemble entirely from one Saturday trip to the thrift store. I take old butter knives, a broken-down Scrabble game, and some epoxy glue, and I make the cutest, handiest, butter knife and Scrabble tile plant markers that you've ever seen. Here's how you can make some, too! You will need:
  • Thrifted butter knives. These tend to be super cheap at any thrift store, because most people don't want mismatched cutlery.
  • Thrifted or stash Scrabble tiles. You can get Scrabble games for a buck at nearly every weekend garage sale. I always buy old Scrabble games when the price is right, because those letter tiles are endlessly useful!
  • Epoxy glue. I used Gorilla Glue in most of these pics, but later I made another set of plant markers using E6000 and I like those results so much better, actually.
1. Wash the butter knives. You don't have to be too loving about this or anything, but glue adheres best to a squeaky clean surface and cutlery, even if it hasn't been in use since the 1950s, can be greasy. If you don't want to scrub the butter knives from top to toe, wiping the handles with alcohol should do.

2. Arrange the Scrabble tiles to make labels. If you've only got one old Scrabble game to work with, this can get tricky. This project works best for labels with six or fewer words, and not too many Q's or J's. There are also only two C's and 2 H's in a Scrabble game, so if you make CHARD and BOK CHOY you can't also have CARROTS. There's only one K, so you can have either PUMPKINS or KALE. It's your choice! Other options are simply to work from more than one Scrabble game, or to pad out the letters with other types of moveable alphabets. You can buy old refrigerator alphabets as cheaply as you can Scrabble games, for instance, and with a pair of tin snips, cutting letters out of expired license plates is dead simple.
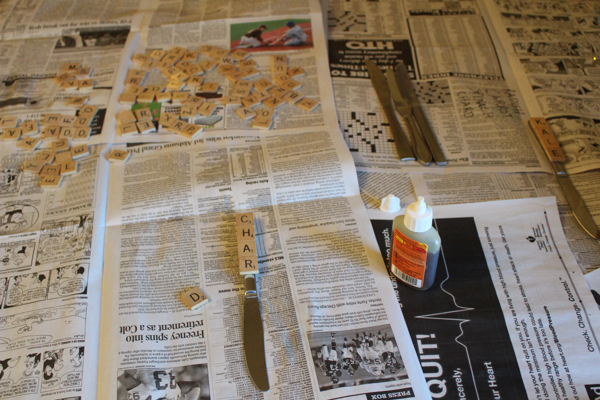
  scrabble letters on newspaper

3. Glue the letters to the handle of the butter knife. I prefer to put the epoxy glue on the knife handle, and then arrange the letters. I like the letters nice and even, but my kid likes them skewed and off-center--to each her own! When the label is glued on, leave it to cure for the length specified by the glue--usually about 24 hours.
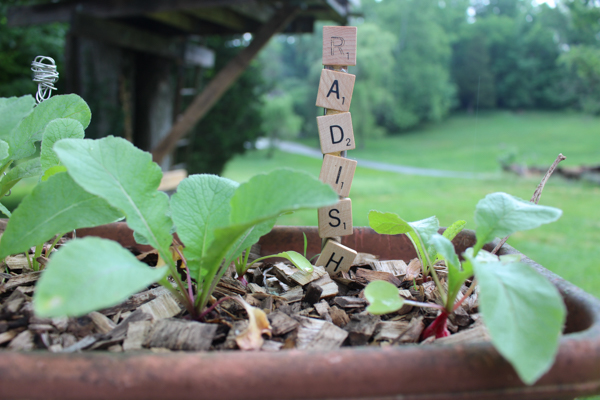
  radish plant marker

These plant markers are so efficient to install since the blade of the butter knife will slide into your soil as easily as it slides into butter, and yet kids and rabbits can't accidentally displace them. If you want to customize these plant markers even more, you can experiment with spray painting (and sealing the paint) first, or, if you'd like to use them indoors, why not decoupage them more elaborately?

P.S. Like tutorials and WIPs and lots of fun crafting ideas? Check out my Craft Knife Facebook page!

Wednesday, June 20, 2018

A Little Try at Oil Painting

Syd is a talented artist, so I try to offer the children a lot of hands-on art exploration during our school days. Some is intentional and cross-curricular, as when we studied the Berlin Wall and made graffiti, or draw the animals we study in biology, some of it is led by kid interests, as the way that we always come back to Sculpey and Perler beads, and some is me just tossing a particular tool at the kids and saying, "Here! Go!"

I think it was Matt who actually received this set of oil paints for Christmas some year or another--when Mammaw was alive, she sweetly gave him lots of art supplies every year because she knew that he's an artist--but Matt has never painted in oils, and so was as clueless as the rest of us about how one goes about it. Nevertheless, I like the kids to try new things, AND I like to not have years-old supplies just taking up space in my closet, completely unused, so I checked some books out of the library, hit up a couple of websites, and then one afternoon, just like that--


--they were oil painting! I'm dissatisfied that we only have one easel, but not so dissatisfied that I plan to buy another easel new from the store. Perhaps I'll build one, or perhaps one will magically appear at a garage sale near me soon.

I also remain dissatisfied in that the children didn't really come away with the understanding of the possibilities of oil painting. My own understanding is that it's great for blending and layering and under- and over-painting and whatever you call all that, but the kids mostly found those qualities of the paint that allow for those techniques to be messy and annoying. Syd, in particular, got infuriatingly frustrated with her cat. She wanted to be able to paint over a mistake, as she can do with acrylics, but unlike acrylics, which dry quickly to make that possible, the oil paints stayed wet forever and she couldn't work out how to keep them from getting muddy when she wanted to add a new layer of paint:


She kept at it, though, and eventually created two paintings that she's pleased with:


Will created something, too, but I can't find it, and I can't ask her because she's at day camp right now. Grr!

So I don't know about this one; the results are mixed. But that's the idea of a little taste, right? You test the waters, get some experience, and when you have at it again you'll know just that much more.

Here's the best online resource that I found for beginning oil painting with kids. When thinking about doing art with my kiddos, I like to look for blogs and websites created by art teachers who work with kids their ages.

The kids also really liked this book that I checked out for them from the library--


It's VERY kid-friendly, and has some nice techniques, and some projects to get them started if they don't know what they want to make.

If I had this lesson to do again, I'd also add in some art history and have us look at fine examples of oil paintings throughout history. I wonder if that, in particular, might have engaged Syd about the possibilities of oil painting. A visit to an art museum would be best, so that you can see all the details up close and personal!

Monday, June 18, 2018

Graph the Digits of Pi, and More Delicious Pi Projects

Sometimes I try to make our weekly hands-on math enrichment something that relates to a math concept that one of the kids is studying that week, but often, it's just something fun, because math IS fun!

For math enrichment one week, then, I challenged the kids to graph the digits of pi.

I printed out 1cm graph paper while the kids found the Cuisenaire rods and markers. Cuisenaire rods and 1cm graph paper are best friends, and I LOVE using them together.

First, the kids used Cuisenaire rods to make a physical model of the graph directly onto graph paper:


Look at how pretty that is!

Next, each kid took two sheets of graph paper, and was responsible for coloring in the graph for those digits. Will went first, so that Syd could start where she left off with her second two sheets.


On another day while they were at day camp, I trimmed the graph, taped the sheets together, and mounted it in their playroom as a surprise for them when they came home:


That graph below pi is from I don't remember when, when Syd graphed the number of toy animals on these shelves according to categories that she made up. The far greatest number of animals belong to the Mythical Creatures category, it seems.

Here's a better look at their complete graph of pi:


 I think it's lovely!

Can't get enough of pi projects? I kind of can't! Here are plenty more resources for active engagement with the concept of pi:

  1. This song makes it so easy to memorize the first 25 digits of pi that a seven-year-old can do it!
  2. Archimedes used the Method of Exhaustion to find pi by averaging inscribed and circumscribed polygons. You can do this, too, small-scale with pencil and paper or large-scale with chalk on your driveway.
  3. If you're looking for an anchor chart with the digits of pi, why not make it as lovely as possible? I really want to make this out of stiffened felt.
  4. Syd is going into the seventh grade and she STILL loves BrainPop videos. Here's one on pi.
  5. Oh, look! If you use LEGOs, you can take your graph of the digits of pi VERTICAL!
  6. Here's another really cool visual exploration: you cut a circle into equal parts, then rearrange them so that the parts form a rectangle. I'd use heavy cardstock to help the pieces be less fiddly.
  7. Demonstrate pi with string,  although use something with no stretch to it, like twine.
  8. This post shows a pi scarf knitting pattern--which I super need to learn how to knit so I can make--but the template also shows the gridded digits, so you can use it to cross-stitch pi or make it from Perler beads.
  9. Bake pi! If you have a set of numeral cookie cutters, check out this cherry pi decorated with the digits of pi.
  10. Okay, this is the cutest thing that I've ever seen. Make a Pi Day pin out of felt!
  11. This is a terrific activity for demonstrating pi. It uses lined notebook paper to help you make your measurement.
When Syd was really into memorizing pi, we found this video that taught her that she actually only needs to memorize the first 39 digits. With that, she can measure everything in the known universe with an accuracy equal to the width of a hydrogen atom!


And finally, here are our favorite books about pi:


P.S. Want more in-the-moment handmade homeschool projects? Check out my Craft Knife Facebook page!