I don't have a "before photo," so just imagine that prior to building our DIY wooden headboard, our bed was basically consisted of a mattress on top of a platform.
Super classy, right?
I really like the look of a giant, rustic, wooden headboard, but I don't have access to antique barnwood or other salvaged wood, I'm not comfortable with keeping pallet wood that close to my head, even if it's well sanded and well sealed, and I didn't want to pay for or really even use fake but easy-to-apply laminate.
That left us with using new, though natural, materials, from our local big-box hardware store.
With those supplies, plus a little jiggering around, we figured out how to get the look that I wanted in a single day for less than sixty dollars--and that includes buying the wood stain, which you may not necessarily need to do.
DIY Wooden Headboard
Here's what we used:
two shelving unit end frames. These are wooden frames with metal brackets, designed to allow you to add your own shelves. You'll be turning these on their sides and stacking them, so that you'll have a large frame that's about 6 feet wide and four feet tall. People want to get rid of these all the time--we actually had one randomly sitting in our garage--so you could try to find one at your local ReStore or on Freecycle before you buy it new. It won't matter if it's in poor condition, as it won't be visible.
tongue and groove wooden planks. These are plain, unfinished wooden planks with tongue and groove edges so that you can line them up nicely. By using these, I had to give up on the staggered look that I'd wanted, but the ease of placing them perfectly and making the job quicker and simpler was worth it. We used seven of these for our headboard, although one is completely covered by the mattress, so we could have skipped that one and saved a few bucks.
screwdriver, drill, and drill bits. You'll need to screw the end frames into the wall, and the wooden planks into the end frames.
water-based stain (optional). For some reason, I find that whatever stain I buy, it always looks much darker than I think it will, so I generally go a couple of shades lighter when I choose it.
1. Lay everything out to make sure that you like it. There's no cutting involved in this project, so you really can lay your entire headboard out on the floor to make sure that the pieces will go together the way that you want and that you like the look.
2. Stain the wood planks. My kids helped me with this step, and although I was a little afraid that they'd do a wonky job, fortunately stain is very forgiving.
And yes, as our headboard that stain looks at least two shades darker than it does in this photo.
I did not seal the planks, and I may live to regret that, but it saved me a lot of time, they look fine, and really, how much wear and tear can a headboard possibly get?
Don't answer that if you're gonna be gross.
3. Screw the frames to the wall. Matt set the bottom of the bottom frame just above the top of our platform, so that the platform could still sit flush to the wall (and he found my Fitbit! I thought that I'd lost that thing forever!), leveled it, and screwed it into the studs. Remember, you're setting these frames sideways, so that each one is six feet long and two feet tall.
Once the bottom frame is in, the top frame can sit right on top of it--just double check that it's level before you screw it into the studs.
4. Screw the wood planks into the frame. Although you have to be mindful of those metal brackets, you can otherwise just screw the planks into the wooden frame. I also did not fill in the screw holes, and although I was a little afraid that the screws might catch my hair, they're far enough to either side and inset enough that they don't.
You can see in the photo above that these planks extend just far enough to each side of the frame that we were able to hide a power strip on each side--of course, all the crap that we plugged into each power strip has wires sticking out, but it still looks better than it did before.
Three years on, the headboard still looks brand-new, so I'm super smugly satisfied that I didn't bother to seal it. The rest of our bedroom is still pretty janky, but maybe in another three or four years I'll be in the mood to update something else...
The genesis of this project/home remodel was the PVC pipe ballet barre that Matt and the older kid made for the younger kid for Christmas last year. I suggested it as a present because I thought that she would love it, and she did, but...
...apparently, if you give a ballerina a ballet barre, she'll ask for a full-length, wall-mounted mirror to go with it.
It took me a few months to casually suss out the logistics, but finally, in consultation with the younger kid and Matt, we decided that--well, remember those wall-mounted shelves that Matt made?
I'd insisted that the shelves shouldn't go all the way to the adjacent wall because we have yet another door to the outside there (we have FIVE doors to the outside in our strange, not-really-that-large house) and I thought it would be weird if the door knocked into the shelves when it opened.
Well, it turns out that if you actually don't care about that at all, you've given yourself another full six feet of wall to work with!
BUT you're going to have to empty those shelves--
--unscrew them from the floor and wall, and move them.
They're maybe a teensy bit wobbly now, but don't tell Matt.
I was excited about emptying the shelves, because that's where we keep board games, puzzles, and floor toys, and now that I've got these great, big girls, I expected that I'd be able to get rid of just absolute loads of games and toys. After all, these big girls don't still play Secret Garden and Professor Noggin, do they?
They do.
They don't still want Lincoln Logs and Kapla blocks and marble runs readily accessible, do they?
They do.
They're not still interested in building race car tracks and zipping their Darda cars through them, are they?
Actually, they're not, they say, and so I have it on my to-do list to ebay that giant Rubbermaid bin full of Darda tracks, but even those got one last huzzah:
We bought two of these 60"x36" mirrors, and with much terror and uncertainty about the quality of our walls, Matt mounted them in our brand-new swath of wall space:
He's got my stash cushion foam there to pad the mirrors while we were fiddling with them. I really should use up the rest of that cushion foam and free up some closet space, but then what would we do if we wanted to mount more giant mirrors?
When they were mounted, all we had to do was move the kid's ballet barre in front of it, and she's all set!
It's a great place to pester Jones, the world's crankiest kitten:
And it's also a good spot for some impromptu ballet practice, because of course technique class and jazz class aren't nearly enough dancing for one Saturday!
I'd like to add some framed prints and signed programs to the kid's studio area, but I'm hesitant to put anything above the mirror that could even remotely be nudged off of the wall by pounding ballerina feet, and there's not enough room on either side of the mirror, darn it.
Perhaps a couple of posters could go above the mirror, or a stenciled quote...
How many years can you be vaguely annoyed by your kids' Girl Scout cookie order forms never fitting properly on a clipboard before you do something about it?
Six years. The correct answer is six years.
And you also need the impetus of an imminent Girl Scout meeting at the local farmer's market (the Tuesday one, NOT the Saturday one), for which you have created a scavenger hunt that requires the girls to annotate a large-format map of Indiana while running around and talking to growers and producers, making large-format clipboards also obviously necessary.
So here's how to make your own large-format clipboard! It's super handy, I love it, and you're going to like it a lot, too.
You will need:
MDF or hardboard, or a similar wood type. You want something that's higher-quality than particle board, although still within the same approximate .5cm-.25in thickness. You can go thicker, keeping in mind that you're going to have to tote this bad boy around with you, but I wouldn't go thinner, because if the wood is so thin that it flexes, then it's a crap clipboard and you'll be sad. You can also use real wood, of course, not the weirdo particulate nonsense that I'm advocating here--the best case scenario is to dig around in your garage until you find a piece that works for you for free.
measuring tools.
saw. I used a circular saw, but use whatever you've got that works for you.
sandpaper or grinder. You'll use this to round the edges of the clipboard.
(optional) paint, stain, and sealant. You don't have to decorate the back of the clipboard, but why lose out on an opportunity to be extra?
binder clips. Generally, it's bulldog clips that are used on a clipboard, but we're going for something different--and more versatile!--here.
1. Measure the clipboard. Since I essentially used scrap wood for this project, the proportions of my clipboards are slightly strange in order to use as much of the wood as possible. However, 12"x16" or 12"x18" make little difference--they're both good sizes to fit a Girl Scout cookie order form.
2. Cut the clipboard. Go play with power tools!
3. Sand all the edges and grind the corners. Especially since kids will be using these clipboards, you don't want them to be sharp or have splinters, so round all of the edges with sandpaper, then use a rough grit--or a grinder, if possible--to round the corners.
4. (optional) Embellish! The trick here is to embellish and seal ONLY ONE SIDE of this clipboard. That's because it's going to be secretly multi-purpose! I'm just going to tell you right now that when the kids were young I was super into Waldorf-style stuff for well more than a hot minute.
I wasn't into Waldorf-style learning, mind you--just the stuff! I loved beeswax crayons and tree blocks and hand-sewn dolls stuffed with wool roving and wet-on-wet watercolor supplies and rolled candles and gnomes and shit.
Anyway, all the wet-on-wet watercolor aficionados always used these super-awesome wooden painting boards, which really are super awesome because they hold the paper still, don't get water all over, and are wipeable. I don't think you even need the beeswax polish, because I think it ruins the tooth.
So I never made the kids one of these painting boards (although I highly suspect that I originally bought this particular piece of wood in order to make painting boards and then never did that project and instead just hoarded the board in the garage for several years--I may have even moved house with it!), BUT by leaving one side of this large-format clipboard completely unembellished and unsealed, you know what you get?
A Waldorf-style plain wood painting board! Yay! Syd has been really interested in watercolor painting this summer, so this painting board is particularly nice for her. I also like that it's lap-size, perfect for sitting against a tree trunk and doing some outdoor art.
But back to the back of the clipboard, which you're free to embellish and is a nice size for it. To embellish these particular Girl Scout cookie order form clipboards, I stained them, stenciled a large trefoil onto each, painted the trefoil green with three coats of craft acrylic, redrew the border with Sharpie to neaten it, and then painted polyurethane sealant over the whole back.
Instead of screwing a non-removable clip directly to the clipboard, I have four of these binder clips clipped to it. We can use or move them as desired, which makes the clipboard highly versatile.
We've already used these clipboards a bunch, and it's not even close to Girl Scout cookie season! I love how handy they are, and how easy they are to store. It wouldn't be unreasonable to make one for every girl in a troop, or to have them make their own (Hello, Cadette Woodworking badge!), or to have them embellish their own before you seal it.
You guys, these kids are going to sell so many Girl Scout cookies this season!
P.S. Like weird (and wonderful!) projects like this? Check out my Craft Knife Facebook page, where there's lots more!
Check out this quick and easy project that I made on one of the first shirtsleeves weather days this spring:
It's the Mini Bookshelf from The PVC Pipe Book (which I received for free from a publicist), and it came together in the time that I should have been spending cooking a decent, nourishing dinner for my family:
I'm pretty sure that we had sandwiches for dinner that night, but whatever. I built a little bookshelf from scratch, AND I painted it!
It's meant to be the latest foray in my neverending quest to make the big table that we use as the kids' school table during the school week (and which they're SUPPOSED to clean up so that we can use it for family stuff each weekend but they never do and I'm perennially too lazy to add it to my list of things to nag them about), but I think I might like it even better in its current set-up:
We're deep into a stretch of shirtsleeves weather days--yay!--that make school outside the perfect thing to get the kids a little more enthused about book work until that stops working and I have to think of something else. We are also on high alert, as yesterday, our whole family was sitting on the couch admiring the children's Easter baskets when we heard a chicken start fussing outside. I ran to the open deck door (because shirtsleeves weather!), saw something orange tumbling with one of our Brahma hens, took another step forward and saw that it was a genuine, BBC documentary real-live FOX trying manfully to snap my sweet baby's neck while she squawked and struggled and tossed feathers everywhere.
I, too, began hollering, ran out across the deck, slipped and almost broke my dang neck, bent down to grab Syd's Crocs (that she was supposed to have brought in last night, sigh...) so that I could start throwing stuff--my second choice was going to be my cell phone--but by the time I stood back up and readied my throwing arm the fox had completely disappeared and Brahma Hen #3 was booking it back to the flock where she was supposed to be in the first place. Will, who was part of the also-hollering idiot mob who ran out behind me with no idea of what was going on but clearly ready to do some brawling, claims that she saw a streak of orange disappear back into our woods.
Brahma Hen #3 is fine, thank goodness. She's so big and fluffy that it looks like the fox didn't even break the skin, although the amount of feathers she had flying at the time had me sure that the fox was something like four chickens deep by the time I ran out there. I'd say that I hoped the whole flock learned a lesson from her experience, but I'm sitting by an open door right this second and can clearly see our little blonde and brown hen, much less fluffy and definitely much smaller, just bopping around all by herself miles from the flock but painfully near lots of great hiding places for foxes. I swear, they cause me as much worry as the kids do sometimes!
So that's how we spent the less fun part of our Easter Sunday strengthening the chicken coop, researching foxes (Matt looked up from the computer at one point and said, "This website claims that the fox has probably been watching us for days and knows our routine!" so now we've got not just regular life but a high-key stalker to think about), and trotting Luna out to "keep watch" and "guard the chickens" for us. I have no idea if she's actually capable of these tasks, since the last time a chicken died on our property SHE was the reason I had to euthanize it, but still. She's bigger than a fox, at least.
And now we can spend our school days outside, not just enjoying the lovely weather and getting some fresh air, but keeping a weather eye on the goings-on of the backyard and the fool hens who are SUPPOSED to be staying with that rooster who I tolerate even though I have to take a stick every time I walk around my own property and turn around suddenly every few feet as I walk to catch him acting like he wasn't just about to jump me from behind BECAUSE HE'S SUPPOSED TO BE PROTECTING MY SWEET BABIES FROM FOXES.
How is YOUR week going?
P.S. If you've got the PVC to make this mini bookshelf, you should also have your kids make this PVC pipe bow and arrow set and PVC pipe sword. It'll help them in their battles against the foxes, don't you know?
Will is in her final months as a Girl Scout Cadette, and also in her final weeks (at least, I DEARLY hope so!) of her Silver Award project.
To earn the Silver Award, the highest award that a Cadette can achieve, a Girl Scout Cadette must create, initiate, and complete a big project that fulfills a long-term need in the world around her. It must be sustainable, so that it works toward a permanent solution, not a temporary fix, and she must ideally spend at least 50 hours planning and producing this project. It's her project, so she must take the initiative and complete all the steps herself, doing lots of things that she's never done before and participating in the adult world at a level that she's likely never before experienced. An adult adviser guides her, offers advice, and helps her work through problems, but the project belongs to the girl.
It's a lot to tackle for a sixth-through-eighth-grader, but like much of the Girl Scout experience, it's experiential learning at its best.
Which is what I try to remember when mentoring Will's Silver Award project starts stressing me out!
Will did a lot of brainstorming for her Silver Award project a year ago (and let me tell you, a year has turned out to be just almost not enough time for this project! I am telling my current crop of Cadettes who bridged last fall that they need to start their projects this fall or by Christmas at the latest, giving them 9-12 more months than Will had), but had, as I think is fairly typical, a lot of trouble coming up with a project that inspired her. She really wanted to do something legislative, but I encouraged her to save that for a Gold Award project, as I doubted a year would be enough time for a project like that. Then she thought that maybe she'd do something for or with the national park system, since she loves Junior Ranger badges so much. She even did some networking at the GIRL 2017 convention, and a park ranger there gave her the contact info of a ranger who would be a good person to hear her ideas.
The Little Free Library program! With its founder, reeling everyone in and speaking super enthusiastically and handing out fun patches!
The next time I asked Will to show me her brainstorming ideas, a Little Free Library for our town was at the top of her list, and I encouraged her to dig in and go for it.
Of course, just setting up a Little Free Library any old place isn't doing a lot to solve a "problem," so I encouraged Will to work through the steps to earn the 2018 Global Action Award, which is all about the United Nations' Sustainable Development Goals. As part of her badge work, I asked her to find a Sustainable Development Goal that could apply to her Little Free Library project. She realized that Quality Education was a good fit, and I helped her work out some specific ways in which a Little Free Library could improve access to quality education.
Using the Quality Education Sustainable Development Goal as her lens, Will decided that putting her Little Free Library in a public park would ensure the most access to reading material to the widest population.
Her next step, then, was to figure out who to consult about the possibility of putting a Little Free Library in a public park! We knew that there are a couple of parks in our town that already have Little Free Libraries (and that's okay, because a Cadette doesn't have to invent the entire wheel for her Silver Award project--even knowing it's already been done before, this is very much a big enough project for a Cadette!), so I Googled them to see if I could get any more information, and found an online article that covered one such library's groundbreaking, and included the names of the library's sponsors, the group that sponsored it, etc. I showed this article to Will and encouraged her to contact one of these people to ask them some questions about how they structured their process.
I would have asked one of the named sponsors, myself, but Will chose to instead email the author of the article, who happened to be the city's communications director and also the absolutely most perfect person to contact. That woman not only replied to Will promptly, but also found the exact person in the city administration whom Will should be dealing with, and connected the two by email!
I just need to say that I am sure that for any adult, working with a child who is a project leader must be a novel situation, and yet every adult that Will has worked with throughout this process has been just wonderful to her, treating her respectfully as an equal, but at the same time having a LOT of patience with the obvious learning curve she's experiencing in writing good business emails, summarizing and explaining her project, returning emails promptly with the relevant information, etc. People are really great!
I helped Will proofread her emails, and suggested edits, but Will was responsible for contacting the city official, explaining her project to him, and asking him for permission. He then asked for a meeting to hear her ideas in person, so then she had to prepare for that. What to say. What to wear! How to answer his questions! It was a big deal!
While this research and emailing was going on, Will also was working on the physical library, itself. She used the Little Free Library site to find a map of all of the Little Free Libraries in our town, and we took several trips to drive around and see as many of them as possible, often coming across unregistered Little Free Libraries and checking those out, as well. I encouraged Will to look at all the details of each Little Free Library, in particular its location, construction, installation, and special features, to decide what she thought would work best for her own build.
Here are some photos of her favorites:
Will liked those really unusual Little Free Libraries best--I mean, of course!--but decided that the following style would be the easiest to build, as well as the most practical for her purpose:
As you'll see, this was... ultimately not completely correct, but it IS a learning process!
Will researched plans for Little Free Libraries similar to what she liked, and when her grandparents came to visit to watch Syd dancing in The Nutcracker, her grandfather spent a day helping her build her first Little Free Library:
She stained it and sealed it, and it turned out just beautiful.
This, then, was the model that she brought to her meeting with our town's Parks and Rec official, and it was the model that he approved. Will told him what she was looking for in a location, and he helped her find a city park that serves an economically disadvantaged community, so that placing the Little Free Library there would hopefully increase the population's access to literature.
Parks and Rec took care of getting the site surveyed for utilities (call 411 before you dig!), and Will contacted the manager of the grounds crew and settled a time to meet them there and together install her Little Free Library. I invited the rest of our Girl Scout troop, and the girls all got a chance to help dig:
Will assisted in the installation itself:
She filled it with books, and it was perfect!
And from this moment on is where there started to be a LOT of problems.
Like, a LOT of problems.
Part of Will's commitment to Parks and Rec was that she would be the steward for this Little Free Library, so we drove back a few days later so she could check on it and restock, and we discovered that it had been vandalized. The back was cracked all the way across, with a boot print to show what had done it, and the Plexiglass from the front door was missing.
Will cut a new back, stained it, and mounted it over the broken one:
She cut new Plexiglass, which she will readily inform you is the thing that she hates doing the most in the world, and set it in with silicone caulk:
The next time we came back, the Plexiglass was gone again. We figured it had gotten "displaced" before the caulk could set, so this time Will unmounted the door, took it home, replaced the Plexiglass, sealed it, and then returned the door and remounted it.
--and then came back one day to find that the entire door was broken off.
Will did a lot of troubleshooting for this repair, and eventually decided that a clear door was just not working. Instead, she cut a plywood door--
--painted it, and because she was worried that people wouldn't understand what was inside if they couldn't see, she stenciled a label on it. We drove her to install it...
...and it was too small.
So she made another door, same process, took her to install it...
...and it was too small, actually smaller than her first try, inspiring my new Word to the Wise, "Measure not, cut a lot!"
Will was SO frustrated by this time, but she DID measure so much more carefully, and cut so much more carefully, and (with some on-site sanding for one sticky-outy part), the third try fit.
There's been one good check-up since then, and I REALLY hope that this sturdier door solves the vandalism/rough usage/whatever is going on, because I have to tell you, I know it's not my project, but whenever I see that someone has damaged my precious baby's hard work, it makes me sick to my stomach.
I mean, at least let her reach the age of 14 before she loses all faith in humanity, you know?
Regardless, this project has so far taught this kid so much. She's got experience writing business emails and attending business meetings, and she better understands professional communication and what is required. She's a more confident builder. She's had more practice speaking with strangers. She has done a LOT of troubleshooting and problem-solving, sooooo much trouble-shooting and problem-solving, and she's learning how to deal gracefully with setbacks and disappointment, and how to just keep working towards a solution. She's seen a couple of kids squealing in delight at the contents of her newly-stocked library, so that was pretty great. And she's figuring out how to plan and handle and (hopefully) complete a very big, long-term project, which is something that will help her throughout her whole life.
Will still doesn't consider her Silver Award project complete at this point, which feels right to me, too. She's done a lot of work here, but most of it has been troubleshooting and problem-solving. That's all great--experiential learning!--but I think she needs to spend more time working on the big picture of her underlying goal of improving access to literature for underserved communities. Here are a few ideas that I've heard her toying with:
Building and installing another Little Free Library in another park to reach more people.
Holding a book drive to ensure a readier supply of books for the library, instead of relying on community exchange as one could do in a more affluent area where most people could be assumed to have excess books to share out.
Hosting a community literacy fair at her library, perhaps involving the whole troop in fun activities and free books for community children.
Hosting a Girl Scout workshop at the library, also with the troop to help with activities, but with the goal of doing service and garnering book donations, and rewarding the attendees with a fun patch.
Writing instructions for constructing and installing a Little Free Library in an economically disadvantaged area, with her advice about hardening the library against vandalism or rough usage, ideally to help other people who want to do this same project. An alternative would be to host such a program at the public library or farmer's market.
Writing lists of recommended books, all of which would be available at the public library, and providing instructions for how to obtain a library card.
I'm not sure what she'll settle on, but I am VERY much encouraging her to get whatever it is rolling by the end of the summer. She's still got a lot of paperwork to fill out and essays to write to apply for her Silver Award, and I want all of that stuff filed and recorded well before she bridges to Girl Scout Senior in October.
And then? On to Gold!
P.S. Come hang out with me on my Craft Knife Facebook page and I'll share more WIPs and Girl Scout hijinks with you!
Some time ago, I bought a package of leather scraps from RSVPhandcrafted on etsy, so that I could introduce crafting with leather to Syd. Leather isn't a material that I, personally, have a ton of interest in, but Syd is a gifted artist and an avid crafter, and it's one of my homeschool goals to introduce her to as many facets of arts and crafts as possible.
Unsurprisingly, she took to leather crafting like a natural!
To make a wood burned leather bookmark, first use sturdy scissors to cut a bookmark out of leather. I used another bookmark (we make them often!) as the template.
Next, use a pencil to make your pattern. It's helpful to decide what tip on the wood burner you're going to want to use, so that your pencil marks are suitable. You can get quite narrow and detailed lines with the right tip, but Syd wanted to use something a little wider, so made sure to make her lines suitably wide.
Then get out the wood burner and trace over your pattern!
You'll notice that Syd does the busy mom trick of listening to her audiobook with only one headphone on--the other is off her ear so that she can participate in conversations. It means she only pays half-attention to whatever is going on, but like her sister (and, frankly, like me...) she's gotta feed that brain with stories or she'll squirm out of her skin!
Here's the part that I think is the coolest: after you've finished wood burning the leather, you can get a set of permanent markers (Sharpies would work, but here Syd is using Prismacolors) and embellish the bookmark.
Notice that Syd has another piece of scrap leather by her side to test colors, because the tan leather gives unexpected results, sometimes:
Finally, you can use an eyelet setter, an awl, or the wood burner to put a hole near the top of the bookmark, then thread through embroidery floss and knot it. And then admire your bookmark, because doesn't it look pretty!
We have so many books constantly going in our family, that making bookmarks is somewhat of a collective obsession of ours. Here are some other bookmark projects that we like a lot:
Upcycle a coloring book page into a bookmark. I love these for preserving the sweet coloring pages that the children complete, without adding another thing to my stack of keepsakes.
cardboard record album bookmark. The duct tape is optional for this project; I generally only use it if the back of the album cover looks gross.
upcycled cross stitch bookmark. I buy a ton of old picture frames at Goodwill, and this one had an elaborate, but not to my taste, cross stitch creation framed in it. So I gave it new life!
upcycled Girl Scout cookie boxes. Seasonally, we have endless supplies of these, and so we have endless supplies of bookmarks made from them!
downloadable coloring page bookmarks. It's actually easy to find bookmark templates online for printing in cardstock and coloring in. We found lots of ones for TV shows and comics that we love.
secret bookmarks. This isn't a bookmark tutorial, but when Syd was a Brownie, the Take Action Project for her World of Girls Journey was these "secret bookmarks" that she hid in library books in the children's department of our local public library. It was such a clever project, and so perfectly suited to a Girl Scout her age!
I don't have concrete plans for the rest of the leather scraps in the package that I bought, although Syd has made other bookmarks and a few other projects. If you think of something else awesome that we should do with leather scraps, let me know!
P.S. I post more WIP pics and crafting and homeschool resources every day over on my Craft Knife Facebook page. Come find me!
Shape puzzles are super fun and excellent for mathematical and logical thinking. I've been trying to strew more puzzles for the kids this spring, along with the sensory materials that I'm already used to offering them, and out of everything that I've offered, I think that shape puzzles have been the most popular.
And, of course, it doesn't hurt when *I* become obsessed with what I've strewn!
I happened upon pentominoes in the book Engage the Brain: Math Games, Grades 6-8. It was the first time I've seen them, and I can't get enough of them! They're diabolically simple: five squares must all share at least one side. Twelve original shapes can be made from that rule.
You can simply fiddle with them, putting them together however you like and seeing what you can make, or you can solve puzzles with them, either trying to assemble them into rectangles or squares or fit outlines that others have made. There are some easy, perfect-for-beginners puzzles out there, but we started with these more difficult ones, specifically the 6x10 rectangle with 2,339 reported solutions.
"Over two thousand solutions!" you say. "Why, that must be simple!"
I'm afraid I must disagree:
The kids and I worked and worked and worked on this! The most frustrating thing is almost solving it but for one single piece. Grr!
The younger kid developed the strategy of drawing her possible solutions rather then putting them together. Took much longer to do, but it did look lovely!
Don't tell the children, but I cheated. We were all working together at the school table, and they were so focused and intent that I didn't want to disturb them by leaving, myself, without a solution. If you homeschool, you likely know that the surest way for a child to lose interest in her work is for you to lose interest first. Go take a five-minute phone call and you'll find that the school table has mysteriously absented itself of children when you return!
I figured that the only way that I could walk away from the table without discouraging the kids is if I'd solved the puzzle, but that darn 6x10 rectangle just would not solve itself! And so I cheated. The puzzle page that I linked to earlier has its solutions diagrammed, so I began sneaking peeks at the solution, giving myself more and more pieces that were correctly placed to start with. I think I'd cheated half the puzzle before I finally managed to solve it:
And then, about ten minutes later and completely on her own, so did my thirteen-year-old.
Grr, indeed!
You can make a simple set of pentominoes using just graph paper (I'd recommend the one-inch grids), but you'll notice that we have these handy-dandy, ready-made plastic pieces:
Super-awesome pro tip: they come from our Blockus games! We own both regular Blockus and travel Blockus--AND an almost complete extra set of travel Blockus pieces--all bought from Goodwill. Blockus and Scrabble are two games that I almost always buy when I see them selling for a song at a thrift store or garage sale. I had it in my head that I really wanted to make DIY versions of pentominoes, so the younger kid and I experimented with some unfinished one-centimeter cubes that I have, and we did manage to end up with a couple of sets that I like okay:
I like that these handmade pentominoes are more tactile than a paper model, and that they're three-dimensional, so they have more utility and scope for creativity than the 2D versions. However, they're impossible to make so that they fit together as snugly as store-bought, machined pieces, and that U piece, in particular, I had to remake about four times, and after painting it I realized that I'll have to remake the purple one a fifth time--it's REALLY difficult to keep that middle space open more than a centimeter!
So in this case, I've finally resigned myself to the fact that store-bought plastic is simply better:
I had additionally been thinking that I should make a DIY magnetic version, perhaps to fit in some sort of metal tin, maybe made of Perler beads and with magnets on the backs, but then I realized: duh. I can obviously just use our TRAVEL BLOCKUS set. So that's one more problem solved!
The greatest thing about pentominoes, especially if you have gifted learners and learners at different levels, as I have both of, is how many enrichment opportunities there are with such a simple toy. There are a million ways to play with pentominoes, a million ways to structure activities, a million research projects, a million projects to solve, a million ways to incorporate them creatively into play. Here are some extension ideas and resources, some of which we've used, and some of which I've put on our to-do list for later exploration:
Chasing Vermeer. We're listening to this right now as our car audiobook.
lesson plan. If you need to more formally introduce the concept pentominoes, here's a full lesson plan.
pentomino alphabet. These solutions are demonically tricky, but I think it would be really cool to cheat the solutions, then use them as templates and simply draw them and decorate them on graph paper for fun.
printable pentomino puzzles. These didn't work great for us, because the printout diagrams didn't match the sizes of the pentominoes we already have. If you needed a quiet activity that kids could do independently, though, you could print these and the included pentomino templates. Bonus points for printing the pentominoes on magnet paper, popping it all into a metal tin, and having the travel pentomino set of my dreams!
3D pentomino puzzles. Here are some templates especially for pentomino sets made from blocks.
See! Now you can be obsessed with pentominoes, too!
P.S. Interested in more hands-on homeschool projects? Check out my Craft Knife Facebook page!
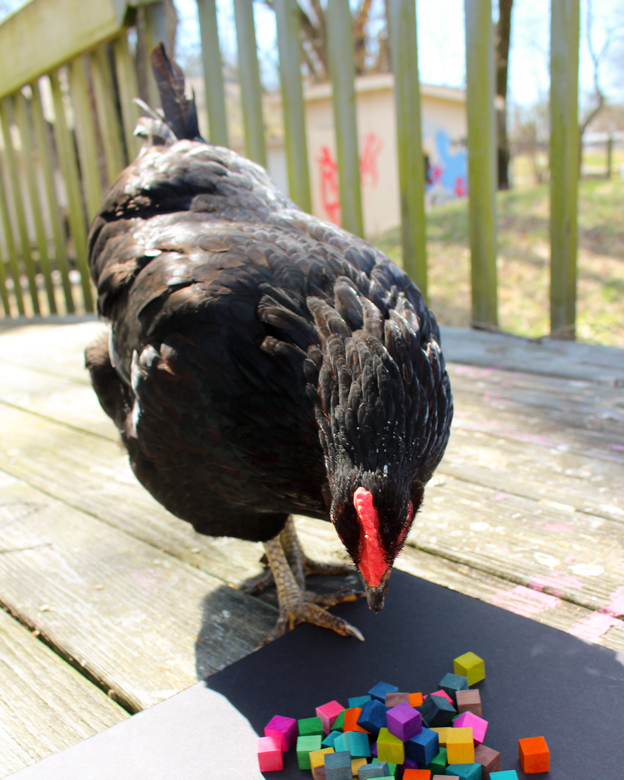
"Aww, look!" I thought. "The chicken wants to seee what I'm doing out on the deck on this gorgeous afternoon!"
"Isn't she pretty?"
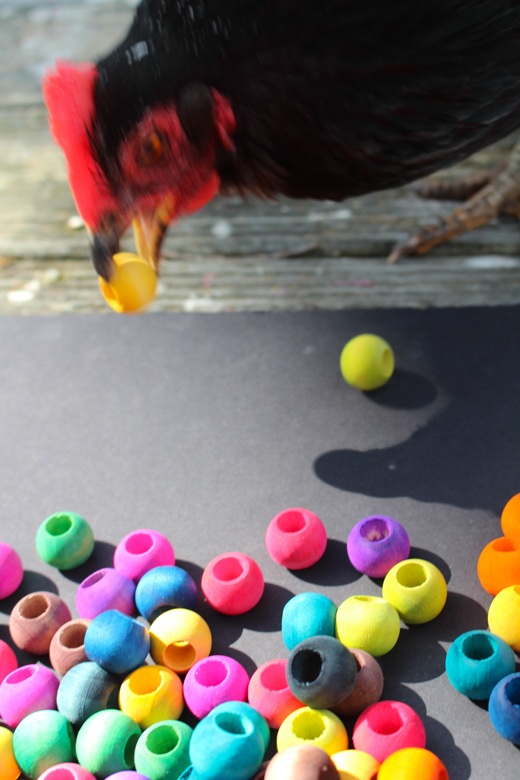
"HEY!!! Those are not berries!"
So there you go. My hand-dyed wooden beands and blocks are so pretty that chickens think they're berries.
I can't even tell you when I dyed these--a couple of years ago, perhaps?
We were doing several projects that involved hand-stained wood, and I was working out just the perfect technique to share over at Crafting a Green World.
While working out the technique to my satisfaction, I made waaaaaay more dyed wood pieces than we needed for the projects.
Apparently, I just squirreled the surplus away in my stash, because I am actually a hoarder.
I rediscovered them the other day while I was cleaning and decided I might as well peep into that plastic drawer in the closet--I'm still finding containers that I haven't unpacked after our move (which was four years ago now, for those of you playing the home game), so perhaps that drawer could contain my wedding ring, or my folk music anthology!
It didn't.
What it did have, however, were projects that I'd meant to list/relist in my Pumpkin+Bear shop. Some were projects that I used to have listed but wanted to rephotograph or rework in some way, and some where projects that I wanted to list in Pumpkin+Bear, but I'm guessing the light was poor on the day that I wanted to photograph them, or I got busy, and set them aside, consequently forgetting all about them.
Of course.
Fortunately, last week we had our first sunny, above freezing days in FOREVER, and there was nothing I wanted to do more than spend the afternoon out on the deck photographing stuff.
The kids actually use our stash of undyed wooden cubes as a sensory material. I pour them out onto a tray that sits on our homeschool table, and off and on all week I'll notice a kid fiddling with them as she thinks or reads. They're stackable, arrangeable, and they just feel good in your hands.
Syd really wants to turn some of these beads into Camp Halfblood beads, so that's a project we'll be taking on before too long.
I've used these stained beads to make magnetic mosaic tiles for our giant metal memo board. I'll probably use some of these to make more, and I'm tempted to upcycle a metal tin from somewhere and make a travel-sized version.
Of course, if you bought these from me, I'm sure I'd find something else to happily hoard and/or occupy my time with...