Showing posts with label astronomy. Show all posts

Monday, February 14, 2022

Homeschool Astronomy: How Does A Color Filter Affect the Temperature of Light Refracted through a Prism?

 Here's my biggest homeschool tip: never get rid of your homeschool stuff!

Big kids may not use those sweet sensory materials and basic manipulatives the way that they did when they were little, sure, and all that stuff from the early years may sit in your closet for a distressingly long time, but every now and then these big kids DO need that stuff, and it's awfully nice to have it. We've repurposed all kinds of the kids' early learning stuff into our homeschool high school, from the map puzzles that I dragged back out when Will was studying AP Human Geography, to the Base 10 blocks that helped the kids wrap their heads around binary during our Robotics and Programming study, to the beakers and balance scale that helped the kids understand mass and volume that we now use in science labs.

For this Honors Astronomy lab, Will repurposed the colored cellophane that I bought back in 2015 when the kids were going through a phase of having big interests in color theory (we did ALL the color wheels and color mixing and color filter stuff! It was so fun!). She also used a set of glass prisms that I WISH I'd bought back when my little learners were super interested in rainbows, dang it, and an infrared thermometer that I bought in 2014, after seeing the one that Will used to earn her Junior Scientist badge at Yellowstone

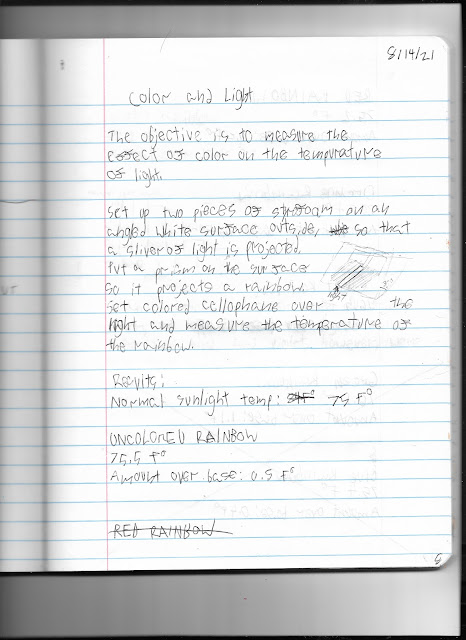
By this time, we'd played around quite a lot with prisms and their angles of refraction, and how a color filter might affect the dispersal of light, etc. So when I challenged Will to create her own experiment involving prisms, she thought it would be interesting to investigate how a color filter might affect the temperature of each color of refracted light from a prism.

I love the way that this experiment flows so naturally from her prior explorations. To make this lab work, she needed to know the prism shape that would give her the widest spread of individual colors, and have that experience of measuring the temperatures of each color, and noticing how a color filter affects the refracted rainbow.

If we'd owned these prisms throughout her childhood, that's probably information that she would have already picked up through sensory play and simpler experiments, and who knows how sophisticated her lab ideas would be now?


It's surprising how many astronomy labs a kid can complete right on her own back deck!


Will's got a few more labs that she ought to do to finish up her lab notebooks for a couple of her science studies (the goal for a high school lab science course is at least ten labs), and now I'm trying to think of more ways to use this awesome colored cellophane in experiments. 

Maybe she can grow bean sprouts under colored light for AP Environmental Science? 

P.S. Interested in more of the hijinks involved in homeschooling two high schoolers? Follow along in my Craft Knife Facebook page!

Thursday, January 20, 2022

Homeschool Astronomy: Spectroscope Lab

 Will completed this Astronomy lab as part of the chapter on radiation in her astronomy textbook. It was cheap, it didn't require much setup, it was simple to complete, and, most importantly--it was fun and interesting!

Spectroscope Lab

Materials:

Pre-Lab Work (Answer these questions in your Astronomy Lab Notebook):

  1. Complete the online spectroscope lesson.
  2. List the colors, from longest to shortest wavelength, as observed in the solar spectrum. What do the dark lines in the absorption spectra of stars indicate?

Procedure:

  1. Aim the spectroscope at a variety of light sources:
    1. LIGHT SOURCES TO TEST (list the exact sources that you test in your Astronomy Lab Notebook):
      1. desk lamps
      2. computer screens
      3. television screens
      4. sun (don't look directly at the sun)
      5. light bulbs
      6. candle light
      7. flame from the stove
  2. For each light source, draw a box that models the spectroscope's display.
  3. Use colored pencils to draw the spectrum that you see for each light source. Include the numbering.
  4. Using the data you gathered, give more information about each light source. Can you name the type of light bulb, or discuss its energy efficiency? Can you name any elements or chemicals in the flame sources?

Post-Lab Questions:

  1. Which colors/wavelengths of light had the most energy? Which had the least?
  2. What color of light do you think would be most useful for a plant doing photosynthesis, and why?
  3. Which color of light would be most useful as a source of energy for a solar power plant? Why?
  4. Give an idea for an experiment that tests any of these concepts further. You may not describe the same experiment with different materials.
Will was able to do this lab independently, without needing me for an extra set of hands. Here she is observing the spectrum of candlelight:


And here's part of her lab report!

I used to have such high hopes for this kid's handwriting. And I kid you not--it has taken until literally last year to get it this legible. It's my biggest homeschool failure.

We could do even more cool spectroscopy with a good chemistry setup, but it's looking like chemistry will be the one science that we don't DIY during Will's high school years.

Other than, you know, the time we made rocket candy for her sixth grade science fair, or put sulfuric acid on limestone for geology, or all the other chemistry-adjacent stuff that I probably should have been tallying up for at least a credit's worth of high school chemistry by now...

P.S. If you want a ready-to-use version of this lab, here's a Google Doc of the Spectroscope Lab assignment sheet.

P.P.S. Come find me over on my Facebook page, where I often talk about the labs and experiments that we're doing as we're doing them!

Monday, September 27, 2021

Homeschool Astronomy Chapter 3: Radiation, the Information from the Cosmos

Chapter 3 of Will's Astronomy textbook is titled, "Radiation: Information from the Cosmos." This chapter was especially fun because after, you know, reading the chapter and answering all the questions in the Chapter Review and doing all the actual book learning, we got to play with lots of toys!

Well, after also studying a few more supplementary resources:

Laser Khet is a game that's probably more thematically related to our later unit on telescopes, as it models how visual information is transmitted via mirrors, but I like it better as a sort of sensorial study of the way that wavelengths reflect off surfaces at interesting angles. You can see these reflections in the interactive virtual prism, above, and in the real-world prism exploration that Will also did for this chapter, but I like the challenge here of working out the angles in your head and problem-solving and testing predictions, etc.


And it's also a fun game and you get to play with lasers!


In an extension activity that involves both reflection and refraction, here's Will's further exploration of prisms, including an experiment she created, performed, and wrote up in her Astronomy Lab Notebook.

We've owned this spectroscope since our solar eclipse study, so Will was able to play around with it, then use it to conduct another experiment:


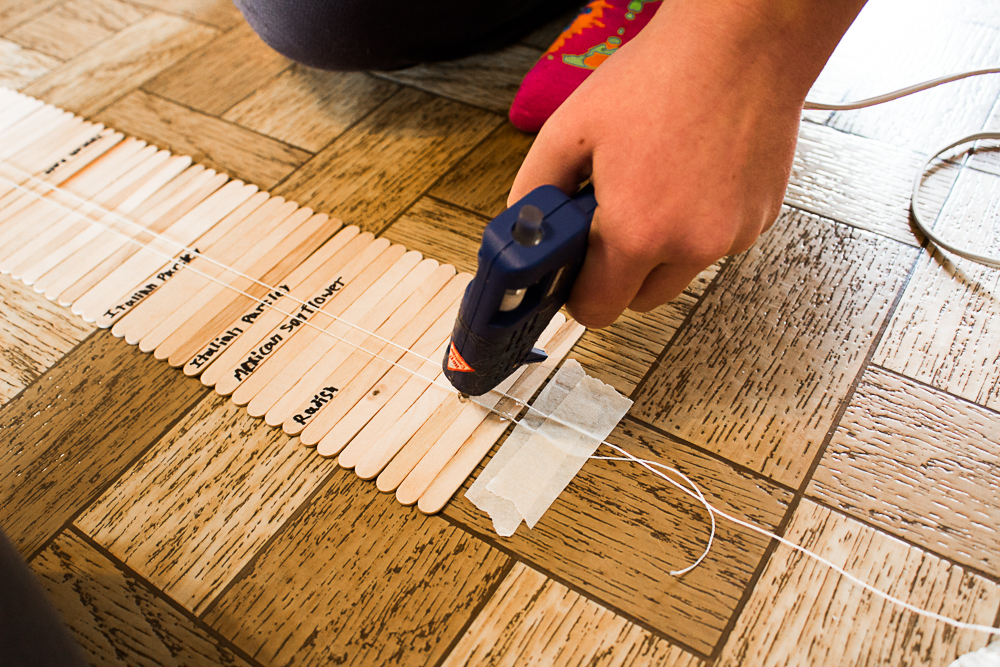
This is also when we made the wave machine that still lives in our family room. Especially when used in combination with the electromagnetic spectrum poster, it's a terrific model of how electromagnetic radiation travels. Just between us, though, I'm a little sad that I didn't give Will fresh popsicle sticks (not ones formerly used as plant markers) for this project, or even spend time with her dying the sticks with liquid watercolors or otherwise prettifying them, because this ugly-ass wave machine with various types of kale written on each stick is basically the focal point of our entire house now, and everyone who comes over looks at it and plays with it.

As a final activity for this chapter, Will explored how radiation is interpreted by coders in a way that makes it visually meaningful and easier to analyze at a glance. She further extended this work in the textbook's next chapter, which is fully focused on spectroscopy.

And then we'll move onto comparative planetology!

Wednesday, August 18, 2021

Homeschool Astronomy: Investigating Prisms

Just try your best to ignore her dirty fingernails, sigh. If it makes you feel better, after looking at the entire reel of these photos I put a couple of nail brushes in my Amazon cart.

The spectroscopy units in the big kid's Astronomy study made me realize that I've never let the kids do much exploring with prisms, gasp! 

Fortunately, there's still enough time to fix that gaping hole in their education before they go off to college. Can't have the kids trying to make their way in the world with no experiential education regarding prisms, can we?

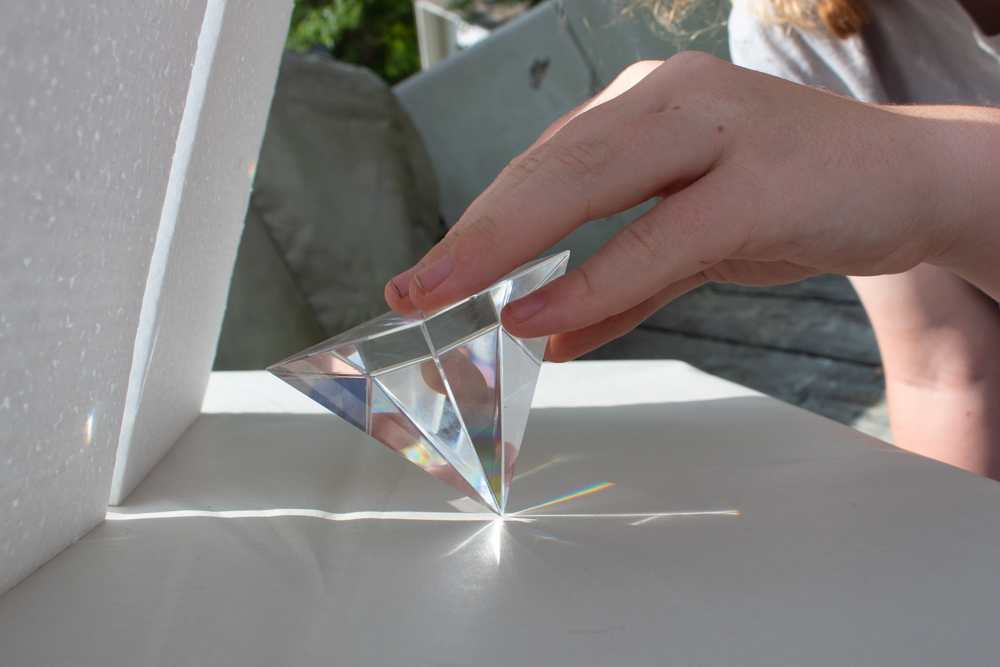
I bought this set of four different prisms and set up a viewing station by covering a large square of cardboard in white paper, taping it to my camera tripod to make it adjustable, then taping two pieces of Styrofoam scavenged from the recycling bin upright on the cardboard with a very narrow gap between them.

It worked great!


First, the big kid spent a ton of time simply playing with each prism--yay! She discovered all the positions in which each prism would produce a rainbow, and at what angle the rainbow would appear in relation to the prism's face and the ray of sunlight, and which colors in the rainbow were absent or most evident:


If she'd wanted to be scientific, she could have measured these various angles, and she might go back and do that for her Astronomy Lab Notebook, but for now this was pretty much just play:


It was harder to make rainbows with the other prism shapes:


And she never did manage to make a rainbow using the sphere, which I personally find weird because raindrops are the prisms through which rainbows are formed. Are raindrops not perfect spheres, or should we have also set up some white paper walls to better catch the dispersion?


There was a break time to cuddle Luna, who WILL NOT STOP CHEWING HER TAIL.


Finally, the big kid was curious to see how colored light might affect a prism's dispersion, so she set up an experiment using colored cellophane:


That one DID go into the Astronomy Lab Notebook!

All the play with prisms made me long for one in every single sunny window of our house, sooo... high school astronomy can have the occasional craft project associated with it, right?

Ooh, and the little kid's back to homeschooling, which means that I need to find some enrichment and contextualization and hands-on activities for Geometry. Time to break out the Zometools, then absolutely repeat this activity with a protractor at hand!

P.S. Want to follow along with my craft projects, books I'm reading, road trips to weird old cemeteries, looming mid-life crisis, and other various adventures on the daily? Find me on my Craft Knife Facebook page!

Monday, April 26, 2021

Homeschool Science: Build a Paper Model of a Telescope

The high school kid and I have been ambling along her astronomy study at a very leisurely pace, which is... not terribly clever of us, as we'd have been much better off doing night sky observations during those clear, early winter nights than we will all summer in the middle of the freaking night trying to look through heat distortion, sigh.

The fact that it was overcast the entirety of February didn't help, but whatever. Leisurely-paced science studies are our specialty, it seems!

That being said, it is really just the observations that are hanging us up, as the high school kid is totally caught up on the readings and we've done tons of interesting non-observation hands-on activities, including this project of creating a paper model of a telescope.

Big telescopes are fascinating evidence of the progression of scientific knowledge. They're cutting edge when they're created, but because they're used as long as possible, they're often outmoded well before they're retired. The high school kid and I have enjoyed learning the history of several big telescopes around the world; interestingly, we were actually studying this at the time of Arecibo's collapse, so we got to watch history happening while we were learning about it!

Building a paper model of a telescope isn't intrinsically necessary for learning about big telescopes and how they work, but it is a fun hands-on activity that invites deeper exploration of how the parts of one specific telescope work, and how it comes together into a whole. 

The high school kid built a model of an ALMA 12-Meter Antenna:


And I think it turned out really well!


Of course, to be perfectly accurate, she'd need to build 65 more just like this one, because the ALMA is actually a 66-antenna array.

Along with her model, the high school kid researched and wrote a detailed history of the telescope and explanation of how and why it works. The project obviously has pride of place on our family room shelves, now, because I'm never going to recycle something this awesome!

It would be interesting to visit a working observatory one day. The kids and I visited Lowell Observatory back when they were small, but honestly, they mostly just remember the hotel pools from that trip...

Here are some other paper telescope models:

  • NASA paper telescope models. There are so many paper telescope models to choose from here!
  • NAOJ paper telescope models. The high school kid's ALMA telescope came from here! This site is fun because as well as telescopes, you can also build their control buildings or transporters. You know, for your entire model telescope world!
  • Subaru telescope. This paper model is on the printables site for Canon, so it's worth exploring all the other interesting paper models they've got, too. I wish I'd seen the ones for the moving Copernican and Ptolemaic systems when we were studying them!
  • working telescope model. This isn't a model of a big telescope, but instead an actual working telescope. Younger students can use it to learn how telescopes work.
And if you just want to draw some cool telescopes, check this book out

P.S. Want to follow along with my craft projects, books I'm reading, road trips to weird old cemeteries, looming mid-life crisis, and other various adventures on the daily? Find me on my Craft Knife Facebook page!

Tuesday, March 23, 2021

Homeschool STEM: Our Popsicle Stick and Kite String Wave Machine


Because energy travels in waves, and we can prove it!

This DIY popsicle stick and kite string wave machine is one of many hands-on projects that Will and I are doing as part of the spectroscopy chapters in her astronomy study, but we're both completely obsessed with it. It is really fun, and really fascinating to watch. It both soothes and stimulates (if that's possible? Is that possible? It feels possible!) both of our pattern-loving brains, and we can each entertain ourselves endlessly just by flicking a little popsicle stick and watching the energy cascade down the line.

To make our wave machine, Will and I followed this tutorial


I don't exactly know why I randomly always seem to have 1,000+ popsicle sticks just hanging about in the homeschool closet (some clearly leftover from failed seed starting projects of yore), but they do come in handy!


The real fun, though, is in playing with it!


See the wave move, even though each popsicle stick stays glued to its place? That's how all energy moves, whether it's light, sound, or tsunamis. Beyond just that demonstration, though, there's a lot of visual interest in simply playing with and watching the patterns that emerge through various manipulations of the wave machine. That kind of play and exploration builds intrinsic understanding, which is a very real way to build concrete knowledge and skills. As part of Will's AP Human Geography study, we've been thinking about the ancient stick maps of Micronesia. These maps represented not geography as we conventionally think about it now, but instead a model of the waves around the islands, which is also a very real aspect of geography, but one that most people would find it impossible to comprehend, much less use as a navigation tool. It's likely that sensory experience of the ocean waves provided the intrinsic understanding that made it possible to use the waves in such a way. 

It is FASCINATING to see energy travel so concretely, and there's a lot of scope for play and experimentation. I wish I'd made this with the kids when they were young, as I think it would be a picture-perfect hands-on STEM project for upper elementary!

Nevertheless, we have it now, and it hangs in homemade honor from a ceiling hook in our family room. I mean, it's not like we put any effort into tasteful decorating; a popsicle stick wave machine isn't even the oddest homemade thing on display in that room. 

And when it's hanging in easy reach, we can still play with it!

Our wave machine, as I mentioned, was a quick little demo for spectroscopy, but understanding how energy travels in waves is also crucial for some of these other studies:
  • CALDER AND KINETIC SCULPTURE. Mobile-making and kinetic sculptures of all kinds are a great way to explore physics, as well as to add an art history component to a STEM study. Here's a great resource on the physics of mobiles, and an interesting history of kinetic sculptures, with a lot of images for inspiration. 
  • SOUND AND HEARING. Vibration is another word for waves, and there are a lot of fun ways to explore how sound travels through space and how our ears work to sense it and our brains work to process it. Use tangible demonstrations like this one with a speaker and salt, this one in which you measure the distance of a signal, and the DIY wave machine, along with a study of the anatomy of the ear. 
  • TSUNAMIS. Is my kid the only one fascinated by natural disasters? I think we've done deep dives into just about all of them by now! Anyway, use the wave machine along with this TED-Ed video on tsunamis and this DIY diagram of tsunamis to explain the physics behind that particular natural disaster. 
This isn't a comprehensive list, of course--it's literally just what's happening to occur to me from our own studies as I'm writing this--and so I'd love, as always, to hear your ideas and suggestions, too. I LOVE multi-disciplinary connections!

Tuesday, January 5, 2021

We Earned the Girl Scout Space Science Badge (after I completely rewrote it...)


To be fair, the Girl Scout Space Sciences badges at every level are more than fine as they are. They offer a good progression from Daisy and Ambassador, don't have so much overlap with school curricula that they'd be repetitive and boring, and are a fun combo of activities, academics, and hands-on work.

However, as the leader of a CSA troop during a pandemic, I have a couple of special circumstances:

  • Since the badge is offered at every level, I wanted to lead the badge in such a way that each kid could earn it at their level, and wouldn't have to repeat any activities to earn it at the next level. So basically, I had to invent new activities that met the same goals as the activities recommended in the badge books.
  • We'd planned to have an entirely outdoor meeting in November to earn this badge, which... brrr! Mind you, Girl Scouts can deal with the cold, but I thought it would be more productive to hybridize the badge, and have some activities that the kids could complete at home, while saving the must-be-outdoors activities for our meeting. 
I ended up really liking that hybrid method, by the way. As the kids get older, their badges take more work to earn, as they should! But my troop does not meet so often or for so long that we can easily do all the badge activities together and still earn badges with any regularity. Giving them the at-home kits worked well to make sure we accomplish the pedagogical and skill goals of the badge, while making the best use of our limited meeting time. Even better that it puts more of the responsibility of actually finishing the badge on their shoulders! It's a fairly low-stakes, high-interest project for practicing those crucial time management skills.

Here, then, is the agenda of activities to earn the Girl Scout CSA Space Science badge at your level:

  1. SEE THE STARS IN A NEW WAY (from the Cadette Space Science Researcher badge)

    1. Make a planisphere.

  2. DISCOVER TELESCOPES AS LIGHT COLLECTORS (from the Senior Space Science Expert badge)

    1. Look through Ms. Julie’s telescope.

  3. DISCOVER WORLDS BEYOND EARTH (from the Ambassador Space Science Master badge)

    1. Make a postcard or tourist brochure (Use NASA tourist posters for inspiration)

      1. Include graphics, explanation, postcards, and postcard stamp in at-home package

  4. DIVE INTO NASA SCIENCE (from the Ambassador Space Science Master badge)

    1. Model rockets!

      1. Drop off early in October; should be assembled, with glue cured, painted by meeting time.

    2. Can we see the ISS during our meeting?

  5. EXPLORE YOUR INTERESTS (from the Ambassador Space Science Master badge)

    1. Light Pollution

      1.  Bortle Dark-Sky Scale

        1. https://www.delmarfans.com/educate/basics/lighting-pollution/

    2. Globe at Night Citizen Science Project: https://www.globeatnight.org/

Our main theme was the ways that we explore and observe space. Many of the kids had never stargazed with any intention before, so for Step 1, I wrote everyone a lesson about naked eye observation of the night sky, in particular the regularity of the constellations, and their use as celestial calendars. I gave the kids the supplies to construct this cardstock planisphere as a paper celestial calendar/night sky viewer, and I showed the kids who brought theirs with them to our in-person meeting how to use them, and also shared around the night sky app on my phone as a comparison. The kids pretty much all preferred my night sky app, but with their analog planispheres they'll never be lost in the sky!

Step 2 was my favorite, because my favorite thing to do is to look through my telescope! While the kids and our other chaperone were finishing up their campfire dinner, I set up my telescope; it's fiddly, takes a billion years to get just right, and trying to do it while people watch me makes me nervous. It was fully dark by the time everyone had finished eating, which was perfect timing! In early November, great things to see through a telescope include Jupiter and its moons, Saturn (and its rings!), and, of course, the Moon:

And since it was right there, we looked at Mars, even though it's not exactly the most mind-blowing planet to observe through an at-home telescope. I would have loved to have shown them the Andromeda Nebula, which is my current favorite thing to look at, but I'm still learning my telescope and I'm lucky if I can find it when it's just me in a field with all the time in the world and nobody looking at me.

I didn't do so much of a guided lesson for the telescope step, but we did talk a lot about what we were looking at, what else we might look at, and about good old Galileo. The canals of Mars! How he probably burned out his retinas! You know, all that good, educational stuff!

I wanted the kids to know that most space observation is indirect, but still results in interestingly detailed descriptions of what's being observed, AND I wanted something that they could do completely at home, so for Step 3, I decided to have them make souvenir postcards for a space object of their choice. I gave them postcard blanks that I wrote, color copies of several of these NASA Exoplanet Travel Postcards as inspiration (I had Matt tile several at a smaller scale onto a single page so the kids could see lots of examples without the troop paying for lots of color printing!), a stamp, and the address of their "secret Girl Scout," i.e., another kid in the troop. I wrote them a lesson on exoplanets, the methods of indirect observation that give us information about them, and the ways that the artists of the NASA postcards used that information to construct creative visuals of them. 

Each kid's assignment, then, was to choose absolutely anything in space that humans have not stepped on or sent cameras to the surface of. They were to research their space object, creatively interpret that information to make their own travel postcard for it, then mail that postcard to their secret Girl Scout along with the name of their object and some cool facts about it. 

Here is Will's:

I love how she even included a cute slogan for her exoplanet with three suns!

Okay, Step 4 could easily be a badge of its own--and why are there no Girl Scout rocketry badges?!? I did want the kids to learn more about direct exploration of space, but mostly I wanted a super-fun, super-exciting activity that would really sell space science to them, AND I wanted it to be outdoors and social-distancing friendly.

Rockets it is, then!

I bought a bulk set of these easy-to-assemble rockets, and a variety pack of engines. I put the rockets and build instructions into the kids' at-home kits, and told them what step to stop at, because I planned for us to finish them as a group during our in-person meeting. The instructions that came with the package were... not great, unfortunately. Some kids texted me for troubleshooting advice, some kids found their own tutorial videos on YouTube, some more or less got it right on their own, and some I helped at the meeting. 

Everybody DID end up with a launchable rocket, although there were... some issues. Some kids who misread the instructions had rockets that basically blew up on the launch pad. Other kids glued their fins into very creative configurations--I should definitely have covered fin placement in my lesson!--and had rockets that spiraled off alarmingly upon liftoff. Of course it had to be my own kid's rocket that lifted off, rose about five feet, then turned 90 degrees and screamed directly at one of our chaperones. She and all the kids leapt away, the rocket landed basically where she'd been standing a half second previously, smoked quietly for several seconds, then exploded.

But most of the kids had awesome launches!


There were so many cool, technical things that the kids practiced and learned during this activity, from the build instructions to fin placement (oops!) to engine size to the practicalities of hooking up the rocket to make a complete circuit to why we always do a countdown to launch that, yeah. There should seriously be a badge for that. It was the FUNNEST!

Girl Scouts always want to make the world a better place, so for our final step, I introduced the kids to the Bortle Dark-Sky Scale. We live in an interesting location, with very dark and rural areas just a few minutes from our town, but also with a large university that also leaves the lights on at its large football stadium way too often for my liking. In other words, do NOT GET ME STARTED about light pollution!

I gave the kids an at-home copy of the Bortle Dark-Sky Scale, and we talked about it and about light pollution while we took turns looking through the telescope. I had really wanted to also do this Globe at Night Citizen Science Project with them, but it wasn't the correct time of month when we met, alas, and I didn't want to turn it into one more at-home assignment. I guess I'll save it for the next time I run this badge and need all new activities!

I think the kids all had a fun time with this badge. We had the perfect combination of activities for their different personalities--active stuff, outdoor stuff, hands-on stuff, art stuff, experiential learning stuff, and, of course, campfire and hot dog and s'mores stuff. It was one of the very few times we've met in person since the pandemic began, so I think they were all thrilled to see each other, and I'm very hopeful that rocketry and telescope observation were exciting events even for those jaded teenaged hearts. 

Next up: we navigate Girl Scout cookie season in a pandemic, maybe go kayaking in a cave, and also maybe have an entire meeting based solely on Percy Jackson.
Wednesday, September 30, 2020

Homeschool History: Make a Gingerbread Stonehenge on Top of a Cookie Cake

This is what happens when you write lesson plans while you're hungry.

Chapter 2 of the high school kid's astronomy textbook covers the history of astronomy, and we've done some really cool projects to extend that information or contextualize it--with even a couple more planned, because I freaking LOVE the history of astronomy.

The most elaborate of these projects--so far--has been making a gingerbread Stonehenge, something that I have wanted to do approximately all my life. 

Modeling is a great way to help a kid really dig into the geography and physicality of an artifact, as well as encourage them to look more closely at it. I mean, yes, you probably know what Stonehenge looks like more or less, but how many stones are there actually? What is their exact configuration? How many are currently standing? What, exactly, do we think it looked like when first constructed?

Making a model, whether it's out of clay or gingerbread, means that you've got to put the research in to answer most of those questions, and the answers will likely stick in your memory, too.

The gingerbread is just the bonus!

For this project, I first made this M&M cookie cake. I've baked this cookie cake a few times, and although it's not my favorite cookie recipe, it IS a reliable and tasty-enough cookie cake, which is why I keep it in my repertoire. But if anybody knows a reliable cookie cake recipe that also tastes so super amazing, please let me know! We eat a lot of cookie cakes over here!

For the gingerbread, I used the construction gingerbread recipe from Serious Eats. This is what we used for our thousand and one gingerbread cookies--and houses!--last Christmas, and anyway, Serious Eats would never steer me wrong. I made royal icing using this Wilton recipe, which is convenient since that's the brand of meringue powder I own! Even halving the recipe I made WAY too much, but the recipe claims that you can freeze it, so, remembering last Christmas Eve when I forced everyone together to decorate cookies at 6:00 pm and THEN realized that we were out of powdered sugar, I was pretty stoked to freeze the rest. Cross your fingers that it's still delicious at 6:00 pm on Christmas Eve!

Add some green cream cheese frosting to the top of the cookie cake (I thought about floating the idea to the high school kid that we pipe it on using the pastry tip that looks like grass, but even I know when I'm going too far. Sometimes), and it was ready for Stonehenge!


The high school kid decided independently how to size and cut her Stonehenge pieces, and she did a terrific job, considering that when she had all of Stonehenge laid out on the cookie sheet, there was just enough leftover for a couple of gingerbread people (which I also froze, because you CANNOT have too many Christmas cookies to decorate!). 

If we had this project to do over again, I'd encourage her to use royal icing to place the gingerbread on the cookie cake before frosting it--maybe that piping bag would have been the best idea, after all! The toughest part was definitely making the stones stand up on the cookie cake, but fortunately that royal icing made easy work of placing all the cross-pieces:


I LOVE how Stonehenge turned out. It's delicious, historically not entirely inaccurate, and delightfully festive for the time more or less around the autumn equinox.


I'm not going to guarantee that we're not going to make another one for the Winter Solstice.

If you're interested in a more sustained study of Stonehenge, check out my other favorite resources!

Next up: the high school kid and I follow in Galileo's footsteps and observe the nightly positions of Jupiter's moons!

P.S. Want to follow along with my craft projects, books I'm reading, road trips to weird old cemeteries, looming mid-life crisis, and other various adventures on the daily? Find me on my Craft Knife Facebook page!

Friday, August 25, 2017

Total Eclipse of the Sun


Are you guys still getting over the total eclipse, too? Is it just me?

Y'all, I had been so pent up with excitement over the eclipse that by Sunday afternoon, I'm surprised that my partner didn't just drug me like a dog about to go on a plane trip. Studying the eclipse intensely with the kids for a month just got me even more worked up--I've been revved up about this eclipse for a year. My partner got us our hotel room 50 minutes from Carbondale, Illinois, Eclipse Capital, almost a year ago. Heck, I have had our eclipse glasses since MARCH!

Plan A was to leave our house on Sunday, stay the night at our hotel 50 minutes from Carbondale, then drive the next morning to Crab Orchard National Wildlife Preserve, just outside Carbondale's city limits, and watch the eclipse there. Plan B, if Crab Orchard was too busy or the traffic on the highway into Carbondale was too heavy, was to head a little further away and watch the eclipse from Cedar Lake, a reservoir more to the east. Plans C and D, if Carbondale was overcast, were to drive either towards Nashville or St. Joseph, Missouri, until we were free of cloud cover, and then find a suitable spot to watch.

To that end, we left the house on Sunday morning, just in case the traffic was already heavy. Since it wasn't, though, we ended up with plenty of time to spend the afternoon in Evansville, Indiana. We played at a local playground, found a Krispy Kreme so that the little kid can continue to live her dreams of eating ALL THE DOUGHNUTS, and then tag-teamed the kids around Angel Mounds, on account of I'm not used to planning vacations that include dogs and I didn't notice that dogs weren't allowed in the archaeological area until after we'd paid our admission:

Three Sisters Garden, with the addition of sunflowers

Here's a partial reconstruction of the wattle and daub stockade that surrounded the community.
This is what the inside of the stockade would have looked like, absent kids trying to look up the Native American's skirt.
This is Mound A, the Central Mound. The chief probably lived on the highest point, with some other community members living on the lower platform.

Even the lower platform is high, especially considering that it was built using basket-fulls of dirt, probably carried by hand.
Here's what the village might have looked like:


I'm always the most fascinated by the artifacts that are uncovered in a particular place. The architecture or other physical features are one thing, but these are items that regular people used as part of their everyday lives.


And look! The perfect complement to the weeks that the little kid and I spent studying prehistoric fashion as part of her History of Fashion study!
See the holes drilled into those teeth? It's like the holes that we drilled into shells!


We had an early night at our hotel (why does my quest to order from independent pizza places wherever we stay mostly result in us eating a lot of highly mediocre pizza?), with me checking the radar hourly and fretting over all the traffic reports, and an even earlier morning. The good news is we passed the north-south biscuit and gravy line in our travels, so there was a crock pot of sausage gravy waiting for me, along with cold biscuits, microwaveable cheese "omelets," and bad coffee down in the hotel's breakfast buffet. Every single other person on the planet was also shoving breakfast into their faces and bolting out the door, too--we'd booked our hotel so early that it was a normal price, but the night before, on our way down to the pool, I'd heard the check-in clerk telling some guys that they were full, but she'd heard there were still a couple of rooms at the Fairfield Inn down the road that were going for 900 bucks apiece.

We were on the road by 6:30 am for a 50-minute drive, with little traffic to speak of, and were pulling into an only quarter-filled parking lot at the Crab Orchard National Wildlife Preserve an hour later. There was an air-conditioned visitor center across the lot, with working bathrooms and flushing toilets, and a lovely wooded hike that led to a lovely lake, but honestly, we spent most of the morning like this--


--and like this--


--yep, hanging out in the shade right off of the parking lot. The dog was content, we had plenty of books, and the car was right there whenever we wanted a snack or a drink--it was perfect! The parking lot filled within the hour, and then we were also treated to the sight of cars coming in and circling hopelessly before driving on--ahh, the satisfaction of sitting snugly in our spots in the face of the desperation of others!

Around mid-morning, rangers even came out and closed off the entrance to our lot entirely, so we could move our lawn chairs out of the shade and onto the asphalt, to better watch the show:


Even before you could really tell a difference in the day without your eclipse glasses on, things started to get weird. Just as we'd been told, the dappled light under our tree began showing us the crescent images of the sun:


Just as we'd been told, our shadows on the sidewalk had crisper, sharper edges:

This is because the light is coming from a smaller and smaller point, not diffused as it is when it comes from the entire body of the sun.

The crickets began to sing. The ambient light began to seem oddly dim, but not like sunset, when the light is leaving from the side; this was dimness like a room with the light bulb on low. It grew noticeably colder, as 99% of the photons normally striking us through sunlight were now being deflected. A breeze blew, as the air pressure became affected. We could see that it was visibly darker to our west. And still we watched:


And then there was this:


I was peeping at the sky when the last light left, so I saw the diamond ring with my naked eyes. I turned to make sure the children were watching, and saw the little kid still with her eclipse glasses on, so I ripped them off her face--I wasn't even thinking about damaged eyesight; I just wanted her to see that spectacular beam of light for the second that it was visible.

I'm not even going to try to describe the total eclipse, itself, to you. My photo doesn't really look like it, but I haven't seen any photos that do. I can't think of the words to say that would make it clear to you what it was like, if you didn't see it for yourself. Just... it was beautiful. It was the best thing that I've ever seen in my entire life, and yes, I know that I'm supposed to say that my first look at my children is the best thing that I've ever seen, but I was half out of my mind both times I gave birth, completely terrified both times, both times in pain. This was nothing like that. This was just beautiful, just this ephemeral, beautiful thing that you had to experience right that second for all that you could, because you couldn't rewind the experience to play it again, couldn't watch it on TV later and get the same effect, couldn't come out the next weekend and see it again. It lasted 2 minutes and 40 seconds, all of which are impressed on my memory, and yet when the diamond ring appeared again on the other side of the sun, it felt like surely it hadn't been that long. Surely it had just been a couple of seconds.

As the totality passed, someone began to play The Beatles' "Here Comes the Sun" from their car stereo, and people were already packing their cars back up. The kids were beaming. My hands were shaking so hard that I had trouble taking a drink of water. We hit ALL the eclipse traffic on the way back that we missed on the way there--we only saw one car crash happen right in front of us, but the drive that had taken 3.5 hours the day before took more like 7+ on the way home, bumper-to-bumper traffic the whole way.

I don't know what mood I'd be in if I didn't know that there's another total solar eclipse coming in seven years, but there is one coming, and I am buoyant. Better yet, Friends, my town is in the path of totality. 

Lemme just repeat that: MY TOWN IS IN THE PATH OF TOTALITY. MY HOUSE WILL SEE AN ECLIPSE!!!

You can come stay in a tent in my backyard, and I'll haul out the lounge chairs. The little kid, who will be graduating from high school the next month, will decorate us eclipse-themed doughnuts. The big kid, home from college for the weekend, will read and ignore us. And we'll have another powerful encounter that's beyond belief, in just seven years.

P.S. Want to follow along with my craft projects, books I'm reading, road trips to weird old cemeteries, looming mid-life crisis, and other various adventures on the daily? Find me on my Craft Knife Facebook page!