Tuesday, April 2, 2019

Guest Post: A Little Bit of Rock Painting

I'm featuring a guest writer on Craft Knife today. Syd is here to share with you her photos and review of The Little Book of Rock Painting (which we received free from a publicist). Please don't tell her that this was also her grammar and rhetoric lesson for today, as during the editing stage many, many comma splices met sad ends, and Syd still mourns them because apparently breathless writing is the BEST writing. 

To start with rock painting you need some ROCKS. Who would have guessed?

You could, of course, go and find some rocks in the rock wilderness. Beware, some may bite! I used some bagged rocks, which are nice because they are much flatter and smoother than rocks you would find outside.


The rock painting book that will be the guide in this journey is The Little Book of Rock Painting, full of cute and kinda strange ideas.

Once you have your hands on a rock you should open the book and choose a design. I chose a feather for my first one.


 Bellow you see the instruction page for the feather--it is very straightforward and simple!


I choose a medium squarish rock, perfect for an oval feather shape? Maybe not but it worked despite my poor planning, which was a relief.


Here are the paint pens that I used on the rocks. The more colors you use the better and more vibrant the rock!

 
Here is the beginning phase of the feather. The book was very helpful for making it look like a feather and not a corn dog.


Here is the design for the feather. If the pen was thinner it might have worked better.
The book had nothing to do with this, though. I should have made the feather larger to compensate for the pen size.


Next I followed the owl pattern. It was slightly more difficult then the feather but came out pretty cute!


Here is how the owl came out. You should most likely sketch out the design beforehand so that one of the eyes doesn't hang off the rock.


I followed the raindrop one next. It kind of looks like firecrackers, which is a cute idea for a rock design!


This is how the raindrop came out--super cute!


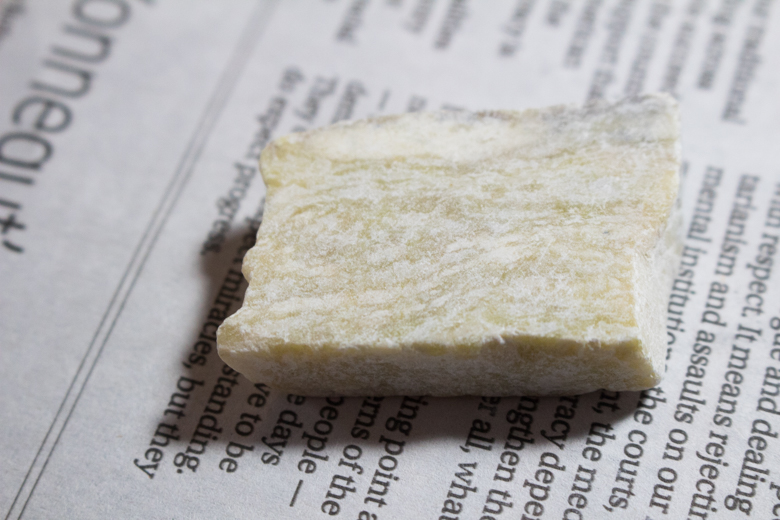
Next, I chose the fish. Their fish came out super cute but it doesn't have a fin for some reason  so I chose to add a fin to my fish.


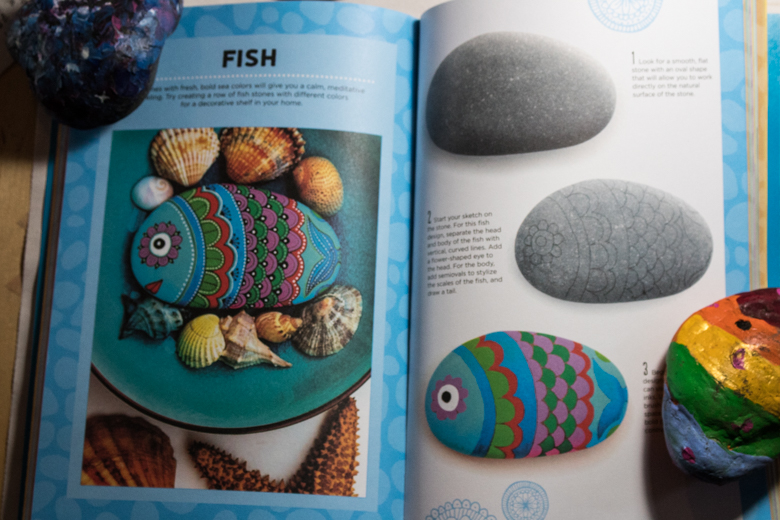
A nice square rock, yet again the wrong shape but it turned out nice!


I sketched a fish... cause I am doing the fish... nice!


Here is the fish all done. I added the googly eyes cause why not?


This one is if you don't have a rock that fits rock painting standards. I used a nice wooden egg to show you can pretty much use anything.


I chose the fox for this one. It turned out pretty cool on the egg.


It wasn't as hard as I feared to draw on a round object. But it was kind of cool to draw on a wooden egg!


I found that this book was full of nice ideas and tips that you could expand on to improve your rock painting knowledge and skill. I enjoyed the simple steps making it easy and fun to use.

Syd is a fashion designer, author of two previous blogs (Syd the Craft Kid and My My Little Ponies), and slime expert.

Thursday, March 28, 2019

Spring Sale for Pumpkin+Bear

Looking through the Sold archives of my Pumpkin+Bear etsy shop is one of those activities that's chock-full of nostalgia. The dinosaur stuffies and quilted blankets remind me of Will's obsession with dinosaurs. The T-shirt dresses and buntings for every occasion used to delight at tiny Syd.

There are crayon rolls from when I used to keep one in every pocket and every bag, moveable alphabets of all sizes and sorts from when I was focused on providing a language-rich hands-on environment, felt sets and bean bags and remade crayons and all kinds of things that little ones love.

We're beyond much of that now. These days my girls mostly ask me for custom clothing and novelty blankets, and many of the handmade items that they want they're fully capable of making for themselves--and they do!

I let all my listings for little ones linger in Pumpkin+Bear for years longer than I needed to, violating my original principle that I made things for sale as I made things for myself and my children, a side hustle that was more an extension of crafting for my family than a business--if I ever quit my day job, it's never to be a full-time artisan!

Anyway, my Girl Scout troop is preparing for a big garage sale fundraiser next month, which means that of course I'm on the hook to go through all my stuff and see what I can stand to get rid of. I was crouching down, digging through crafting supplies and thinking about what I needed for what, and out of the blue I thought, "Huh. I don't actually need felt play set materials or crayon roll materials or play silk materials anymore, other than for Pumpkin+Bear. And what if I didn't actually even need them for Pumpkin+Bear anymore, either?"

Well, I'd have more space, that's for sure. I might have more time to invent creations that I'm more passionate about. I might have time to make and sell some things that are better suited to the tween and teen that I've got now.

So deep breath, because I'm putting everything that I'm no longer going to make on BIG SALE--like 50% off big! When it's gone, it's gone. Here's what's going:


To be fair, Syd DOES still use her vast collection of play silks once in a while, and whenever we're going through our possessions and I ask her if she wants to keep them out or move them into keepsakes, she always wants to keep them out!

Still, it's been years, probably, since she's asked for a new size or different color...


You can tell the things that I've been making so long that I didn't know how to properly photograph them when I started. Also, how long has it been since I've made my children some nursery decor?!? The last thing that I made for the kids' bedroom was embellished picture frames for their Comic Con art purchases...

Fairy Tale Flannel Christmas Stocking--Originally $16.25, Now $8.12

I actually will probably continue making the odd Christmas stocking, particular as the kids' interest change, but regardless, there's no need to buy more fairy tale fabric, not with kids who are much more into Greek myths and post-apocalyptic literature and European history memes.


Since I'm on a roll, I might as well clear out all of my Christmas stocking flannel altogether...


The preschool years really are over, if the kids are no longer playing with their felt boards and asking me for new felt pieces and making and embellishing their very own felt pieces for all of their pretend play.

I love the felt play sets the most, because they're all based on something specific that a kid asked me to create for her at one time.


Do you guys remember when Syd was OBSESSED with rainbows?


Sydney is outgrowing her American Girl dolls WAY faster than I am!


I should have suspected what an artist Syd was growing to be back when she was a toddler and I had to pack crayons and paper or chalk or markers or play dough every time we left the house. I still do that, or rather Syd does it for herself, but now it's generally fashion design notebooks or comic book templates and Prismacolor pencils.


I've tentatively set my sale to run for a full month, and I'll still have most of my supplies through then, so let me know if you've got a custom request.

Right now, though, I've got to get back to sorting stuff for that Girl Scout garage sale...

Monday, March 25, 2019

Homeschool European Geography: Zooming In On Ukraine

I haven't written much about our European Geography study, but I assure you that we have been steadily working on it for several months now.

Our spine for European Geography is Draw Europe, supplemented with lots of fiction and non-fiction, YouTube and DVDs, hands-on activities, live radio...

...and an international snacks subscription box that I bought for Will's last birthday! I bought her a year's subscription to Universal Yums, and it has been SO FUN. Each month she gets a box from a different country, and when her box if from a European country we treat it as a bonus chance to dive deep into that country.

This month's Yum Box was from Ukraine:


Here are some of the snacks that she received:


Ukraine is VERY into potatoes.
These boxes are a LOT of fun for adventurous eaters, and they're how I know that I super love smoked plum candy. NOM!

Anyway, although we've already covered Ukraine in our study, spring is an especially good time to revisit the country, because one of the traditionally Ukrainian crafts is the making of pysanky eggs for Easter. We don't make pysanky eggs every single year, but it is a surprisingly accessible kid craft, and I do recommend it. Don't they turn out cool?


Here are some other great projects to add into your study:
  • Print, color, and label a map of Ukraine. We use the free Owl and Mouse maps for all of our geography studies--I love them SO MUCH because you can print them up to several feet across. Color and label the printouts, or use them as templates to make salt dough or cookie maps
  • Print and color Ukraine's flag. The kids really loved coloring flags when they were early elementary, but even now, we still get out the pin flags and maps sometimes. 
  • Make and memorize fact flash cards. Even if you're focusing on history, politics, or culture, it is useful to have some basic facts memorized. I like the templates here because kids learn more when they have to research the facts themselves.
  • Learn a little of the language. Some languages have fun flash cards that are easily found via Google search, but I didn't have a lot of luck with Ukrainian. Nevertheless, one or two lessons through Mango Languages is enough to give a kid a glimpse at what speaking Ukrainian is like--it will at least teach them how to say hello!
  • Read about Chernobyl. This is a good way to get a science-focused kid interested in geography. Here, for example, is a quite readable explanation both of nuclear fission and the chain of events that led to the Chernobyl accident.
  • Study Sevastopol. There were important sieges there during both the Crimean War and World War 2--which gives you opportunities to also delve into studying both of those wars, too.
  • Listen to Ukrainian music. We like CDs of folk music from the library, but currently our favorite ways to experience a country's music are by streaming live, local radio stations on Radio Garden and by searching the playlists on Spotify--seriously, don't you want to listen to Ukrainian rap?
When the kids and I are searching YouTube for resources on a country, we always look for Geography Now, Eurovision, and Rick Steves videos. Geography Now and Rick Steves haven't covered Ukraine yet, alas, but Ukraine does participate in Eurovision, and they have some great performances. This one is our favorite, sort of because of the costumes and the dancing, but mostly because the lead singer has the best hair EVER, and every time we watch this video we mostly just spend the time talking about how nice her hair is and wondering how she got it so nice and shiny and tangle-free:


It's REALLY nice hair, right?

Although we didn't find many YouTube resources on Ukraine (please let me know if there's something that you love that we should know about!), we found loads and loads and LOADS of great books. I'm extra happy that Will's Yum Box led us to this review, because there are so many good books that we didn't get nearly through them the first time:


Now that we've experienced a few snacks from Ukraine, I'm longing to hit up the giant international grocery up in Indianapolis to see if they have any of our favorites, or something new to try. 

Thursday, March 21, 2019

The Weirdest Puzzle

I wrote several years ago about our family Thrift Store Puzzle Philosophy, and we still hold to it. I can't tell you the number of puzzles that have come and gone over the years--certainly more than our house could hold if we'd had our hearts set on keeping them all!

This puzzle, though, is something special. First of all, it's round, which is unusual:


Primarily, though, this puzzle is just very, very strange:


Okay, yes, it's all cats. That is very, VERY weird.


But these cats? They're also all consecrated religious, and they are acting VERY irreverently:


Yeah, that's a feline nun. Dancing. With a feline monk.

DANCING.

Dancing while TOUCHING.

Very irreverent, indeed!

The entire puzzle represents male and female consecrated religious have a giant party. I can't imagine what on earth the artist was thinking. There are SO many weird things going on here.

For instance, check out this act of charity:


So those are anthropomorphized consecrated religious cats, sitting on the steps eating from a plate, and there are non-anthropomorphized cats around them begging for food.

Are the non-anthropomorphized cats meant to represent the laity? Are they begging for the fruit of salvation? Or... did the artist just think that it would be cute to have cats begging from cats?

It's all so deeply suspect, yet presented so lightheartedly, that I can't figure it out. It's as if Martin Luther, instead of writing his 95 Theses, decided to draw an adorable cartoon and never tell anyone whether or not he was being ironic.

Because OMG look at this!!!

Was the artist trying to make a statement about sexual impropriety between nuns and monks, or is it just supposed to be cute? Is that non-anthropomorphized black cat next to the cat nun meant to symbolize witchcraft, or is it just... there?

Because the implications make a VERY troubling set of statements, but the whole thing is so cute! Does anyone really make a set of statements this troubling by means of a cartoon this cute? I mean, normally when you want to draw worldly sin, you channel your inner Hieronymus Bosch, you know? Not your inner Charles Shulz.

Here are another couple of weird excerpts. We've got a feline Mary and Jesus (but an avian dove)--


--and a domestic cat Adam but a lion God, but domestic cat angels, and there are more non-anthropomorphized cats:


So in this reality, God did not make his creatures in his image, or is the artist making a broader statement about species identification and implying that we should respect monkeys and apes as also containing the divine spark?

If I was still an academic, I would write SO MANY PAPERS about this puzzle.

I'm not, though, so when we were done, I flipped it over and painted a new puzzle for the kids on the back. That was only because there were a few pieces, though--if this puzzle had been intact, I would be hoarding it as-is forever, probably painted with one of those Puzzle Saver solutions and hung on my study wall with all my other weird things.

Monday, March 18, 2019

How to Make Fraction Multiplication Model Sun Catchers


I had intended this math enrichment activity for both girls, but to target primarily Syd, who is reviewing multiplying and dividing fractions in her math curriculum and is having trouble keeping the algorithms straight.

Unfortunately, you'll see only Will in this tutorial, as Miss Syd is having a chronic case of the tweens, and school is such a great outlet for a power struggle when one is feeling tween-ish. I'm declining to participate in this battle, because tweens generally come back around--I mean, look at Will! I wasn't sure we'd both survive her middle school years, and now she's a very dedicated student--so instead of two kids completing a craft project that is math review for one kid and math enrichment for another, we have one kid sulking somewhere else and one kid being crafty.

Eh, Will always needs more fine motor skills practice, anyway.

To make these fraction multiplication model sun catchers, you need the following:

1. Make the templates. The most accurate fraction multiplication model is the ten square or hundred square. We did do a couple of fraction circles, too, but I told Will that we had to know the product we wanted and then construct the model to fit it when we worked with the circles. 

When you work with the squares, the models construct themselves in a really cool way.

Trace several ten or hundred squares or pie circles onto a piece of clear acrylic using black Sharpie. They can be any size you choose.

2. Trace and cut out the fraction models. To make a fraction multiplication model, you need to cut out two fraction representations, one each in a different primary color.

Each fraction representation should be in tenths.

So, for instance, Will cut out one fraction in red--


--and another in blue:


3. Glue the fraction representations to the clear acrylic template. Place them perpendicular, with one edge of each representation lined up on the adjacent side to the other. This way, they will naturally overlap--


--and the area of their intersection is the product.

I like this model because it shows a different way of problem solving than my go-to explanation. Here, the x stands for "of" and the expression 1/2 x 1/2 can be translated as 1/2 OF 1/2. The visual is also a terrific memory aid, as it's colorful and striking and fun:


I haven't figured out a way to make the pie circle model come together as naturally as the square model does; there's no simple construction method that I can pick out that makes the product neatly assemble itself the way it does with the square model.

It can, however, be done--you just have to know what product you're looking for and then assemble the fractions so that the intersection represents that product:


Even though Syd refused to participate in the creation of the fraction multiplication model sun catchers, she can't help but see them on the window every time she's in the family room, mwa-ha-ha:


They look especially lovely when the setting sun shines through them, and I think they're a nice example of how naturally beautiful mathematical representation can be.

P.S. The next time Syd is amenable (perhaps when she's fourteen?), here is how to model fraction division in a way that makes it actually make sense.

P.P.S. Curious about all the other awesome stuff we get up to whenever a kid's not grumping out? Check out my Craft Knife Facebook page for more WIP pics and resources.