Wednesday, April 29, 2020

A DIY Binomial Cube/Trinomial Cube Manipulative


If you've figured out that you can make a manipulative to literally represent (a + b + c)^2, then it's not a big stretch to figure out that you can also make a manipulative to literally represent (a + b + c)^3.

One is a literal square. The other is a literal cube!

I made this DIY trinomial cube to match faces with my DIY trinomial square. This means that it's also set to a 1" standard, NOT a 1 cm standard as are most of my other DIY math manipulatives. But since it was soooooo much easier to find 1", 1.5", and 2" blocks than it was to find 1 cm, 1.5 cm, and 2 cm blocks, it also means that I could take some major shortcuts on this build and save myself a lot of time gluing teeny-tiny wooden blocks together.

I'll take the shortcut every time!

The math isn't exactly tricky on this, but there's a lot of it, and a lot of moving parts, so bear with me.

The trinomial cube has three layers. Layer A is a trinomial square in which every prism has Height a. For my project, a = 1".

Layer B is a trinomial square in which every prism has Height b. For my project, b = 1.5".

Layer C is a trinomial square in which every prism has Height c. For my project, c = 2".

The base block for each layer is a wooden cube that I purchased from Casey's Wood Products:

From left to right, that's a 2" cube, a 1.5" cube, and a 1" cube.

Let's go back to Layer A. We already know that every prism in Layer A will have a height of 1". The cube in Layer A is a^3, with a measurement of 1" x 1" x 1". This is nothing but a 1" wooden block, with no extra pieces added to it. As part of this layer you're also going to have a piece that's b^2, and a piece that's c^2, each with a height of 1", and the prisms that combine the measurements of ab, ac, and bc, each with a height of 1"

For every prism in this layer, you can start with a 1" wooden block, and glue on either .5" wooden blocks or 1" wooden blocks to make the correct sizes.

Here are all the prisms for Layer A:
  • a^3 (1" x 1" x 1"). This is a 1" wooden block.
  • ab^2 (1.5" x 1.5" x 1"). This is a 1" wooden block plus 10 .5" wooden blocks.
You need one ab^2 for Layer A and two ab^2 for Layer B.
  • ac^2 (2" x 2" x 1"). This is four 1" wooden blocks.
You need one ac^2 for Layer A and two ac^2 for Layer C.
  • two copies of  ba^2 (1.5" x 1" x 1"). This is a 1" wooden block plus four .5" wooden blocks.
  • two copies of ca^2 (2" x 1" x 1"). This is two 1" wooden blocks.
  • two copies of abc (1" x 1.5" x 2"). This is two 1" wooden blocks plus eight .5" wooden blocks.
You need two copies of abc for every layer, so six in total.

Every prism in Layer B will have a height of 1.5". The cube in Layer B is b^3, with a measurement of 1.5" x 1.5" x 1.5". This is nothing but a 1.5" wooden block, with no extra pieces added to it. As part of this layer you're also going to have a piece that's a^2, and a piece that's c^2, each with a height of 1.5", and the prisms that combine the measurements of ab, ac, and bc, each with a height of 1.5".

Here are all the prisms for Layer B:
  • ba^2 (1.5" x 1" x 1"). This is a 1" wooden block plus four .5" wooden blocks.
You need two ba^2 for Layer A and one ba^2 for Layer B.
  • b^3 (1.5" x 1.5" x 1.5"). This is a 1.5" wooden block.
  • bc^2 (1.5" x 2" x 2"). This is a 1.5" wooden block plus twenty-one .5" wooden blocks.
You need one bc^2 in Layer B and two bc^2 in Layer C.
  • two copies of ab^2 (1.5" x 1.5" x 1"). This is a 1" wooden block plus 10 .5" wooden blocks.
  • two copies of abc (1" x 1.5" x 2"). This is two 1" wooden blocks plus eight .5" wooden blocks.
  • two copies of cb^2 (2" x 1.5" x 1.5"). This is a 1.5" wooden block plus nine .5" wooden blocks.
You need two cb^2 for Layer B and one cb^2 for Layer C.

Every prism in Layer C will have a height of 2". The cube in Layer C is c^3, with a measurement of 2" x 2" x 2". This is nothing but a 2" wooden block, with no extra pieces added to it. As part of this layer you're also going to have a piece that's a^2, and a piece that's b^2, each with a height of 2", and the prisms that combine the measurements of ab, ac, and bc, each with a height of 2".

Here are all the prisms for Layer C:
  • ca^2 (2" x 1" x 1"). This is two 1" wooden blocks.
You need two ca^2 for Layer A and one ca^2 for Layer B.
  • cb^2 (2" x 1.5" x 1.5"). This is a 1.5" wooden block plus nine .5" wooden blocks.
  • c^3 (2" x 2" x 2"). This is a 2" wooden block.
  • two copies of abc (1" x 1.5" x 2"). This is two 1" wooden blocks plus eight .5" wooden blocks.
  • two copies of ac^2 (1" x 2" x 2"). This is four 1" wooden blocks.
  • two copies of bc^2 (1.5" x 2" x 2"). This is a 1.5" wooden block plus twenty-one .5" wooden blocks.
I painted these prisms the same way I painted the trinomial square prisms, except for the cube, every face will be painted. All the 1"^2 faces are yellow, the 1"x1.5" faces are green--


--the 1.5"^2 faces are blue--


--the 1"x 2" faces are orange, the 1.5" x 2" faces are purple, and the 2"^2 faces are red:


Some prisms in different layers are identical, so here are the total number of prisms by type that I needed:
  • one a^3 (1" x 1" x 1"). This is a 1" wooden block.
  • one b^3 (1.5" x 1.5" x 1.5"). This is a 1.5" wooden block.
  • one c^3 (2" x 2" x 2"). This is a 2" wooden block.
Here's a^3, b^3, and c^3.
  • three ba^2 (1.5" x 1" x 1"). This is a 1" wooden block plus four .5" wooden blocks.
  • three ca^2 (2" x 1" x 1"). This is two 1" wooden blocks.
  • three ab^2 (1.5" x 1.5" x 1"). This is a 1" wooden block plus 10 .5" wooden blocks.
You need one ab^2 for Layer A and two ab^2 for Layer B.
  • six abc (1" x 1.5" x 2"). This is two 1" wooden blocks plus eight .5" wooden blocks.
you need two abc prisms for each layer.
There are a lot of abc blocks, so thankfully Spots was willing to help me photograph them!


  • three cb^2 (2" x 1.5" x 1.5"). This is a 1.5" wooden block plus nine .5" wooden blocks.
three cb^2
  • three ac^2 (1" x 2" x 2"). This is four 1" wooden blocks.
three ac^2
  • three bc^2 (1.5" x 2" x 2"). This is a 1.5" wooden block plus twenty-one .5" wooden blocks.
three bc^2
 Spots is sorry that she knocked over my blocks, so here's a blep to make up for it:


And also a boop for good measure:


 And here's what it looks like when it's all finished!

LAYER A


LAYER B


LAYER C


Spots is still not helping...


The kids wandered over as I was finishing photographing the cube (meaning that now I had two teenagers AND a cat helping me...), so I told them this was a puzzle that I'd just finished building and invited them to see if they could put it together:


They didn't notice that it was a pattern, at first, and so made some unworkable choices:


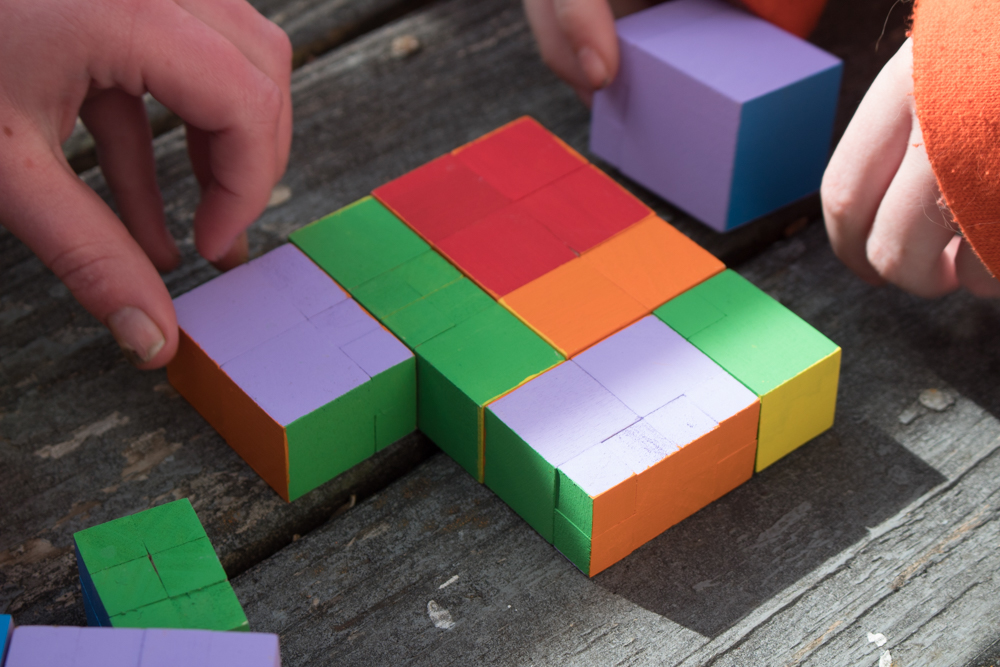
Eventually, though, a light bulb came on...


And behold! It's laid out unusually, but it's our trinomial cube!


Here's the Montessori setup for the binomial and trinomial cubes. They're normally given to small children to work as a puzzle, which is a great way to make that higher level math familiar and not scary at all when they come to it later.

And here are a couple more references, if you want to plan a lesson around the binomial or trinomial cube:

Want to see what other mischief we (and the cats) manage to get up to with our brand-new DIY trinomial cube? Check out my Craft Knife Facebook page for updates!

Monday, April 27, 2020

A DIY Binomial Square/Trinomial Square Manipulative


This trinomial square manipulative is an extension of the binomial square, and if you own a decanomial square manipulative you don't have to make this, because you've already got more than enough to model binomial and trinomial squares. I only made this a separate manipulative because I wanted its faces to match the DIY trinomial cube that I also built.

Because synergy!

I was a little bummed that I couldn't find enough cubes keyed to a centimeter standard to make my trinomial manipulatives in centimeter measurements. Instead, the smallest square in my DIY trinomial square is 1"^2, and the smallest cube in my DIY trinomial cube is 1"^3. So if you're trying to build a real Montessori-style trinomial cube, this is not the project for you. Keep searching for cubes measured in centimeters, or buy a zillion literal centimeter cubes and get to gluing! But because I started with inches, I was able to save myself some work when I made the trinomial cube by buying 1", 1.5", and 2" blocks, and gluing .5" blocks to them to make the prisms.

But that's a totally different project, which I made AFTER this. Here's how to make this project!

To make a trinomial square whose smallest square is 1", you will need the following materials:
  • 81 blocks, each measuring .5"^3. I am profoundly devoted to Casey's Wood Products, and so I bought these .5" wooden blocks from them. 
  • acrylic paint in the primary and secondary colors. Sooo... red, yellow, blue, purple, orange, and green.
  • glue. You can use wood glue, but it's not my favorite. I prefer E6000!
  • paint brushes.
You are going to glue together the following rectangles. Remember that these are area models, not volume models, so don't be stacking any blocks on top of each other. Everything is just one block tall!
  • 2x2 (you need one of these)
  • 2x3 (you need two of these)
  • 2x4 (you need two of these)
  • 3x3 (you need one of these)
  • 3x4 (you need two of these)
  • 4x4 (you need one of these)

Here's what it should look like when it's finished!


If you did an exceptionally bad job gluing, you can pause and sand each rectangle smooth, but don't feel like you need to get caught in the weeds with this project--a few bumps and drips are fine. Nobody needs their trinomial square to look like it came from IKEA!

You are going to paint the faces that represent the areas of the trinomial square, and either paint the .5" tall faces black or leave them unpainted (I left them unpainted--no weeds for me!). If you want to keep your trinomial square at least Montessori-adjacent, then make your 1"^2 faces yellow, your 1.5" faces blue, and your 2" faces red.

Here's another big veer away from Montessori-style: I painted the area models that are adjacent to the squares the secondary color represented by combining the primary colors of those two squares. I think it makes logical sense, and it's pretty!

As another optional step, you can seal these, but if you used acrylic paint and your kids aren't going to play roughly with them, you don't have to.

The main purpose of this manipulative is to illustrate (a+b+c)^2. You can go through a billion machinations to expand this trinomial square via calculations, but just by looking at this physical model and copying what you see, you can clearly see that it's a^2 + b^2 + c^2 + 2ab + 2bc +2ac.

How much sense does that make, and how easy is that to remember?

Here's the entire trinomial square lesson that I do with my kiddos. We tend to spiral in our math projects, so ages ago the kids built binomial squares to practice pattern-building and to see what equations with variables look like. We delved back into it when the older kid's algebra curriculum started factoring. We're back again because now it's the younger kid studying algebra and the older kid studying geometry, and this makes a lovely intersection. To add interest and rigor, I introduced trinomials, and next time we find our way back to it, I imagine that we'll find something else new to explore!

Speaking of something else new to explore: here's another fun bit of spatial reasoning play that you can do with a trinomial square: it's a puzzle! We know how to make a perfect square one way, but how many other ways can you find?


These perfect squares should look familiar, because they're binomial square models!


If you enjoy this type of puzzle, you should really check out pentominoes. I am low-key obsessed with them--honestly, I can't imagine anyone who's a visual learner or enjoys spatial reasoning who wouldn't go mad for them!

P.S. If you need an anchor chart or a poster for display, there's a good graphic of the trinomial square and its measurements here.

P.P.S. Want to see more handmade homeschool stuff, and the adventures that we have with them? Check out my Craft Knife Facebook page!

Saturday, April 25, 2020

How to Square Binomials and Trinomials using Area Models

Let's say that you have two lengths: a and b. You would like to know what area would be covered by a square whose sides are each of these lengths combined.

The equation for that is (a+b)^2.

But how do you actually multiply that?

The algebraic way is to use the FOIL method: First, Outside, Inside, Last. This gives you (a+b)(a+b)=a^2 + ab + ab + b^2, which you simplify to (a+b)(a+b) = a^2 + 2ab + b^2.

That's fine algebraically, and you should totally memorize it, but here's what you should VISUALIZE when you do this, because here's what makes sense:

Visualize sitting on the rug in your family room. It's a Friday afternoon, soooooooo close to the end of your school week, and you'd very much rather be done with school and go walk your dog or listen to your music, but your mother wants to do one final project together before she sets you free. She hands you and your sister the decanomial square manipulatives and asks you to set them up:


Stacking the area models is NOT part of setting them up, but is also nearly irresistable.


Fun fact: a decanomial square is the same concept as a binomial square or a trinomial square. Whereas a binomial square is (a+b)^2 and a trinomial square is (a+b+c)^2, a decanomial square is the representation of (a+b+c+d+e+f+g+h+i+j)^2. How would you like to factor THAT puppy without being able to visualize an area model to make sense of it?

Your mother asks you to choose two squares from the decanomial. You'll label one square as a^2, with sides measuring length a, and the other square as b^2, with sides measuring length b. The challenge is build an area model of a square whose sides are each length a+b; to complete this challenge you may use a^2, b^2, and two other rectangles of your choice.


Visually, it's not hard to find the rectangles that match to complete the square, but it might take a little longer to notice that these rectangles each have two sides that match the length of one of the squares.

The solution to the puzzle, then, is (a+b)^2 = a^2 + ab + ab + b^2. Since you have two rectangles labeled ab, you can simplify your equation to (a+b)^2 = a^2 + 2ab + b^2.

This is exactly what you get when you the FOIL method, but doesn't it make a little more sense to see it?

Unfortunately, your cruel mother now tells you that you have to add a THIRD square to your puzzle. She. Is. So. MEAN!

You add a third square and label it c^2, with sides measuring length c. The puzzle is now a trinomial square, (a+b+c)^2, and your challenge is, once again, to complete the square. Your mother does not tell you how many pieces you have to use to complete this trinomial square, so you make yourself a shortcut:


  Actually, this works algebraically!


The equation you've created is (a+b+c)^2 = a^2 + 2ab +b^2 + 2((a+b)c) + c^2. As long as you can complete the puzzle with area models that have sides that relate to lengths a, b, or c, you can translate the solution algebraically... but this isn't the simplest solution algebraically.

THIS is the puzzle solution that's also the simplest algebraically:


(a+b+c)^2 = a^2 + 2ab + b^2 + 2bc + c^2 + 2ac.

You can make infinitely bigger squares with an infinite number of terms. I mean, think of how many terms that decanomial square has, and yet it still follows the pattern you can see in the binomial and trinomial square.

And as soon as you memorize the binomial square and trinomial square equations that you created, you can go listen to music out on the back deck with your cat!

Wednesday, April 22, 2020

Day Trip under Duress: Spring Mill State Park

Do you remember what life used to be like, when you could roll out of bed on a Sunday, look at your two grumpy teenagers staring at tiny little screens, decide that enough was enough, and drag them, furious and loudly complaining, out to the car and take them on a spontaneous day trip to a public space?

What a luxury that was!

Honestly, as stir-crazy as this pandemic sheltering in place is making us, the kids would probably still have to be dragged, furious and loudly complaining, if I tried to take them on another day trip to Spring Mill State Park--the older kid, because dogs aren't allowed in the pioneer village or caves and so I wouldn't let Luna come on this particular trip that we took last summer, and the younger kid, because other than in-person ballet classes and visits her friends, both of which she is devastated to be without, she is the biggest homebody in the world, is NOT stir-crazy, and even 39 days into sheltering in place has no desire to go anywhere where ballet or her friends are not.

Maybe when it's safe to stop sheltering in place Matt and I will leave the kids home and just go back to Spring Mill State Park by ourselves!


On this particular enforced day trip, we mostly hung out in the pioneer village, dodging the historic reenactors by sneaking in to explore the buildings whenever they popped out of them:


Here I am, pretty excited to be on an adventure out in the sun. Notice that there are no grumpy teenagers in the frame!


Fortunately, even grumpy teenagers can't outlast an entire day of fresh air, sunshine, and interesting places to explore. Eventually, the younger kid found that checkers was calling our names--


--and by the time she'd beaten me thoroughly, the older kid and Matt had wandered off to their own adventures and the younger kid and I wandered away, too, discovering...

...A COTTAGE GARDEN!!!!!!!


I am OBSESSED with historical gardens. They make me burn with envy. I cannot get enough of pretending that I can copy them.


Because of that, when Matt and the older kid came back from their wanderings they figured out exactly where to find us!
 

I... don't know why this particular teenager is wallowing in the historic cottage garden, actually. She doesn't look grumpy, though!


Here's an old stagecoach route that the older kid was absolutely revved up about following uphill for so long that I'm pretty sure it was her revenge for me forcing her into this day trip:

It doesn't look it, but it was REALLY STEEP! Poor horses! Poor ME! 
 Here's an interesting rock that the younger kid spotted in the creek:


And here's just one tombstone from the historic cemetery that I also dragged the children through, mwa-ha-ha:


When we're finally allowed out in public again, I'll drag my furious and loudly objecting children back here, because even though we spent the whole day, we still didn't see the Gus Grissom Memorial or tour the caves!

Monday, April 20, 2020

How We Earned the Girl Scout Senior Locavore Badge


One thing about all this time staying on my own property due to the pandemic is that I have been absolutely banging out some nagging projects. Like, long-term to-do list-type projects are getting done over here every day.

Cool, I guess? I'd still rather be able to go to the park every day and drive my kid to ballet class and check out more library books, but whatever.

Anyway, along with trimming back all the shrubs and brush on our property, washing all our LEGOs (I didn't say that these projects were all rational...), auditing my Girl Scout troop's bank account (once every six months is NOT an ideal schedule for this, yikes), deep cleaning the shower (same), and admitting to myself that there are publicist-sent books that I am simply never going to review and I should put them in our Little Free Library, I started organizing some of my digital photos and discovered that apparently I had so many adventures last year that I didn't even write about some of them!

Sigh... I mean, I'm having so few adventures right now that I'm seriously going to describe to you HOW I washed our LEGOs later, but cool, 2019 Julie Who Had So Many Adventures She Didn't Even Write about Them. Cool.

Anyway, this is the story of how my Girl Scout troop earned the Senior Locavore badge last year, when we could all meet together in person and do things in public. These particular plans do NOT lend themselves to being of a ton of use while sheltering in place, but if you've got internet access and a farmer's market that does curbside pickup, your own Scouts could earn this one individually at home.

The inspiration for my own Girl Scout troop earning this particular badge was a grant that our local farmer's market had won, allowing them to give youth groups who arranged a field trip to their market a $50 voucher to buy farmer's market products during their visit. How could you possibly pass up a generous deal like that?!? Even if there were NO relevant Girl Scout badges to earn at a farmer's market I still wouldn't pass up that deal, and I was even more stoked because, of course, Girl Scouts has LOADS of relevant badges to earn at a farmer's market.

PREP WORK

Arranging the field trip with the farmer's market was the most important piece of prep work, obviously.

I also hit up AAA for as many maps of Indiana that they'd give me, which was four. I keep hold of these maps, and we've used them in different meetings to plan hiking and camping trips. I dug out a couple of compasses from the closet (my favorite is this compass, although I do not want to talk about how hard it was to reassemble after Will "accidentally" took it apart), and got troop parents to bring a couple more. 

At the time, I was already working on this large-format clipboard project for my own kids, so I cut the extra MDF to size to make a couple more large-format clipboard bases. I wanted the kids to have plenty of work space for those maps!

Since I wanted the kids to complete the entire badge in one meeting, and we'd be picking out food, anyway, I decided that after visiting the farmer's market, we'd walk a few blocks to the lawn in front of our city hall. The building is unlocked during farmer's market hours, so the kids could wash their hands (and the produce!), and there's a nice tiered grass and stone area where we could spread out. There, I planned to give each group a "cooking challenge" for the food they'd picked out at the farmer's market, so I packed knives, cutting boards, serving bowls and utensils, and asked other troop parents to bring food prep supplies, as well. I also announced that Step 4 of the badge would be on the kids' own to complete, but if a kid wanted to have completely earned the badge by the end of our meeting, they could bring a dish for Step 4 to the meeting to include in our post-cooking challenge potluck. The kids would have been perfectly happy eating just their cooking challenge creations for their potluck dinner, but I thought that it was nice to also have some baked goods and casseroles to mix in.

Along with that optional dish, I asked each kid to bring to the meeting their water bottle, a personal mess kit, and something to tie their hair back--with Girl Scouts, you have ALWAYS got to be making somebody tie their hair back! The kids in my troop don't all have their own phones, so I also noted that I'd be dividing the kids into groups of 2 or 3, and each group would need access to something that could take photos.

The  main thing that I prepared in advance, however, was a farmer's market scavenger hunt. I wanted a way not just to have the kids meet the badge requirements, but also to explore the farmer's market and engage with the sellers, so I wrote this scavenger hunt for the kids to do in their small groups:


You might think that all of my safety info at the beginning is a little weird... well, our local farmer's market was currently dealing with the fallout from the realization that one of their vendors was a white supremacist. There had been a lot of protests and counter-protests, at a previous farmer's market there'd been a bunch more white supremacists "guarding" their stand, and our field trip was going to be on the first farmer's market date after the whole event had been shut down for two weeks.

Also, the white supremacist was a former friend, not just of mine but of some of the other troop moms, too, and most of our kids had been friendly with her kids.

Good times, amiright? Fortunately, I have another friend who knows several farmer's market vendors, and while I was a couple of blocks away with my troop doing our intro and getting ready to walk over to the market, she was texting me that everything was looking peaceful, with no white supremacists selling their Nazi tomatoes anywhere to be seen.

BADGE ACTIVITY #1: What is a locavore?

To begin our meeting, the kids and I discussed the definition of "locavore." The kids brainstormed some reasons why it's good to eat locally, and decided that local food is good for your body because it's fresh, it's good for the economy because you're spending money on the people who live and work in your community, and it's good for the environment because you're not using resources to ship food to you from far away.

The kids got bogged down, though (as I'd hoped they would), when we tried to decide EXACTLY what "local" means. Is it ten miles? One hundred?

The reality is that there isn't really an exact standard; people generally have to decide for themselves their own range for eating locally. I told the kids that part of their task at the farmer's market would be to find out how far some of the producers had traveled to vend here, and to do that, they needed to annotate their maps.

The idea behind annotating the map is that the kids put our current location as the center, and then they used the compass to draw concentric circles that represented distance away from the center. We found the map scale and saw that it was 1 inch to 13 miles, so the kids decided to draw a new circle for every inch.

This was a challenging activity for some kids who'd never used a compass before, and for other kids who'd never practiced much map-reading, but I'd divided them into small teams of two to three kids first, and fortunately there was somebody in every group who knew how to do both. 

Most groups drew 4-5 concentric circles before they decided they'd done enough. Together, we tried to find a familiar place or two on the map for every circle, so the kids could better visualize the scale.

BADGE ACTIVITY #2: Tour the farmer's market, complete a scavenger hunt, and go shopping!


Normally, I'd only give the kids one activity to do at one time, but there was a lot that we needed to accomplish at the farmer's market. Fortunately, all the kids in the troop are good listeners!

Task #1: Complete a scavenger hunt. The scavenger hunt was designed to meet Steps 1 and 2 of the Locavore badge requirements. It involved interviewing someone involved in the food delivery chain (Step 1), learning when certain foods are in season (Step 2), and finding food sources on their food-radius map (Step 2). 

I added in some more fun activities to get the kids engaged with the food and the vendors, and I included directions for how I expected them to behave. Kids don't always have experience interacting with business owners and retail workers, so part of the learning experience was figuring out how to engage someone politely. It's easy to get so task-oriented that you don't realize you're interrupting, and it's sometimes hard to follow the social script of a new situation.

Matt made it pretty for me. It's good to have a graphic designer as a spouse!
 I told the kids that they didn't necessarily have to complete the entire scavenger hunt, but they all had a blast and so I ended up keeping us at the farmer's market long enough (a little too long, honestly, considering all the other activities we had planned) for them all to finish.

Task #2: Shop for a food preparation challenge. We had three teams of kids, so I gave each team of kids one of the following assignments:

  • Garden Salad
  • Fruit Salad
  • Crostini, or, Something Interesting to Put on Bread
Each team had a budget of $15, and I kept the last $5 to help out if a team went over. (Spoiler Alert: Team Fruit Salad needed that extra five bucks. Fruit is expensive!). 

As the kids worked on their scavenger hunts, they were also meant to be figuring out what they wanted to buy for their challenge. I do think it was nice that they had both the scavenger hunt and the food prep challenge, because this encouraged them to interact with and learn a lot more about the vendors than either activity alone would have done, and it was highly amusing to watch them busily going back and forth between vendors, talking through the pros and cons of various food items and agonizing over hard decisions. Whenever they reported back to pass off their haul, it was clear that some vendors were also being incredibly generous--those kids got a LOT of delicious food for their money!

After everyone had finished the scavenger hunt and spent all their money, we walked a few blocks over to that nice grassy area I'd scoped out, washed hands and produce, and then the kids got to work on Step 3 of the badge!

BADGE ACTIVITY #3: FOOD PREPARATION CHALLENGE


Here's part of Team Fruit Salad in action:


Here's one-third of Team Garden Salad:


And here's an example of the very creative stylings of Team Crostini!


If I had this to do over again, I'd encourage the teams to barter some of their ingredients. Wouldn't some blackberries and apple slices be lovely on bread? And I wouldn't mind some sweet peppers or cucumbers in my fruit salad!

BADGE ACTIVITY #4: Local Foods Potluck


The kids could have gone on happily chopping produce and putting it in bowls and on bread forever, but eventually I called time so that they could show off their creations. Then we washed hands again, laid out our feast, had the kids who'd brought dishes from home to meet Step 4 explain them, and the kids enjoyed a Local Foods Potluck as Step 5 of their badge. 

I'd brought some plastic baggies, so while the kids ate I packaged up their unused ingredients into a variety of bags, and when they'd finished eating, I also portioned out their uneaten food challenge creations while they ran around and played. I called them all back to clean up, and when the space looked as if nobody had ever completed a cooking challenge or held a potluck there ever before, I had the kids all line up, and then got to take turns choosing something from the leftovers, until everything was gone. 

This turned out to be a stellar Girl Scout troop meeting! I think the kids all really enjoyed themselves, and they got a change to practice some academic skills, some practical skills, and some real-world social skills while having fun. They got some exercise, they spent time outdoors, and they ate healthy food. They would have liked a lot more free time to socialize, so this would have been even better as a half-day meeting after the Saturday farmer's market, but for a Tuesday evening on a beautiful day in a summer with no pandemic, I'd say it was pretty perfect!

Four Years Ago: Pom-Pom Pals
Six Years Ago: The Best Way to Hike
Eight Years Ago: Homeschool Boot Camp
Nine Years Ago: On Daytona Beach
Twelve Years Ago: Finally, Clean Lockers