This tutorial was originally published on Crafting a Green World back in 2016.
Some things you just cannot pass by, such as a great toy hiding underneath a gross one.
On a recent trip to Goodwill, my kid showed me this wooden shield. It was finely crafted, made from a solid piece of wood with sturdy straps on the back, but man, it was a mess. It looked as if it had been given to a kid to paint, and then that kid had painted one hundred thousand layers of muddy paint on it.
I am all about process-oriented art, my friends, but when it's done on a great toy, an heirloom quality wooden one that some other kid would be absolutely thrilled to have? It bummed me out to look at it.
So even though the kid is probably a wee bit too old for it, I told her we could buy it. At a buck, the price was for sure right, but also, I knew that very few people were going to look at that gross toy in that Goodwill and see what I saw: a great toy that just needed some sweat equity and some TLC.
Step one: sand that baby down! I made the kid do some of the sanding with our trusty palm sander, but I took over when she got tired of it, because it was a big, tedious job.
Friends, there were a LOT of layers of paint on that shield!
Hiding way, way, at the bottom was also a printed outline of a two-headed dragon, probably what the child was intended to color. My older kid would have loooooooved to color a shield with a two-headed dragon on it, but alas, this dragon had one hundred thousand layers of muddy paint on it, so it got sanded down with all the rest.
To do a really bang-up job, you could use sandpaper with progressively finer grit after you'd sanded all of that paint off, and end up with a shield face that was as smooth as butter. I didn't bother going too smooth, though, because I knew that the techniques we were going to use to refinish the shield wouldn't require it.
Step two: base coat. If it had been up to me, I would have painted a nice design on top of the bare wood, then sealed everything, leaving some natural wood to show and be pretty. This is my kid's shield, however, and she likes things to shine; she spray painted a base coat of gold on top of the bare wood.
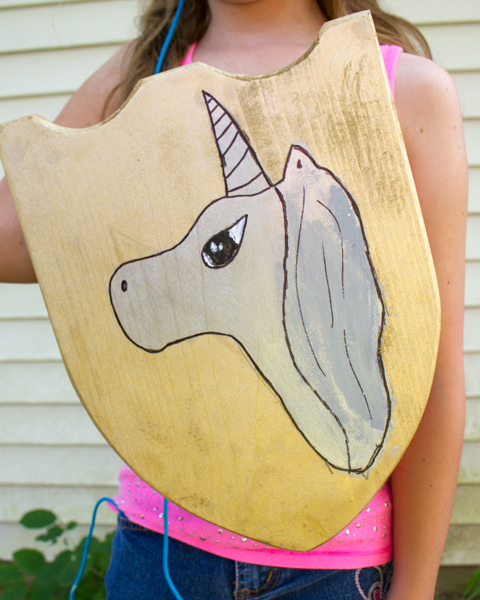
Step three: draw a design. My kid worked on this for a while, because first she drew a bird, then decided that she didn't like it, so erased the entire thing and drew a unicorn. I had her draw her design in pencil so that she could erase it, but if that didn't work, it wouldn't have been a big deal to lightly sand the shield, repaint the base coat, and go again.
After she was happy with the penciled design, she went over the pencil with black Sharpie to give her a better outline to color in.
Step four: paint the design. I gave my kid our nice artist's acrylics to use when she painted in all the colors on her unicorn. Craft acrylics are a good substitute, but artist's acrylics are thicker, and I think they're better for details and smaller projects.
After she'd finished painting, she went back over the Sharpie lines, to cover any paint that had gotten out of the lines. The finished result looks neat and tidy.
Step five: seal the shield. This step isn't completely necessary, but the shield will last longer and hold up better to hard play if you do. I didn't want any of my kid's beautiful unicorn to chip off, so I sealed it with a clear sealant.
My kid and I are very pleased with the finished product--it's a great toy now, and is one hundred percent worth the buck that I paid for it. The wooden shield looks a million times better, will hold up for all kinds of pretend play and dress-up, and it's so lovely now, decorated with my kid's artwork, that I can certainly see it being a keepsake for her after she's grown.
I mean, come one--she painted a unicorn on it. Can you get any more ten-year-old girl than that?


No comments:
Post a Comment